Launch the installer

Steps

  1. Log on to the installation machine with an account that has local administrator privileges.
    Important: Use a dedicated account, and do not change the account after installation. Installed services use this account (the service account) when interacting with the operating system. If the account must later be changed, contact Forcepoint Technical Support first.
  2. Double-click ForcepointDLP1010Setup.exe to launch the setup program.
    This process may take several minutes. A progress dialog box appears, as files are extracted.
    Tip:

    Upon exit, the installer offers the option to Keep installation files. This greatly reduces the time needed to launch the installer in the future (for example, to add components or otherwise modify the installation).

    To launch the installer from saved files, click Forcepoint Security Setup on the Start screen, or in the Forcepoint folder in the Start menu.

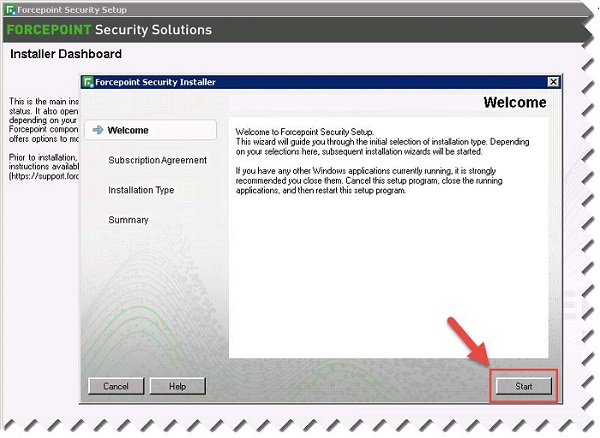
  3. On the Welcome screen, click Start.
  4. On the Subscription Agreement screen, select I accept this agreement and then click Next.
  5. On the first Installation Type screen, select Forcepoint Security Manager, then select Forcepoint DLP.

    The following image shows the Installation Type screen:

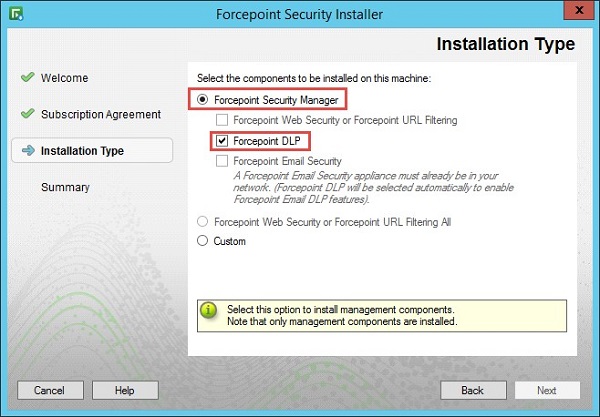
    Click Next. The second Installation Type screen displays.

  6. Review the second Installation Type screen, as shown in the following image:
    • If you do not already have an instance of SQL Server installed, click Installing Microsoft SQL Server.
    • Click Supported versions of Microsoft SQL Server to verify the supported versions before installation.
    • Then, click Next.
  7. On the Pre-installation Summary screen, click Next to continue the installation.
  8. On the Summary screen, click Finish.
    The Forcepoint Infrastructure Setup wizard launches.
    Note: If using the local SQL Express, it is recommended that you update to the latest cumulative update (CU).