Endpoint profile: Properties tab
Use the Properties tab to enable user notifications, define message templates, and configure policy override settings.
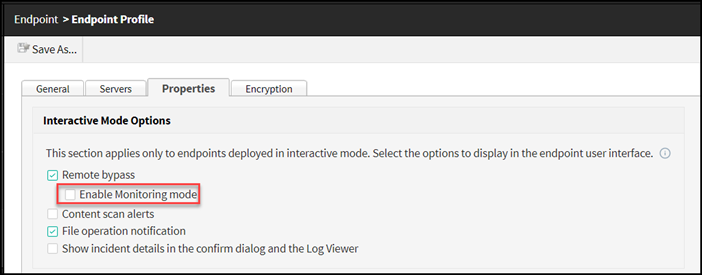
Interactive Mode Options:
- Enable Remote bypass to allow end users that belong to this profile to
disable the Forcepoint DLP Endpoint software on their machines.
This action requires a bypass code from the administrator. (See Bypassing endpoint clients section for additional information.)
-
Enable Monitoring mode allows the endpoint to report incidents to the Forcepoint Security Manager (FSM) even when the endpoint is operating in bypass mode. This feature enables the security administrators to track the user activities when the endpoints are operating in bypass mode.
To enable monitoring in bypass mode, go to tab, then select Enable Monitoring mode check box.
-
- Enable Content scan alerts to inform endpoint users when a violation is
found during scanning. When this option is enabled, a popup message appears on
the bottom of users’ screens.Note: Content scan alerts are not displayed when data is copied to removable media using a non-desktop environment, such as an SSH terminal connection.
- Enable File operation notifications to notify endpoint users when a violation is found during file operations. Depending on the application, file operations can include cut/copy, paste, file access, printing, LAN, encryption, and copying to removable media.
- Enable Show incident details in the confirm dialog and the Log Viewer to provide additional incident details to the endpoint user in the confirmation dialog message and the Log Viewer, allowing better investigation of sensitive data stored in a file. Details include policy name and number of matches.
Endpoint Message Template:
- Enable Set message template to change the default endpoint message
template. Then select the template from the drop-down list.
- Message templates are used for messages sent to the endpoint client, such as status details and alert messages. The templates are XML files, and are available in the endpoint profile in multiple languages.
- Templates are stored in the \custom\endpoint\msgFiles subdirectory of
the Forcepoint DLP installation directory. Modify them as required. Each
message can include up to 256 characters. Any additional characters are
truncated.
Template files can be cloned, renamed, and modified. When a new file is added to the \msgFiles folder, it appears as a template option in the Security Manager. See Customizing Forcepoint DLP Endpoint client messages.
- Set Regional location support:
- If regional location support is not enabled (check box is unselected), all endpoints in the profile receive the message template set as the default template.
- If regional location support is enabled (check box is selected) all
endpoints in the selected profile display message template content in
the operating system’s language.
This is applicable only to the supported languages, which are: Dutch, English, French, German, Italian, Japanese, Korean, Portuguese, Russian, Spanish, Simplified Chinese, and Traditional Chinese.
This also applies to custom templates stored in the \custom\endpoint\msgFiles subdirectory. Note that custom templates must follow a strict naming convention of <language>-custom.xml.
Note: The regional location support applies to Forcepoint F1E versions 21.07 and above. For previous endpoint versions, only the default language is displayed to the endpoint use, regardless of the endpoint operating system language setting.
Endpoint Web Traffic Detection Mode:
This option allows you to select between two supported web traffic detection modes:
- Browser Extensions- with the browser extensions, actions within web browsers can be captured. These extensions are used to enforce web inspection/policies on the endpoint machine.
- Endpoint Inline Proxy - with the Endpoint Inline Proxy mode, you can
detect web traffic without the need to manage browser extensions.
Note: Refer the release notes for Endpoint release compatibility on https://support.forcepoint.com/.

- Set the mode of the endpoint extension of the supported browser. This
applies to all endpoints that belong to the profile.
- Select one of the following options from the Chrome extension
mode drop- down list:
- Enabled: Endpoint blocking alert will be shown and incidents will be created in the Security Manager.
- Monitoring only: Endpoint blocking alert will not be shown. Transactions will be permitted, but incidents will be created in the Security Manager.
- Disabled: The extension is inactive. Endpoint blocking alert will not be shown and incidents will not be created in the Security Manager.
- Select one of the following options from the Chrome extension
mode drop- down list:
- Select Set system PAC - This setting is used to enable or disable the endpoint agent from setting an explicit proxy via PAC file on the endpoint.
- Select Enable driver to capture web traffic - This setting is used to enable or disable the driver on the endpoint agent that is used to capture web traffic.
- Select Enter the IP address and port number of the local proxy to which
the traffic should be forwarded from the inline proxy. Note: To use this setting, you may need to deselect the Set system PAC option.
- Enter the IP address and port number of the local proxy.Note: If more than one proxy are to be set, then each entry should be separated by a comma ",".
This setting allows the user to enter the IP address and port number of the local proxy to which the traffic should be forwarded from the inline proxy.
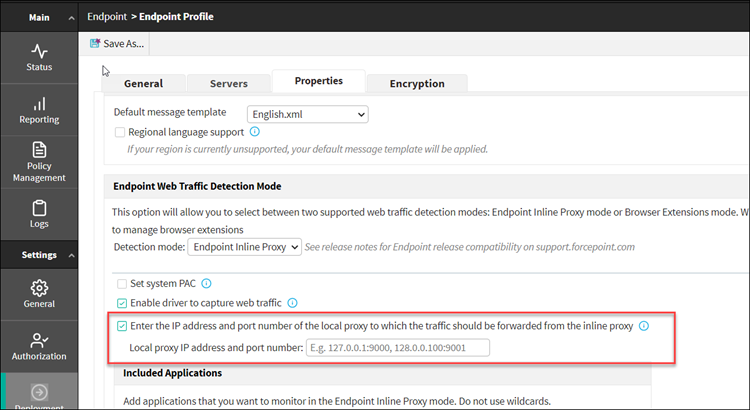
- Enter the IP address and port number of the local proxy.
From Included Applications section, you can add the applications that you want to monitor in the Endpoint Inline Proxy mode.
- Enter the name of the application to include.
For Windows, enter an executable name such as chrome.exe. For macOS, enter an application name, for example firefox.
Do not use wildcards.Note: For macOS, names are case-sensitive. - Select the operation system as Windows or Mac on which the application runs.
- Click the Add button to add the application to the included
list.
The application name will be added and displayed in Application/Folder section.
To remove the application, select the application name from Application/Folder section and click the Remove button.

For more details about excluded domains for bypassing endpoint inline proxy mode, refer "Excluded domains for bypassing endpoint inline proxy mode" section in Endpoint settings: the Advanced tab.
Data Loss Prevention (DLP) Policy Settings:
- Enable Disable blocking and encryption capabilities when policy violations
are detected to disable blocking and encryption of endpoint traffic. If
a policy is specifically set up to block or encrypt content, the endpoint client
overrides this setting and allows traffic.
Use this option, for example, if a policy is preventing a user from doing his job; the block can be overridden for a specific endpoint client.
Continue with Endpoint profile: Encryption tab.
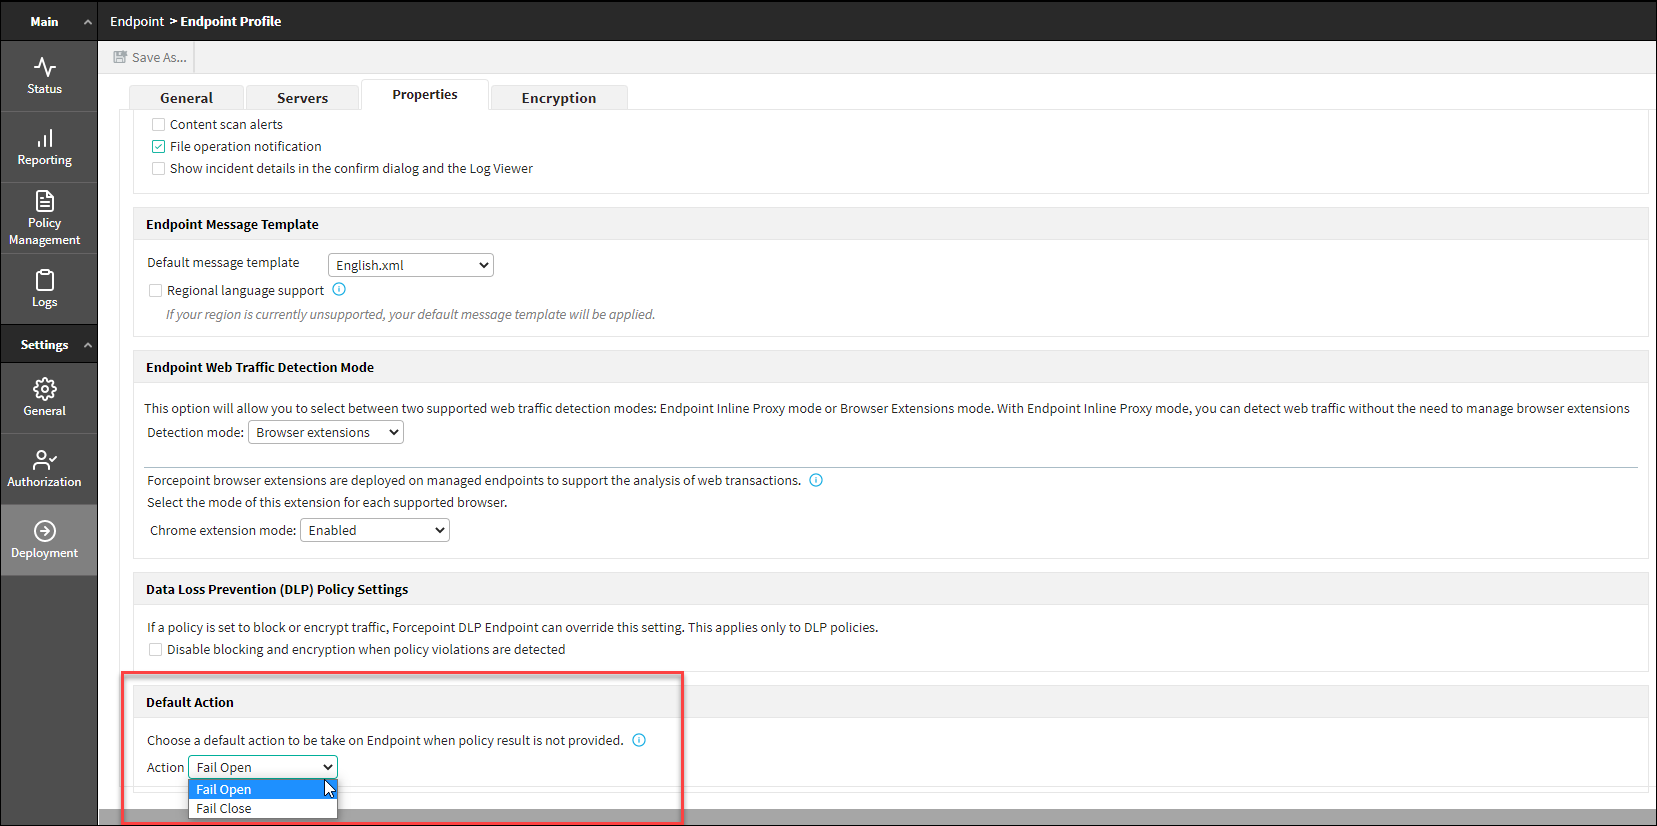
Default Action:
This feature enables the user to configure a default action to be taken on an endpoint when a policy scans times out, hits an error, or is undetermined for any other reasons.
- Fail Open - If analyzing the file fails due to any type of timeout, the file gets sent to a destination successfully.
- Fail Close - If analyzing the file fails due to any type of timeout, the file gets blocked for sending to a destination.
- Navigate to tab.
- Select Fail Open or Fail Close option from Action
drop-down.
- The Action drop-down displays the Fail Open as the default option.
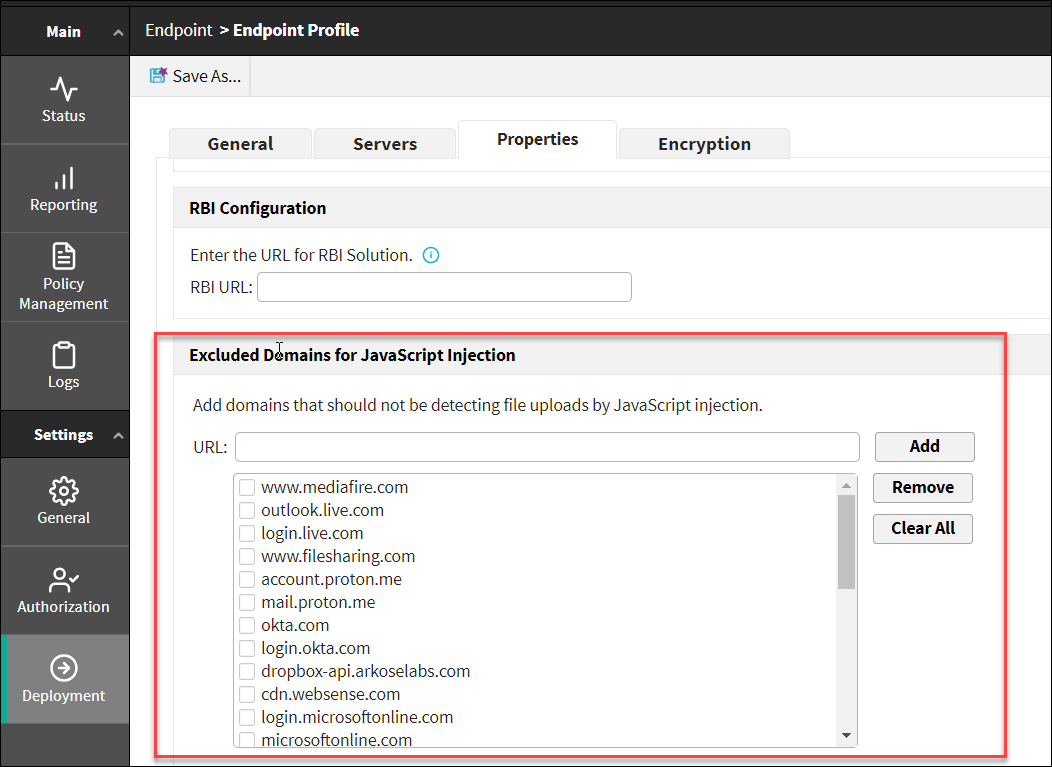
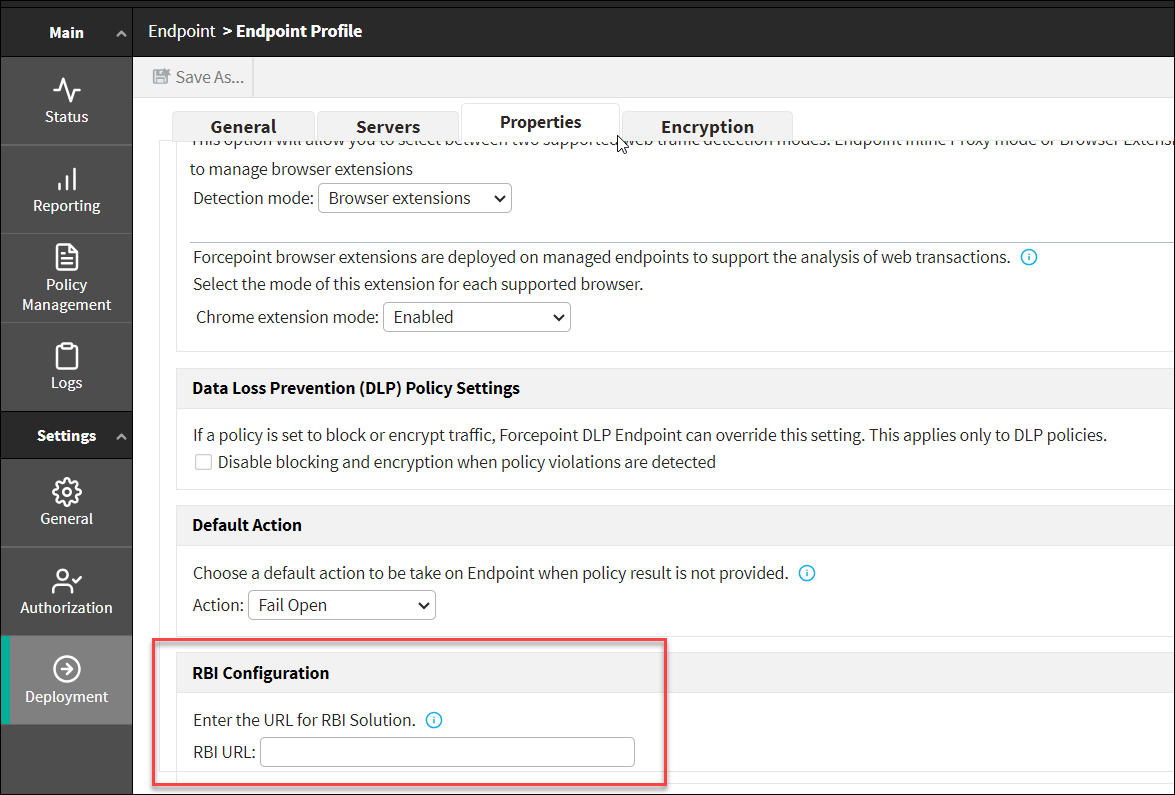
RBI Configuration
This feature enables an administrator to specify the RBI solution’s URL, which allows the Endpoint to enforce the DLP policies on the original URL that the end user addresses to.
During DLP analysis, the Endpoint enforces the DLP policies on the original URL by ignoring the RBI solution's URL.
For RBI URL configuration, navigate to tab, then enter the RBI URL into the RBI configuration section.
Excluded Domains for JavaScript Injection
This feature enables an administrator to add/remove a domain to/from the domain list to be excluded from JavaScript Injection for detecting file uploads.
When a domain is added to the exclusion list, the domain will not detect the file uploads by JavaScript injection.
To add/remove the domain to/from the excluded list, navigate to tab, and go to Excluded Domains for JavaScript Injection section.
- Enter the domain name into URL field.
- Click the Add button to add the URL to the excluded domain list.
- Mark the desired check boxes from the list to select the URLs.
- Click the Remove button to remove the URL from the excluded domain list.
Click Clear All button to clear all URLs from the excluded list.