Deploy the Secure SD-WAN Engine in the Azure cloud environment
The Forcepoint single FlexEdge Secure SD-WAN solution template includes the Secure SD-WAN Engine software and the network environment in which it runs.
Before you begin
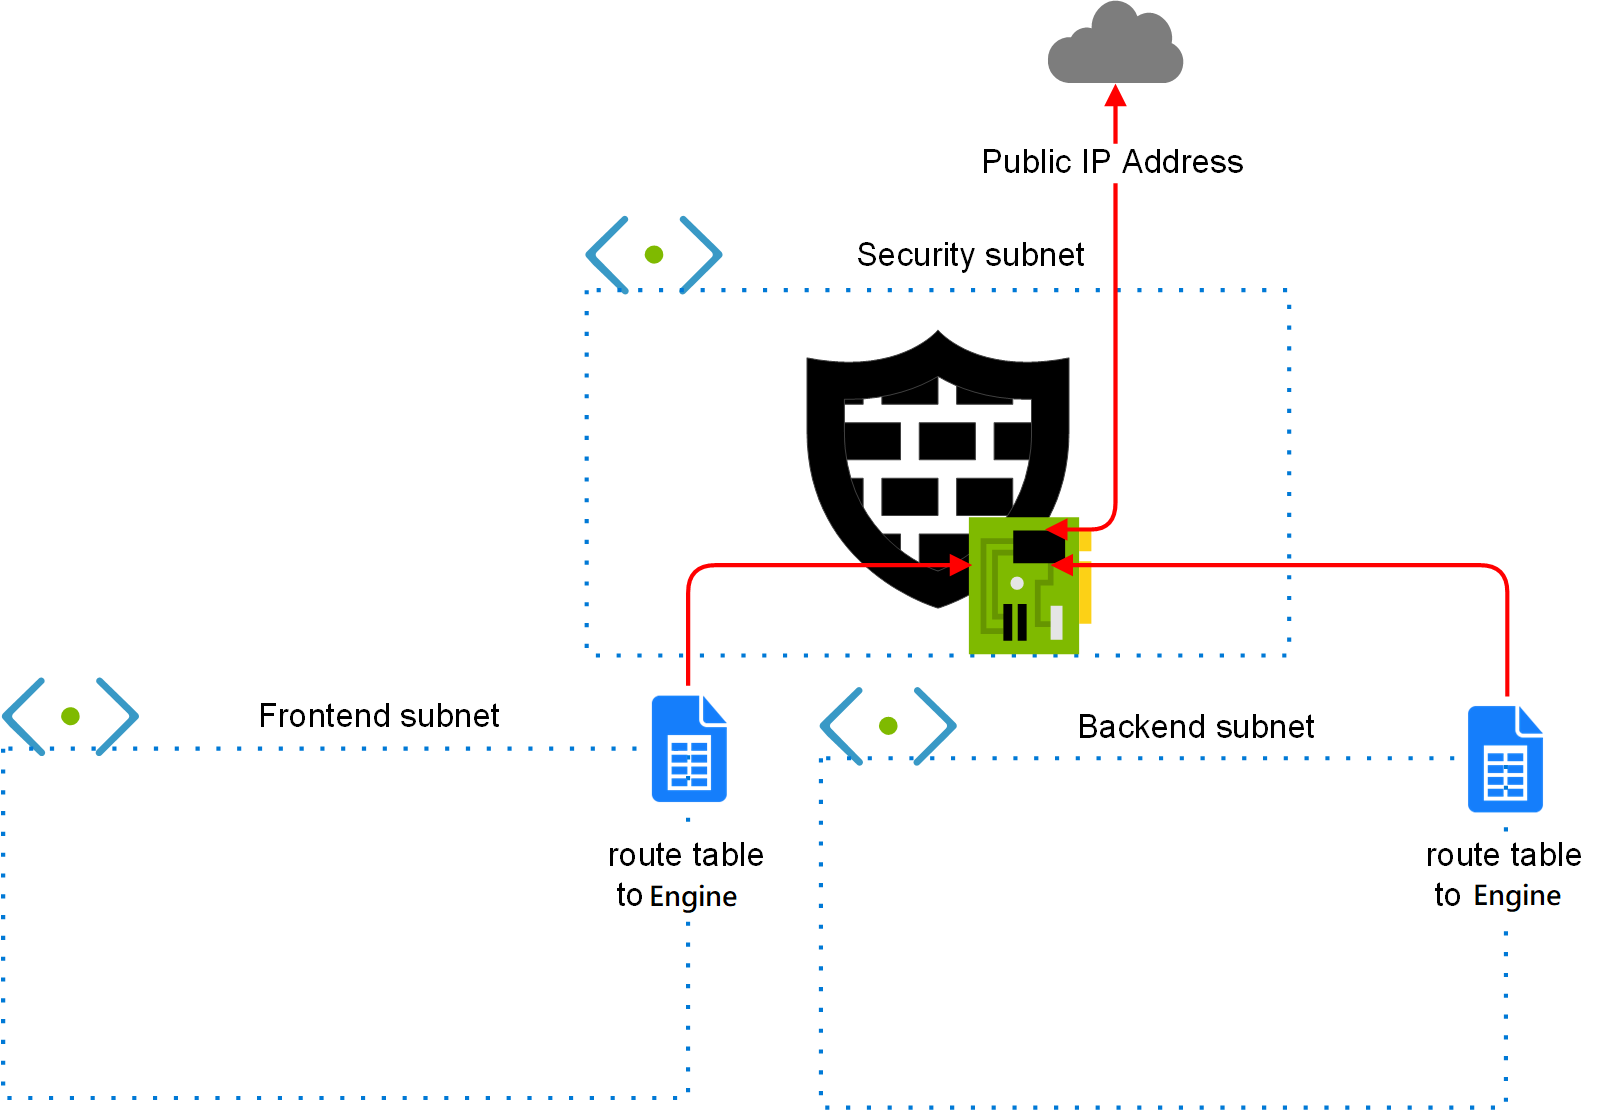
The network environment includes the Security subnet in which the Secure SD-WAN Engine is deployed, and two protected subnets. The template creates a route from the protected subnets to the Internet through the Secure SD-WAN Engine. A route is also created between the two protected subnets.
Figure: Network environment for single Secure SD-WAN engine deployment

Steps
-
Create a Secure SD-WAN instance using the Forcepoint single Secure SD-WAN solution template.
- In the Azure dashboard, click Create a resource.
-
In the Azure Marketplace pane, search for the NGFW solution template.
Tip: Enter forcepoint LLC as a search string to find all solution templates published by Forcepoint.
- Select the Forcepoint single NGFW solution template, then click Create.
-
Configure the options in the Basics section.
- In the NGFW Admin Username field, enter a user name for the administrator account that is used to make SSH connections to the Secure SD-WAN Engine.
- In the Admin SSH Public Key field, enter or paste the public key that is used to make SSH connections to the Secure SD-WAN Engine.
- From the Subscription drop-down list, select the account that is charged for resources.
-
In the Resource group options, select Create new, then enter a name for the resource group.
Note: You must always create a new resource group for the deployment. It is not possible to use an existing resource group.
-
(Optional) From the Location drop-down list, select the region where you want to deploy the Secure SD-WAN Engine.
Regions are physical Microsoft Azure data centers. For more information, see https://azure.microsoft.com/en-us/overview/datacenters/how-to-choose/.Note: When you use an hourly (pay as you go) license, only Microsoft tax remitted countries and regions are supported. For more information, see Knowledge Base article 16011.
- Click OK.
-
Configure the options in the Secure SD-WAN configuration section.
- From the NGFW licensing model options, select the licensing model for the Secure SD-WAN Engine.
-
(Optional) From the NGFW Version drop-down list, select the Secure SD-WAN Engine
version.
Version 6.4 or higher is required.
- If the default value of the Virtual network option does not meet your needs, select a different value.
- If the default values of the NGFW Security Subnet, Protected FrontEnd Subnet, and Protected BackEnd Subnet options do not meet your needs, change the settings, then click OK.
-
(Optional) If the default value of the NGFW VM Size option does not meet your needs, select a different value.
We recommend selecting a general purpose VM size that has a SKU that starts with the letter D and at least 4 GB of RAM.
- From the VM Zone options, select the zone to which the Secure SD-WAN Engine belongs.
-
From the Modify existing vnet to redirect traffic to NGFW option, select
whether to automatically redirect traffic to the Secure SD-WAN Engine.
Note: The Modify existing vnet to redirect traffic to NGFW options are only available if you selected an existing virtual network as the value of the Virtual network option. If you created a new virtual network for the FlexEdge Secure SD-WAN deployment, the new virtual network is automatically configured.
- Yes — Traffic to and from the protect subnets is immediately redirected to the Secure SD-WAN Engine. Route tables are automatically attached to the virtual networks that are selected for the Protected FrontEnd Subnet and Protected BackEnd Subnet options. For Cloud Auto-Scaled Firewalls, the mandatory Azure NSG is deployed in the virtual network that you selected for the NGFW Security Subnet option.
- No — You must associate route tables with the virtual networks that are selected for the Protected FrontEnd Subnet and Protected BackEnd Subnet options to route traffic through the Secure SD-WAN Engine. For Cloud Auto-Scaled Firewalls, you must manually attach the mandatory Azure NSG to the virtual network that you selected for the NGFW Security Subnet option.
- Click OK.
-
Configure the options in the Secure SD-WAN provisioning section.
- From the Secure SD-WAN Deployment model drop-down list, select Manual via engine.cfg.
- Next to the Upload initial contact file engine.cfg field, click the file browser icon, then select the engine.cfg file that contains the initial configuration for the Secure SD-WAN Engine.
-
Click OK.
The deployment continues to a summary and the configuration is validated.
- When the validation is finished, click OK.
- Review the terms of use, then click Create.