Deploying an AD Agent
Synchronizing with Active Directory is a multi-step process which includes installing the Forcepoint Data Security Cloud | SSE AD Connector on a domain-joined Windows machine on your internal network.

AD Agent Machine requirements
- Runs Windows Server 2016 or above. To know about AD Agent machine requirements in detail, refer to AD agent machine requirements.
- Runs Microsoft .NET Framework 4.6 or above. The framework is available to download from Microsoft.
- Is a member of the AD Domain from which you are synchronizing User accounts
- Is operational at all times and has the ability to make outbound connections on Port 443 (SSL).
Installing the AD agent
- Navigate to and click green plus icon in Active Directory User Source title.
- On the AD User Source page, click Download Agent to download agent.
- Install the Forcepoint Data Security Cloud | SSE AD Connector on a domain-joined Windows machine on your internal network.
- Complete the basic configuration required on the Forcepoint Data Security Cloud | SSE AD Connector, which allows the Connector to call back to Forcepoint Data Security Cloud | SSE.
To complete this step, you will need:
- AD Domain Name, AD Server Name, AD Domain Account with proper permissions, AD Account Password.
- The ADSync agent requires the domain account to have read and LDAP query permissions to AD. You can set/review this information in the AD directory tree (see image), via powershell, or via tools such as
ldp.exe
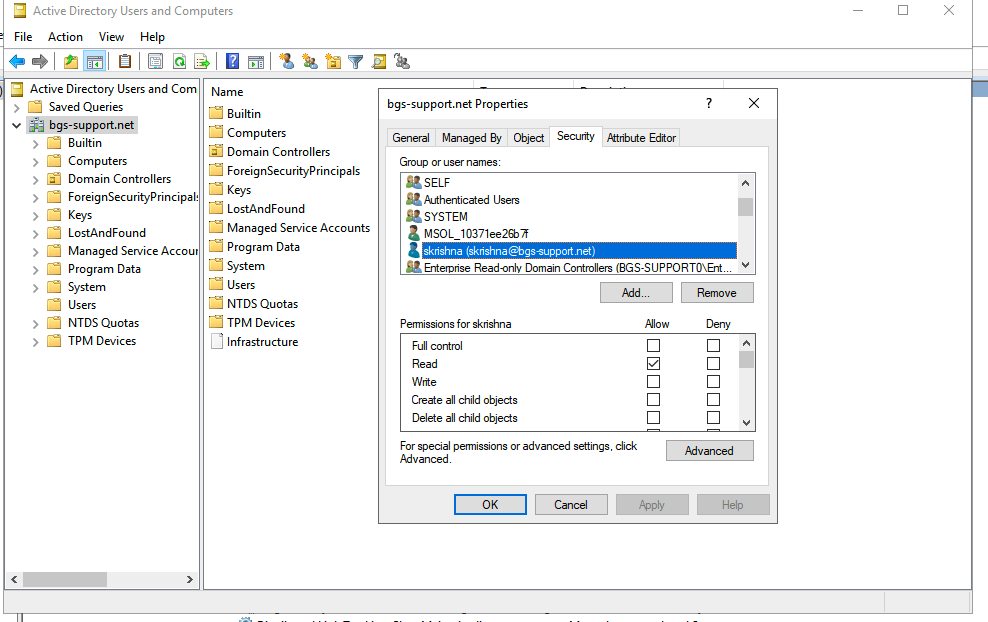
- The ADSync agent requires the domain account to have read and LDAP query permissions to AD. You can set/review this information in the AD directory tree (see image), via powershell, or via tools such as
ldp.exe
- Forcepoint Data Security Cloud | SSE Admin Username and PasswordNote: It is highly recommended that all AD Agents use a dedicated account that has full Forcepoint Data Security Cloud | SSE Administrator privileges. Admin roles with limited access do not have sufficient privileges to complete all tasks required of the agent.
Note: It is required that you install backup versions of the AD agent for HA/DR. - AD Domain Name, AD Server Name, AD Domain Account with proper permissions, AD Account Password.
- Redundant AD agents can be deployed as backups. To install additional agents, simply download and install the agent on a secondary machine that meets the minimum requirements.
User auth requests will be load-balanced across all connected agents when AD Agent Authentication is configured.
- Once installed and connected to Forcepoint Data Security Cloud | SSE, any additional agents and their health will be displayed in the Agents table on the AD User Source page.
Configuring AD DirSync Agent
- Open the Forcepoint Data Security Cloud | SSE DirSync console and on the AD Information tab:
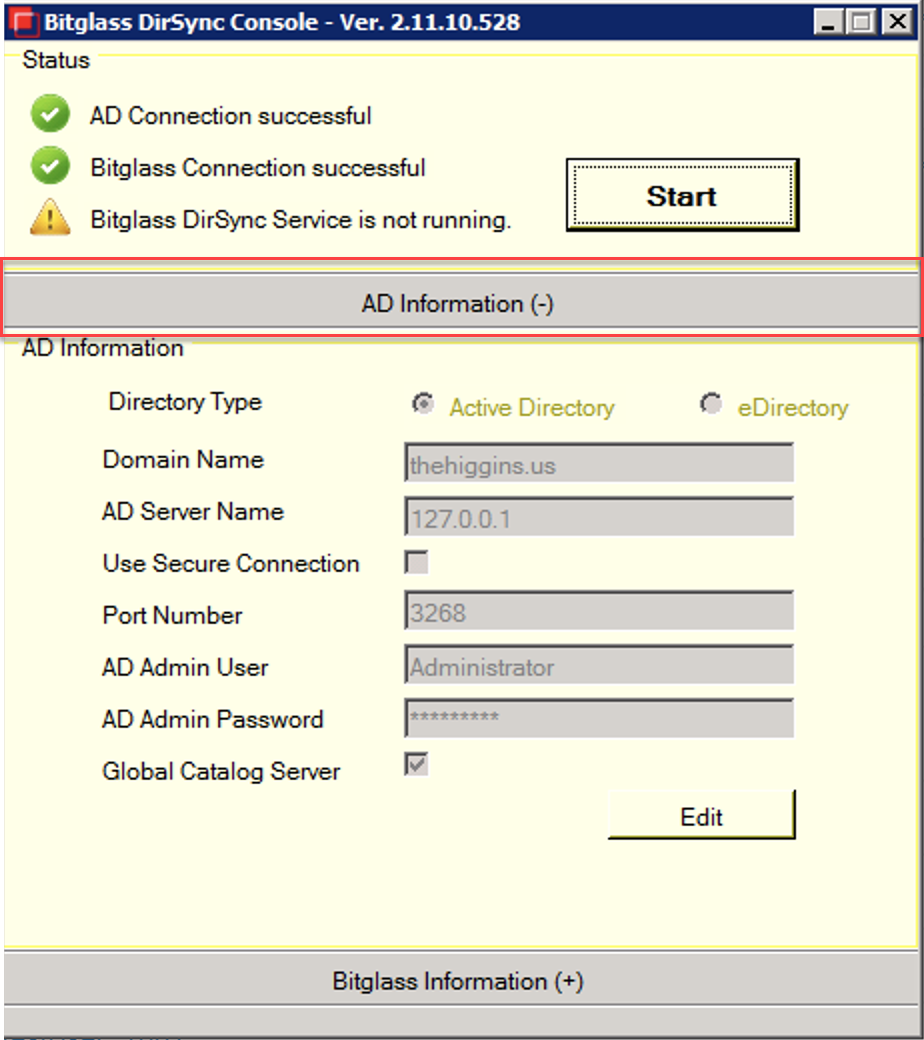
- Enter the primary Domain Name to be synced.Note: You need to enter the same domain name in identical case as specified under the AD User Source section. Forcepoint Data Security Cloud | SSE recommends you to use smaller case for the domain names.
- Enter in the AD Server Name.
This should be the FQDN of either an active directory server or a global catalog server when the option for Global Catalog Server is checked. You can also use 127.0.0.1/localhost can be used if the agent is installed on the AD controller itself.
- Enter a SAM username and password.
If the user is within a different part of the forest, you may use UPN or domain\username as the username.
- Select Use Secure Connection if your AD supports LDAP over SSL.
- Select Global Catalog Server if you are going to use a global catalog server for sync.
Global Catalog supports LDAP queries in the portal configuration only.
- Enter the primary Domain Name to be synced.
- On the Bitglass Information tab:

- Fill the Bitglass Admin Login and Bitglass Admin Password of a sysadmin in the Forcepoint Data Security Cloud | SSE.
The user should not be part of the AD and should be a local sysadmin specifically created for the sync agent.
- Leave Deployment Environment and Target Sync Server as default.
- Fill the proxy details if your network requires it for outside connectivity.Note: To configure a proxy for outbound connections, the Proxy Address must start with the HTTP scheme. Use the http://<proxy-ip-address> format to ensure effective communication through the proxy. For example, enter http://192.168.1.210
- Click Start to start the AD agent.
- Fill the Bitglass Admin Login and Bitglass Admin Password of a sysadmin in the Forcepoint Data Security Cloud | SSE.
User and Group Synchronization
What is synchronized?
- All users which are members of the selected OUs or Groups will be added as Forcepoint Data Security Cloud | SSE users.
- All selected OUs and Groups will be added as Forcepoint Data Security Cloud | SSE groups for use in other locations in portal (for example, App Policy rules).
- The agent synchronizes any AD changes every 3 hours automatically.
Once the Agent is connected, return to the Forcepoint Data Security Cloud | SSE admin portal () and configure which OUs and/or Groups you would like to import into Forcepoint Data Security Cloud | SSE.
- Require confirmation prior to agent initiated user deactivation and group deletion events - When selected, this option will ensure that users and groups that have been
deactivated or deleted in AD will remain active in Forcepoint Data Security Cloud | SSE until a Forcepoint Data Security Cloud | SSE admin logs into Forcepoint Data Security Cloud | SSE and confirms deactivation/deletion.
When this occurs, the affected users are put into a Confirm Deactivation state. Upon manual confirmation of deactivation, by clicking the deactivate button, the user is removed from any existing AD group/OU membership.
- Manual reactivation is blocked for deactivated users synched from AD. The only way to reactivate an AD synced user is to sync a group/OU where the user is a member.
- Forcepoint Data Security Cloud | SSE Admins will receive an alert when users/groups/OUs are put into the confirm deactivation state so that you know that action is required.
- User/Group Sync Settings
- Simple - This will synchronize all Groups and OUs from Active Directory. This is recommended if you plan to have a significant portion of your AD user population using Forcepoint Data Security Cloud | SSE protected apps.
- Advanced - This will synchronize only selected Groups and OUs. This is recommended for deployments that are a small subset of your overall AD user population, such as in pilot or trial deployments.
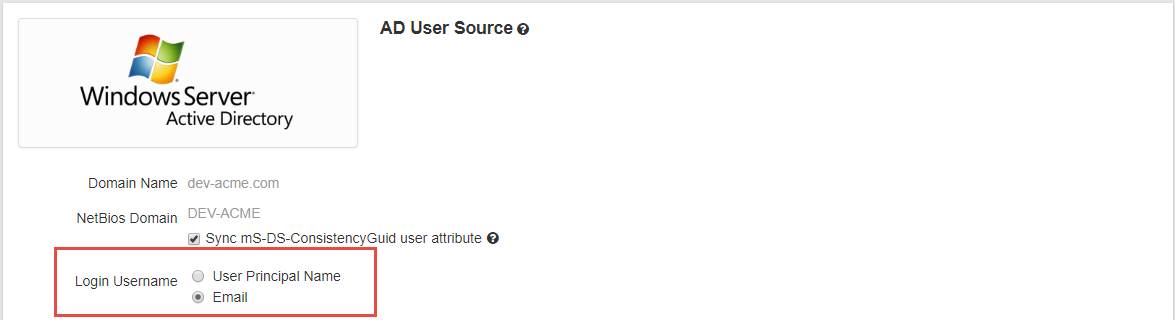
Login Username
Admins can choose between a user's User Principal Name (UPN) or their email address as their username. This will help support environments where users may be using email addresses from domains the company does not own (for example, a company where a user is using a generic @gmail.com email account).
If you are just starting your deployment (you haven't had the AD sync agent installed/deployed previously), you can simply select which format your login username is and then the only additional setup step you would need to do is to navigate to each of your protected applications and change your App SSO settings for what NameID is being used.
- On the page, select the application to view the application settings. Select App SSO from the option under the app instance.


- On the App SSO setting page, change your NameID to match the option you selected for the username (either user.Email or
user.User Principal Name).

If you already had the AD agent deployed and you wish to switch from email to UPN being used as the username, then it is best practice to follow these steps:
- To ensure users are synced to Forcepoint Data Security Cloud | SSE utilizing the proper username, you will first need to desync your users. You can do this by unselecting your OU's/groups/Users that are synced and syncing again.
- It is recommended to delete the AD agent instance and then re-add it to Forcepoint Data Security Cloud | SSE.
- Once re-added, you can now select the username type you wish to change to and then run the sync again.
- Follow the steps documented above to change the App SSO setting for the NameID being used (either UPN or Email). Note: When making a change to the username, you must ensure that any domains your user's contain must be added to the Forcepoint Data Security Cloud | SSE domain table first before running the sync.
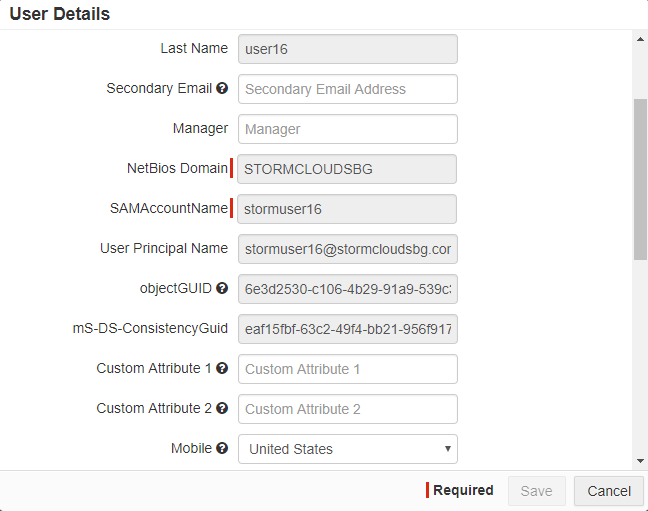
When reviewing the User Details, you will see that their Username should match whichever option you selected (UPN or Email).

Microsoft mS-DS-ConsistencyGUID
Microsoft found that customers came across an issue when they wanted to migrate a user from one domain forest to another. For example, when a customer wants to move users between forests or deletes a user from one forest and creates that same user account again in another forest, that user's objectGUID would change which would prevent the user from being able to login to O365 or access any part of their account. To solve this issue, Microsoft introduced the mS-DS-ConsistencyGUID, which is a different attribute value that can be used as the sourceAnchor similar to the ImmutableID, but one that stays with the user across different domain forests. Forcepoint Data Security Cloud | SSE can sync this attribute via the AD DirSync Agent.
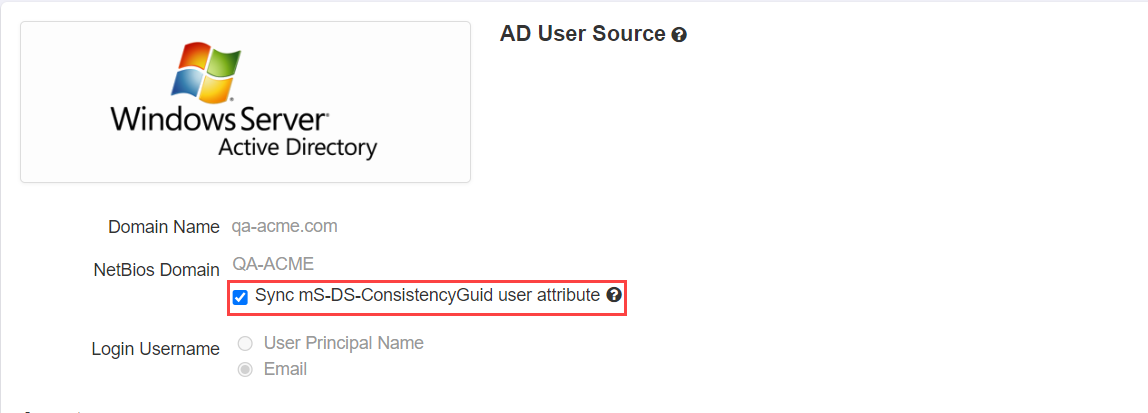
- On the AD User Source page, select the Sync mS-DS-ConsistencyGUID user attribute checkbox under the NetBios Domain to enable
syncing this attribute as part of your directory sync when provisioning users.
 Note: This option should only be enabled when first deploying the AD sync agent and you are about to do you first full sync or if you are currently experiencing issues within your environment due to moving users across AD forests and domains. If you have already synced your user and you enable this option, Forcepoint Data Security Cloud | SSE will initiate another full sync of all your users to Forcepoint Data Security Cloud | SSE which can take a long time depending on your particular domain instance(s).
 - On the User and Groups page, select a user to view their User Details. You can view the mS-DS-ConsistencyGUID attribute field. Notice that the field
is greyed out and cannot be manually updated or changed and can only be synced using the AD DirSync agent.

LDAP Query
Admins can sync a subset of Users from their AD environment using LDAP Queries. This allows admins to sync users to Forcepoint Data Security Cloud | SSE when Groups/OU's are not feasible (for example, syncing users matching a specific AD attribute).
- Navigate to the page and select the Active Directory User Source.

- On the AD User Source page, select Advanced (Specific Groups or OUs) to view the LDAP Query to Import Users section.
- Under the LDAP Query to Import Users section, click the green plus icon to add a new line that will have a default query populated. You can now provide a
Group Name and enter your LDAP Query.
 Note:
Note:- The display of the objectGUID and the internal storage of it is not the same. To learn more about constructing correct LDAP queries, .
- Groups on the User Management page will indicate if they were provisioned through LDAP and an information icon will appear so you can view their attribute information:

Global Catalog
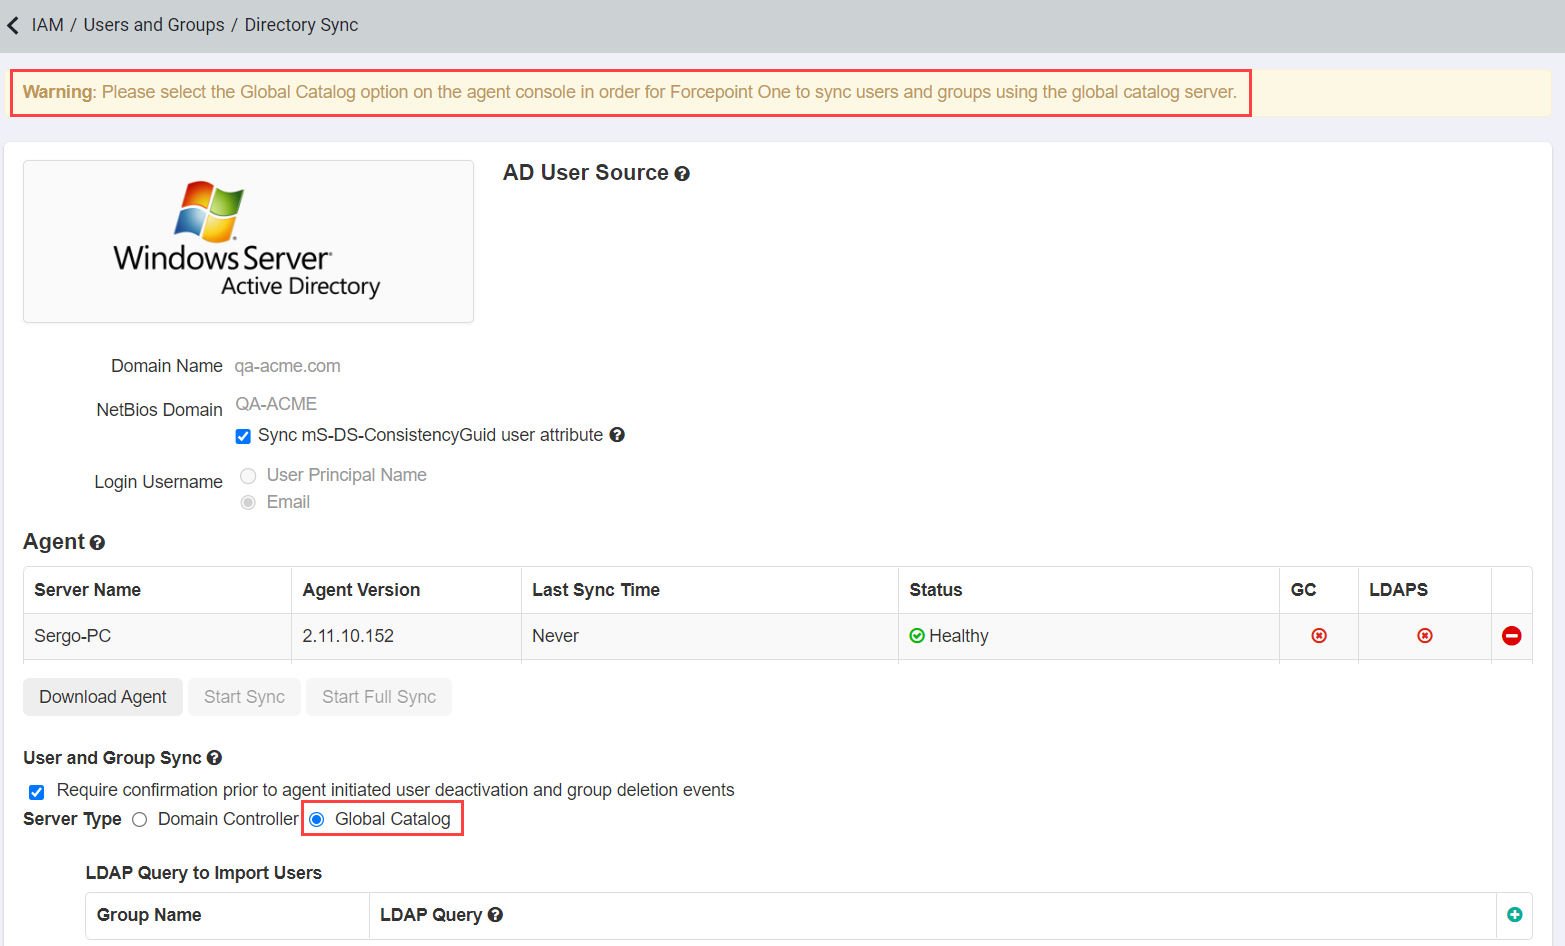
- If you are using a Global Catalog server, select it as the Server Type instead of Domain Controller. When selected, you will be able to configure LDAP queries as explained in the prior section.
- Selecting Global Catalog will prompt you with a warning message at the top to ensure that you agent console is selected for Global Catalog as well.

Note: Global Catalog only supports agent version 1.8.89 and above. If you select Global Catalog and you have not updated your agent, Forcepoint Data Security Cloud | SSE will display a warning message Functionality supported in agent version 1.8.89 and higher.
Checking Health Status
- Under the Agent table, you will see 3 columns towards the end to indicate the health of the connection from the dirsync console to Active Directory.
- Status: Shows the health status of the connection to the Domain Controller
- GC: Shows the health status of the connection if using Global Catalog
- LDAPS: Shows the health if using LDAP queries.
AD Agent Operations and Settings
- There are two syncronization options:
- Start Sync - Will initiate an on-demand sync for any changes made in Active Directory since the last agent synchronization. This sync occurs automatically every three hours.
- Start Full Sync - Initiates a full synchronization rather than synchronizing only changes in AD.
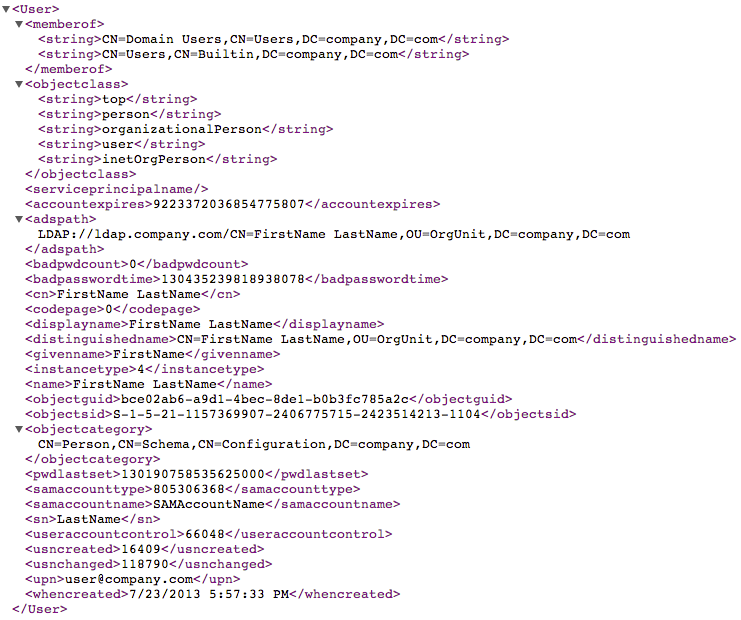
Agent Synchronization Details
The Agent synchronizes the following information (example record for one user):
- To learn how to use an upstream proxy to connect to Forcepoint Data Security Cloud | SSE, refer to the AD Agent: Using an Upstream Proxy to Connect to Forcepoint Data Security Cloud | SSE.
- If the hard drive's capacity is filled, the agent's configuration file (config.xml) can become corrupted. If this occurs, locate the corrupted file, delete it and then
reconfigure the agent.
- The file is located at <ProgramData>\bitglass\dirsync\config.xml, where <ProgramData> is a hidden folder typically located directly on the C: drive at c:\ProgramData but can sometimes be configured at the system level depending on the windows version. It can be reached by entering the environment variable %ProgramData% into windows explorer.