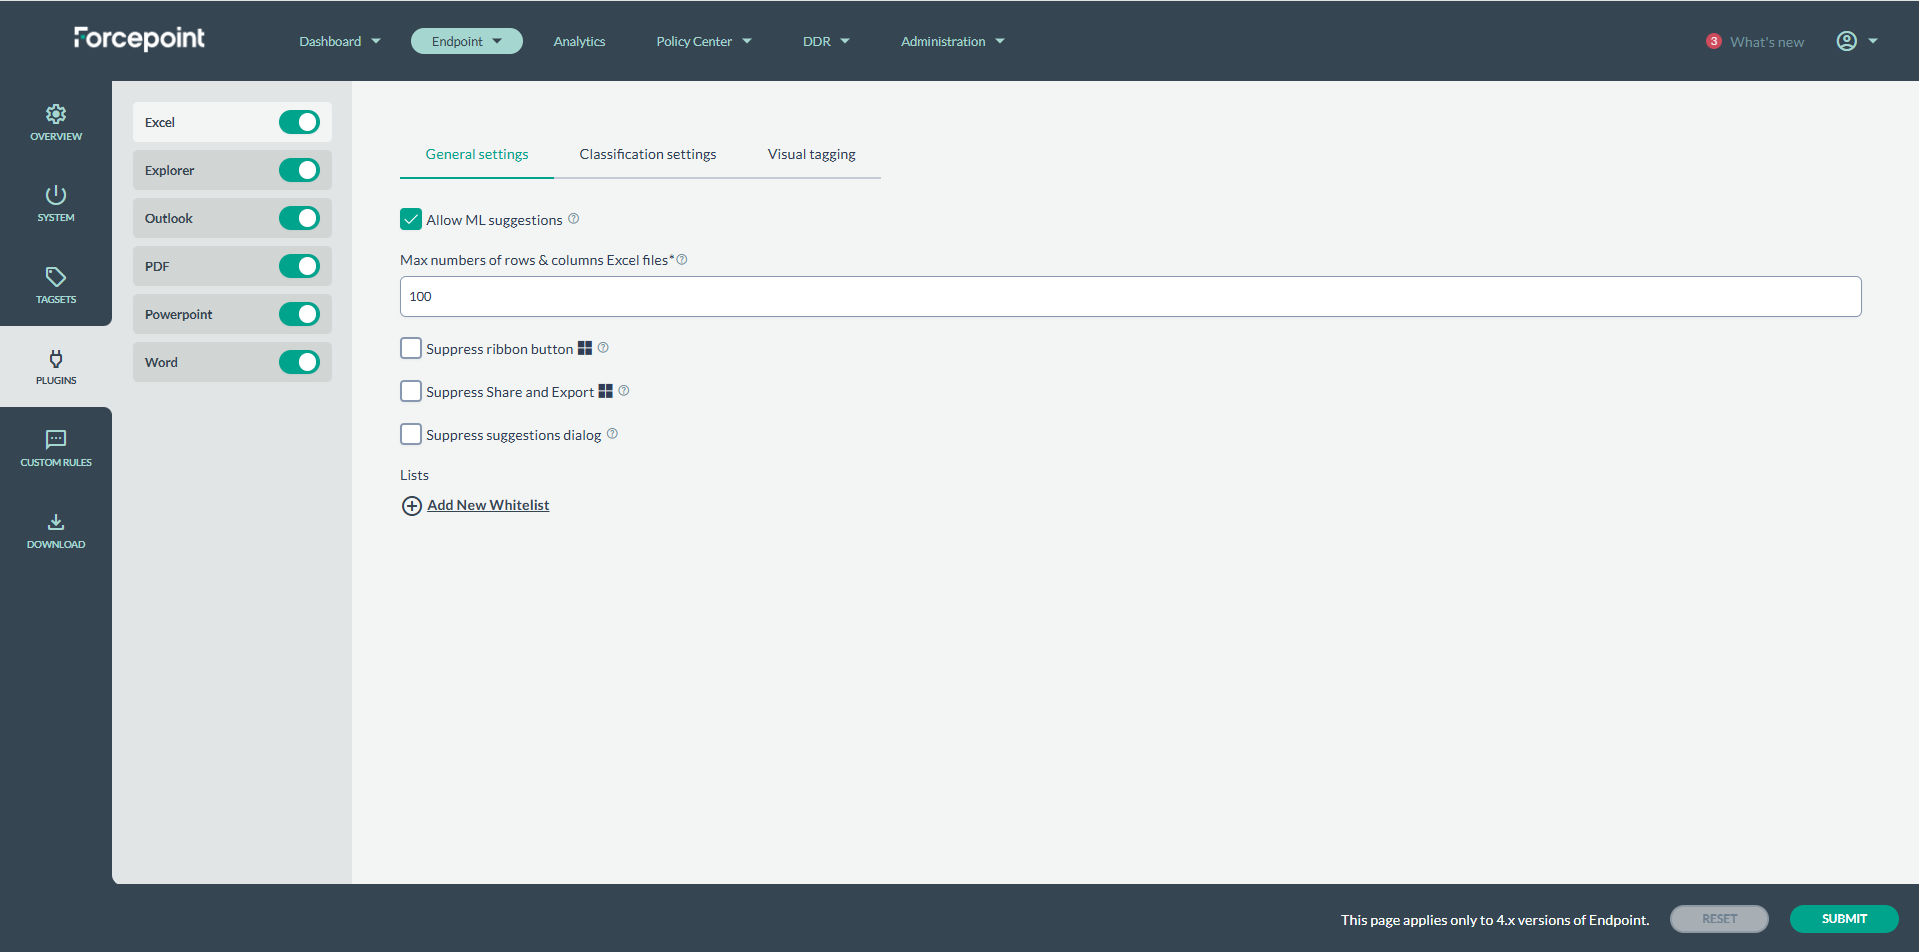
Plugins
This section enables users to easily activate or deactivate the Excel, Explorer, Outlook, PDF, PowerPoint, and Word plugins.
When a plugin is deactivated, its corresponding Ribbon will appear grayed out when opening the application, and no actions from the classifier will be executed. Word, Excel, PowerPoint, and Outlook plugin configurations are quite similar and share several commonalities. However, there are also specific configurations that apply uniquely to each of them.
Following are shared configurations between multiple plugins:
General Settings
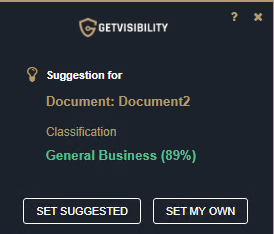
| Allow ML suggestions | This option will enable/disable sending text to the backend in order to generate suggestions based on an ML model. If enabled, agent will receive suggestions. For excel files:
|
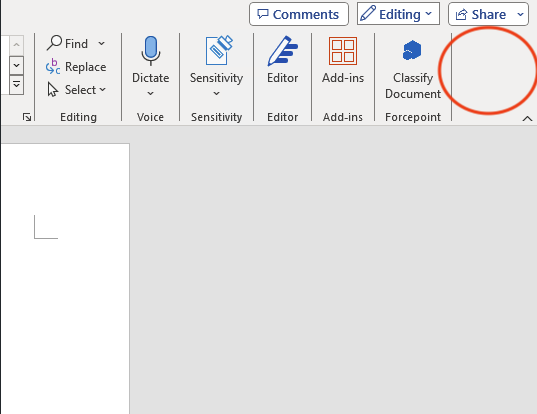
| Suppress ribbon button | This option will hide the ribbon button on selected app.
|
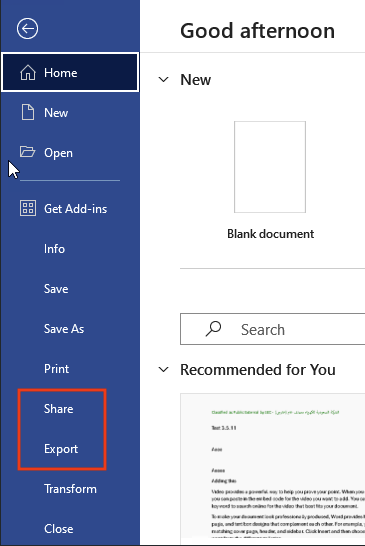
| Suppress Export and Share | This option will remove Export and Share buttons from the ‘File’ menu on the selected app. An example is shown below from MS Word application:
|
| Suppress suggestions dialog | Enabling this option will prevent suggestion pop-ups from appearing. Suggestions will be visible when you click on the Classification button. Note: Make sure to
check 'Allow ML suggestions' to receive suggestions.
This pop-up will no longer appear if enabled.
Suggestions can still be seen by clicking the classification button. |
| Add New Whitelist | This option will allow a certain user or domain to classify with selected classification. Whitelists can be created for Classification, Distribution or Compliance. Once created, if no
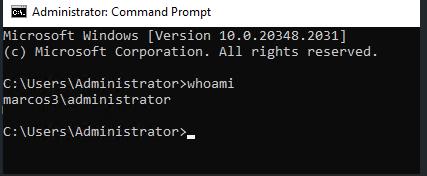
one is whitelisted, no one will access selected tagset. For example if mycompany.domain.com is whitelisted for Restricted tagset, a user not belonging to it will see the selected tagset grayed-out (see screenshot above). Notice that the field legend says ‘You can use both users (user@domain.com) or domains (domain.com) when adding new items to this list’. To get these information, you can go to the Command Prompt and run whoami. This command will return the machinename\username value.
Then, you can simply right-click on 'This PC' and select 'Properties'. Under the 'Full device name', you will find the domain to which the machine belongs.
Lastly, we can enter
|

Classification settings
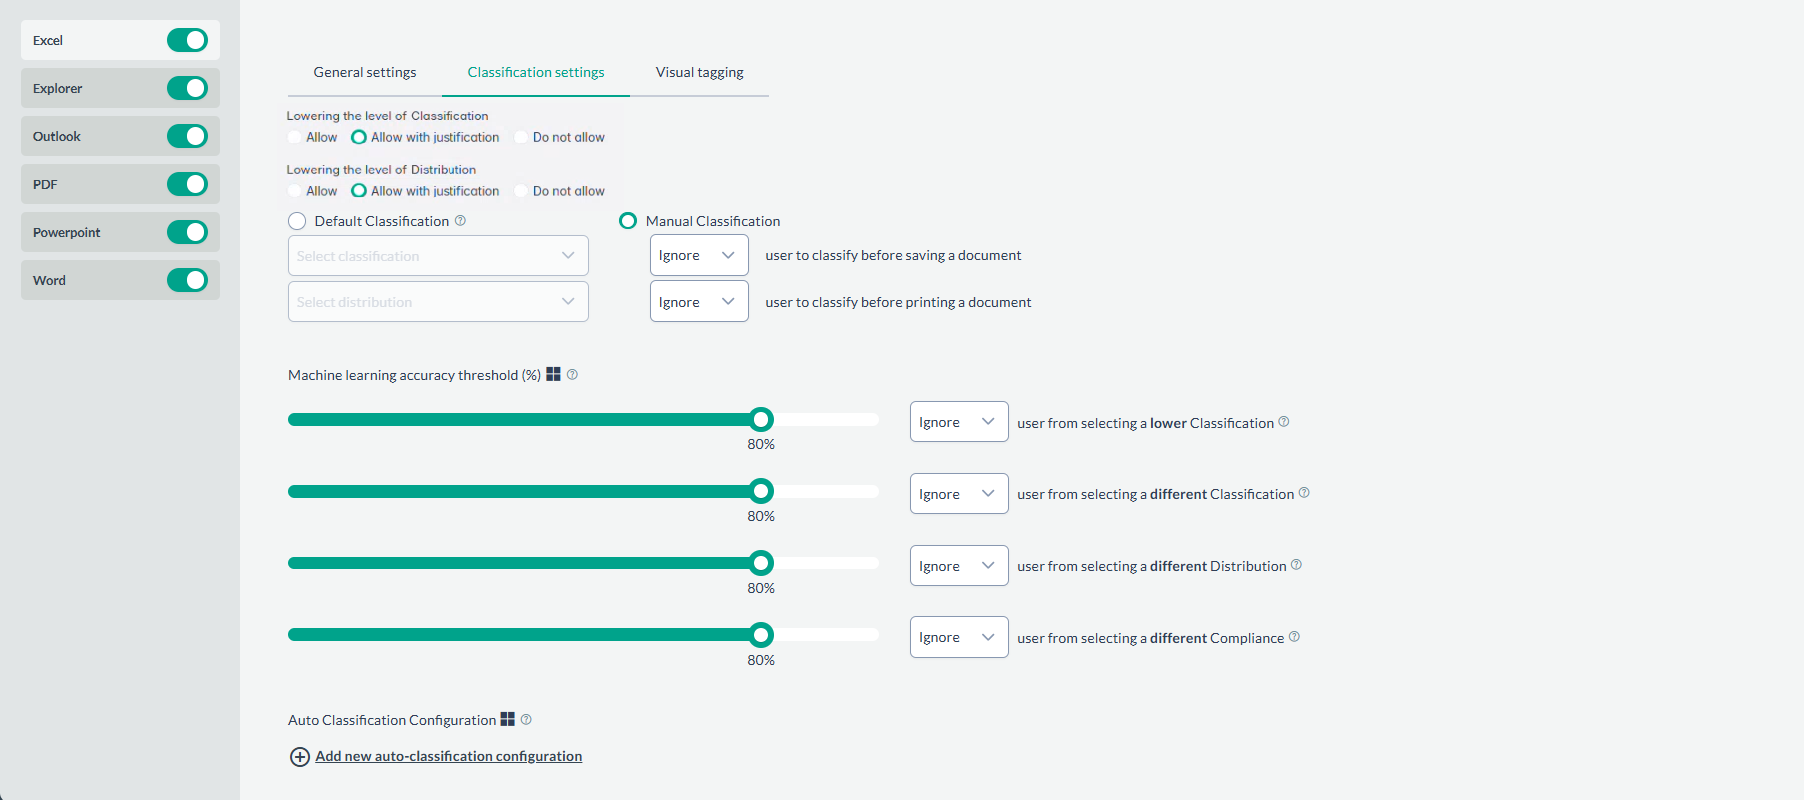
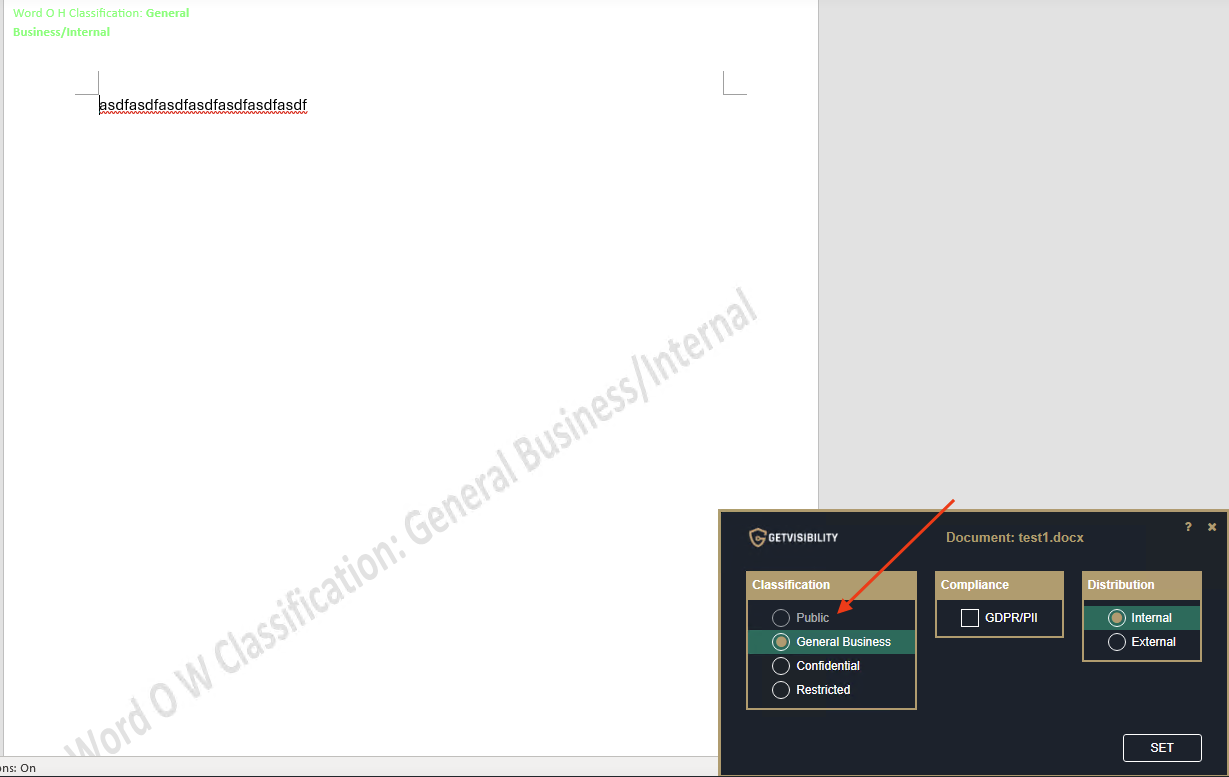
| Lowering the level of Classification
|
This option enables re-classifying files with a lower level of classification. The process involves opening a file, making edits, classifying it, saving the changes, and then closing it. Upon reopening the file, lower levels of classification will be enabled or grayed out if checked or unchecked, respectively.
Note: General-business-classified file, with the option to lower classification unchecked. Note that the "Public" classification level is currently grayed out.
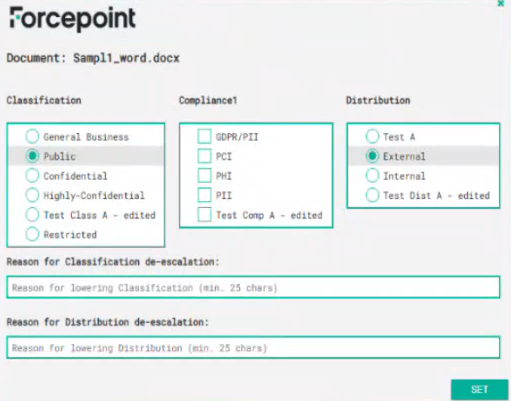
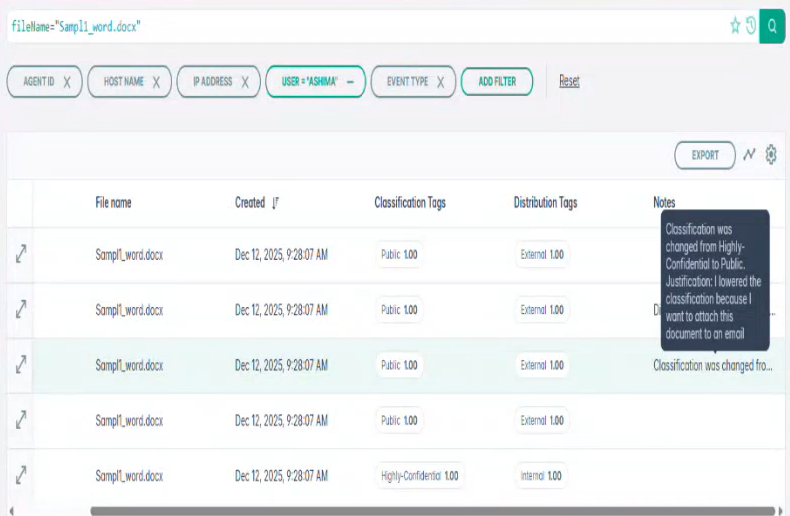
Allow with justification Use Case:
|
| Lowering the level of Distribution
|
Similarly as the one before, this option enables re-classifying files with a lower level of distribution. The process involves opening a file, making edits, classifying it, saving the
changes, and then closing it. Upon reopening the file, lower levels of distribution will be enabled or grayed out if checked or unchecked, respectively.
Internal-classified file, with the option to lower distribution unchecked. Note that the "External" classification level is currently grayed out. Allow with justification Use Case:
|
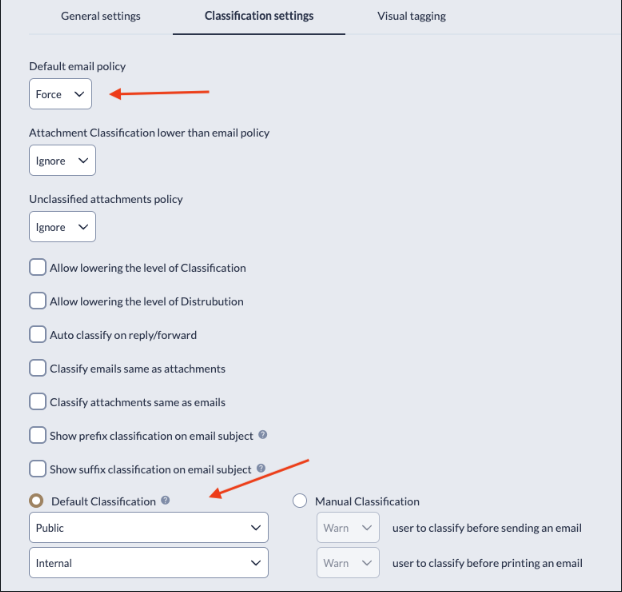
| Default Classification | Here, users have the option to set default values for Classification and/or Distribution. This allows the desired set tagsets to be automatically applied upon Saving or Printing. It is important to note that the triggers for automatic application are limited to Saving and/or Printing, so simply editing the file will not result in classification (or distribution) tags being applied. |
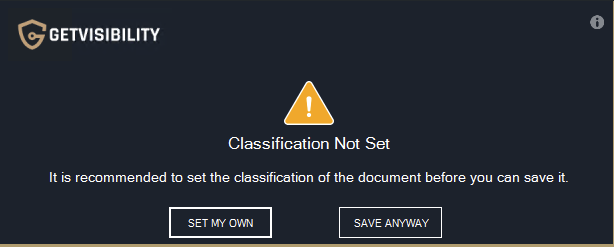
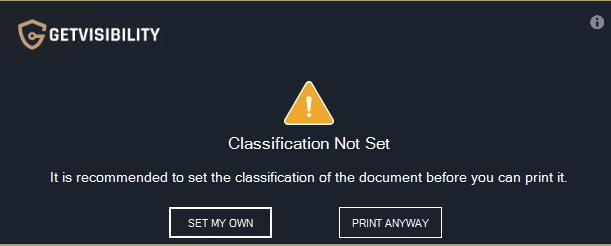
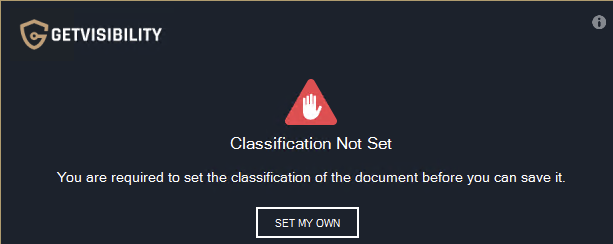
| Manual Classification | As opposed to Default Classification, manual intervention is required here. The agent's behavior on the two triggers offers three options:
Typical warning pop-up window when SAVING, providing the user with the option to set their own classification by clicking on a designated button, or to continue without classifying by selecting 'SAVE ANYWAY'. Note: For printing the warning pop up is quite similar.
Typical warning pop-up window when PRINTING, providing the user with the option to set their own classification by clicking on a designated button, or to continue without classifying by selecting ‘SAVE ANYWAY’. if the user doesn’t classify the file, upon saving (or printing) a pop up will be shown, forcing them to classify ('SET MY OWN’).
Classic force pop up window upon PRINTING. Forces the user to classify. |
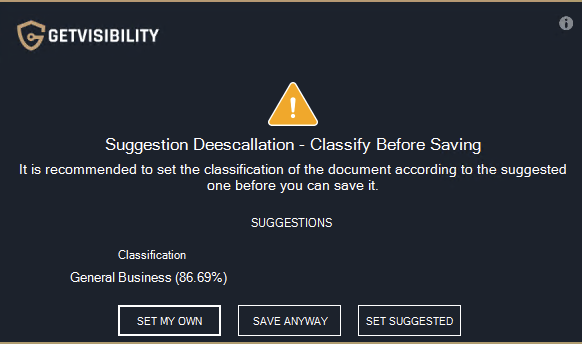
| Machine learning accuracy classification threshold (%) |
As it was mentioned before, ML suggestions always come with a confidence value. This option allows the agent to ignore, warn or force user to select the suggested classification tag or a higher one. Note: The pop-up windows (in the event of selecting ‘warn’) will only appear when you SAVE. If you perform regular document editing or manual classification, the pop-up will NOT be
displayed.
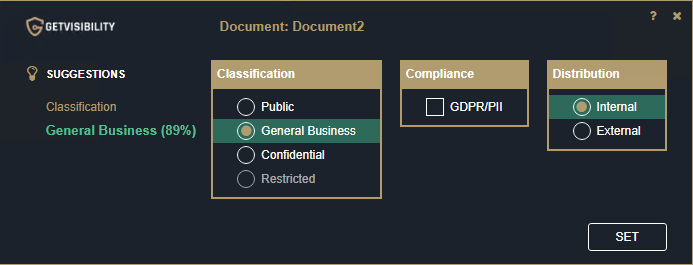
Here ML suggestion was General Business, but document was manually classified as Public (lower level). Upon SAVING, this warning pop up will appear The threshold percentage indicates the minimum confidence required for these triggers. This means that if the ML suggestion's confidence level is lower than the set threshold, no warning or enforcement will occur. |
| Auto Classification Configuration |
This feature enables users to automatically classify items based on machine learning (ML) suggestions. When the confidence level of an ML suggestion exceeds the chosen threshold, the selected classification, distribution, or compliance will be applied without manual intervention. Note: A new configuration can be added with the Add new auto-classification configuration button, to apply a different category, and select a different threshold as
well.
|


Visual tagging
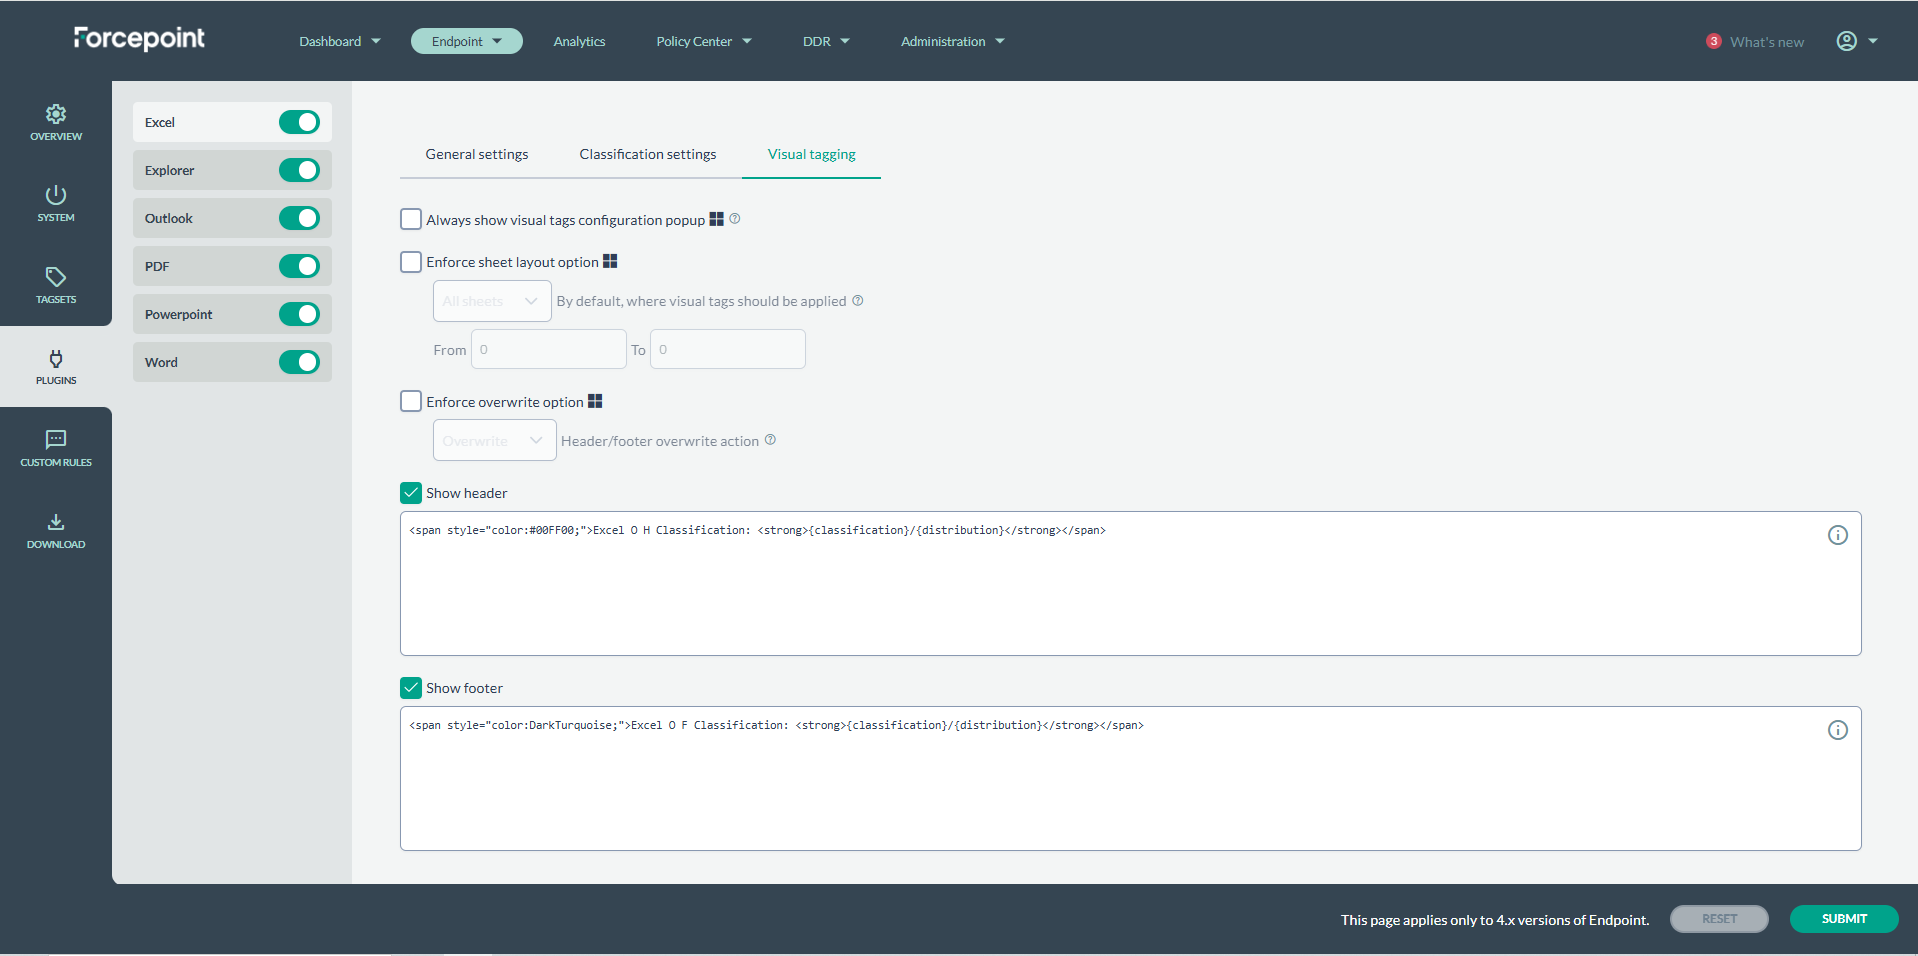
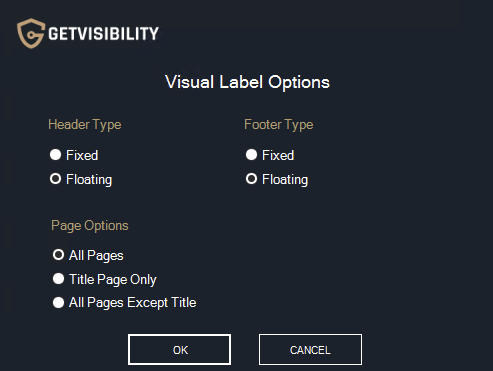
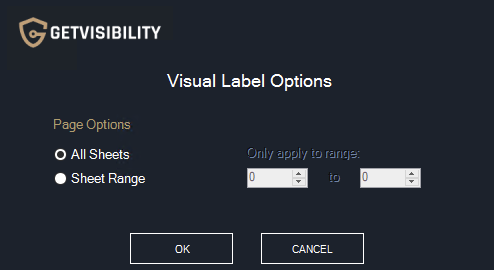
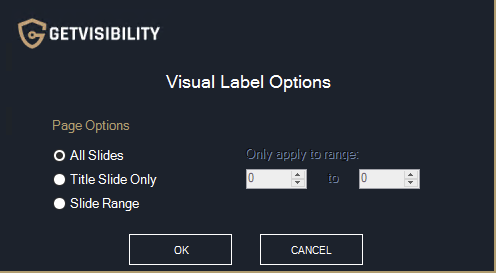
| Always show visual tags configuration popup |
If checked, the user will see the ‘Visual Label Options’ popup window and will be able to configure them on each SAVE or PRINT trigger. If un-checked, visual markings will be applied to all pages. Pop-ups will only be shown in the cases where user input is required to decide on ambiguity between the config and the current document. The popup is slightly different depending on if Word, Excel or PowerPoint is being used. Notice there are no pop-ups in Outlook as there is no concept of title pages or different header/footer types (floating/fixed). Word
Word Visual Label Options Pop-up
NOTE: The actual alignment (left corner, right corner, centre) is determined by the text-align style attribute from the header/footer configuration.
Excel
Excel Visual Label Options Pop-up PowerPoint
PowerPoint Visual Label Options Pop-up For more information on this topic, please refer to this article: Agent Header Footer Details |
| Enforce sheet layout option |
This will set the chosen option by default without prompting the Visual Label Options pop-up. Again, the options are slightly different depending on if Word, Excel or PowerPoint is being used. Word
Excel
Note: The chosen numbers do not refer to the names of the sheets in Excel (“Sheet1”, “Sheet3”, etc) as these are re-nameable placeholder names. They refer to sheets counting from left to right.
PowerPoint
For more information on this topic, please refer to this article: Agent Header Footer Details |
| Enforce overwrite option |
If this option is selected it will apply the chosen option on Headers and Footers. Before going through the available options, a clarification on what this implies. This option will act over the visual markings on the selected header/footer type (refer to the ‘Enforce Header and Footer type’ section). Available options are:
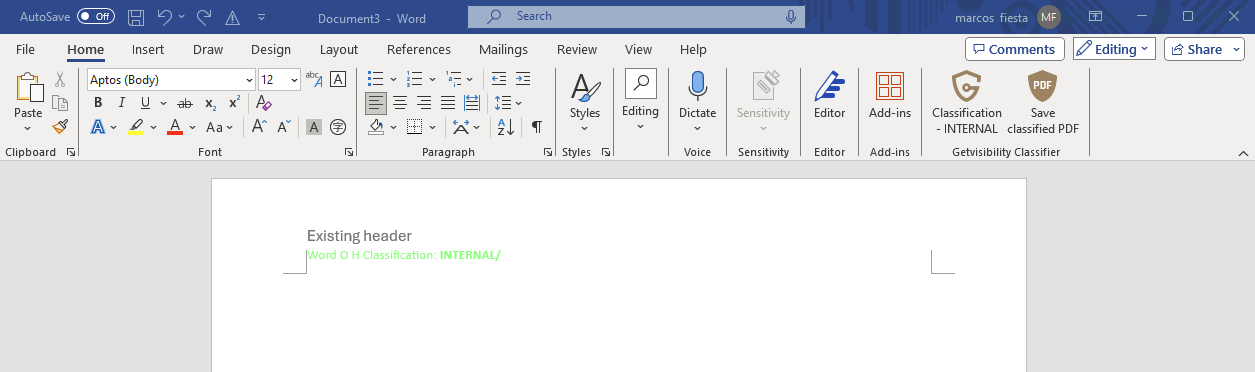
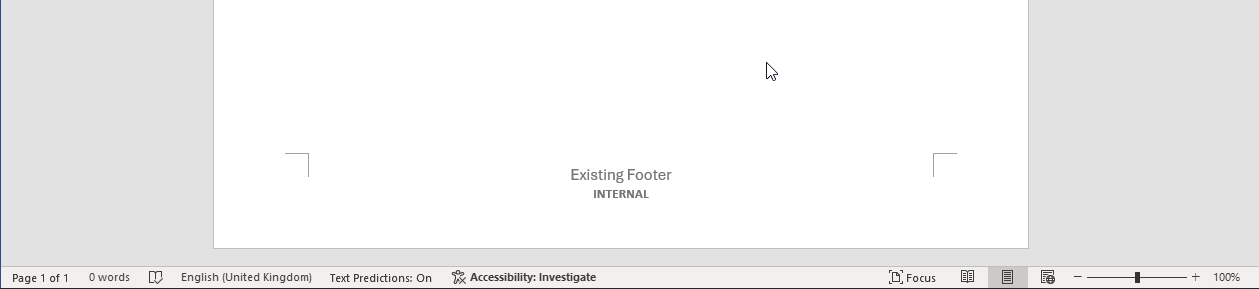
Example of Append behavior over an existing Forcepoint header.
Example of Append behavior over an existing Forcepoint footer. NOTE: For FIXED visual markings, If there is an existing Header/Footer prior to classifying and Overwrite option is selected, upon manual classification or trigger (print/save), existing visual marking will be overwritten.
Example of existing header being overwritten. If this option is unchecked (no enforce), and in the case where the document already has a “fixed” header/footer and the user chooses this option in the Visual Label Options pop up, they will be asked if they wish to append the marking to the existing text or overwrite it. This isn’t shown if selected “Floating” is selected. For more information please check this article Agent Header Footer Details |
| Show header | Show footer |
In this section the user can insert the content of visual markings. Text should be written in HTML language, please refer to this article for more information. Agent: Guide for writing Visual Labels Variables As highlighted in the article, a 'classification' variable is utilized. Additionally, there are several others that can also be employed. Here's a list of these variables:
This is an HTML header or footer example that uses all of them. And this is the output for a default configuration, Public - GDPR/PII - Internal classification: |
Explorer Plugin
Explorer plug in refers to right-clicking over a file in order to classify, mainly for supported files other from Word, Excel, Powerpoint and Outlook. For this, user only has the option to:
- Allow lowering the level of Classification: Classification can be changed to a lower level. For example, a file classified as Confidential is then classified as Public.
- Allow lowering the level of Distribution: Distribution can be changed to a lower level. For example, a file which distribution is set as External is changed to Internal.
Plug in specific settings
Excel
Max numbers of rows & columns Excel files
This setting determines the maximum number of rows and columns that the agent will scan to extract text and send it to the backend for additional analysis.
It's important to note that this process occurs for every sheet, which can consume significant resources. To enhance performance, consider reducing this value.
Outlook
Specify maximum number of recipients
This value specifies how many recipients can be added when sending an email.
When including more recipients than the value set, a pop up message will appear. If 0 is set, unlimited recipients can be added.
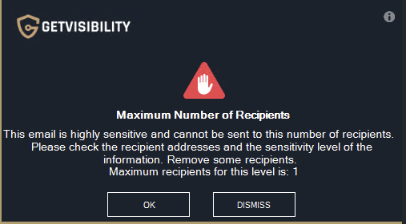
Example of a pop-up message when attempting to send to more recipients than the set limit.
File extension to exclude
This section enables the user to specify the images, audio & video, or other file types from attached files that will not be checked for tags.
Allow
Specific group of users or domains allowed as recipients. Any user or domain not included in this list will be unable to be sent emails.
This option is not restrictive, meaning that if left empty, all users or domains recipients are considered allowed.
Default email policy was set to Force, hence the red sign. Recipient not included in the ‘allow’ list.
Permission to send
Specific group of users or domains allowed as sender. Any user or domain not included in this list will be unable to send emails.
This option is not restrictive, meaning that if left empty, all users or domains senders are considered allowed.
Example of a pop-up message when attempting to send an email from a domain not listed in ‘Permission to send’ list.
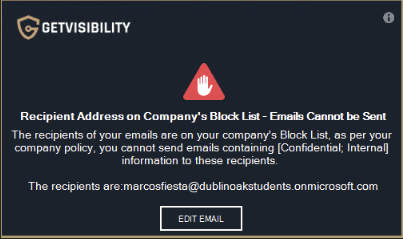
Block
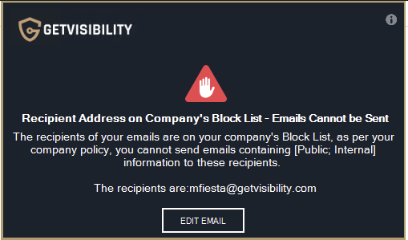
Specific group of users or domains blocked as recipients. Emails to any user or domain included in this list will be blocked upon sending.
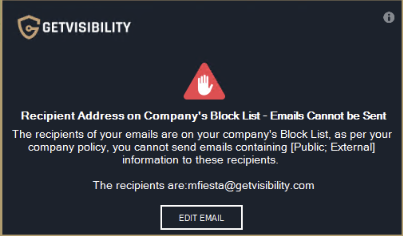
Example of a pop-up message when attempting to send an email to a domain listed in ‘Block’ list.
Warn
Specific group of users or domains blocked as recipients. Emails to any user or domain included in this list will be warned upon sending.
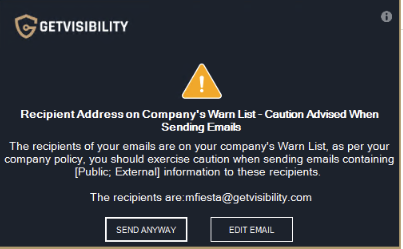
Example of a pop-up message when attempting to send an email to a domain listed in ‘Warn’ list.
PowerPoint
All settings already covered in the Shared Configuration section.
Word & PDF
Document header & footer width
This value applies to the default width for floating headers and footers
Document header & footer height
This value applies to the default height for floating headers and footers
Classification settings
Excel
All settings already covered in the Shared Configuration section.
Outlook
Default email policy
This option gives the user the ability to Allow (Ignore), Warn (Warn), or Block (Force) emails by default. It is designed to complement the Allow, Permission to Send, Warn, and Block domains found in the 'General settings' section.
For example, abc@domain.com is in the Allow list. If default email policy is set to ‘Force’ and the user sends a classified email to another domain, they will get a Block sign like this:
The Default email policy operates with classified emails in conjunction with the allowed, permitted to send, warned, or blocked domains. If none are set, this email policy will not trigger.
Continuing with the same example, if Default Classification is chosen, Default email policy will trigger.
This setting will trigger a Block sign upon sending (Public - Internal will be applied, and domain will be checked).
Example of Default policy triggering for a domain that is not in the Allow list. Default classification is applied.
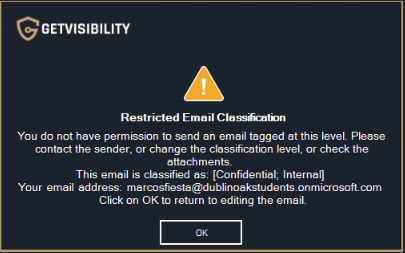
Attachment Classification lower than email policy
Here the user can choose to Ignore, Warn, or Force, if attachment’s classification is higher than email’s classification.
Note: there is a discrepancy between the title and the actual behavior. The condition will be triggered (ignore, warn, or force) if the attachment's classification is HIGHER than that of the document.
Unclassified attachments policy
This option enables users to choose whether to ignore, receive a warning, or be required to classify attachments when an unclassified one is attached.
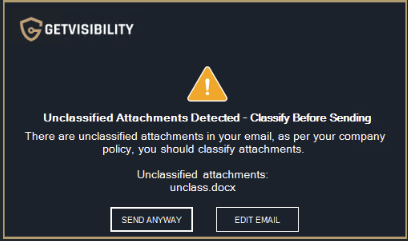
Example of warning message.
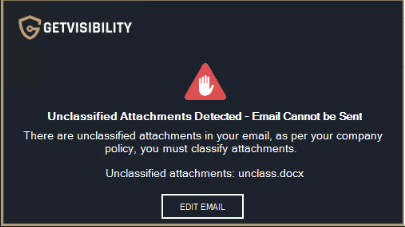
Example of message when option is set to Force.
The same will happen if Default Classification for emails is set.
Auto classify on reply/forward
This option enables users to inherit the original email classification when replying, replying all, or forwarding an email.
Example of classification inheritance.
Classify emails same as attachments
This option enables users to inherit classification from attachments if no classification is manually chosen. If there are attachments with different levels of classification, it will inherit the higher one.
Classify attachments same as emails
This option enables users to classify unclassified attachments with the same classification as email.
Example of pop-up window when unclassified attachments are being classified
Show prefix classification on email subject
This option allows the user to prepend the classification tag to the email subject.
Show suffix classification on email subject
This option allows the user to append the classification tag to the email subject.
Show custom alert message
This option allows the user to set a custom message for the chosen classification level

Example of custom message configuration for Restricted emails.
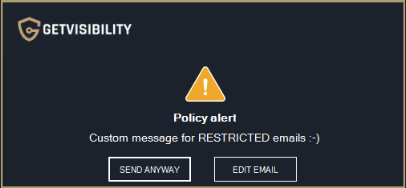
Example of custom message for Restricted emails.
PowerPoint
All settings already covered in the Shared Configuration section.
Word
All settings already covered in the Shared Configuration section.
Visual tagging settings
Excel
All settings already covered in the Shared Configuration section.
Outlook
All settings already covered in the Shared Configuration section.
PowerPoint
All settings already covered in the Shared Configuration section.
Word
All settings already covered in the Shared Configuration section.