Adding a new profile
The Add Profile widget allows to create new RBI Profiles.
- Sign in to Forcepoint ONE Platform.
- Select Remote Browser Isolation from application waffle.
- Go to RBI Profile from left navigation.
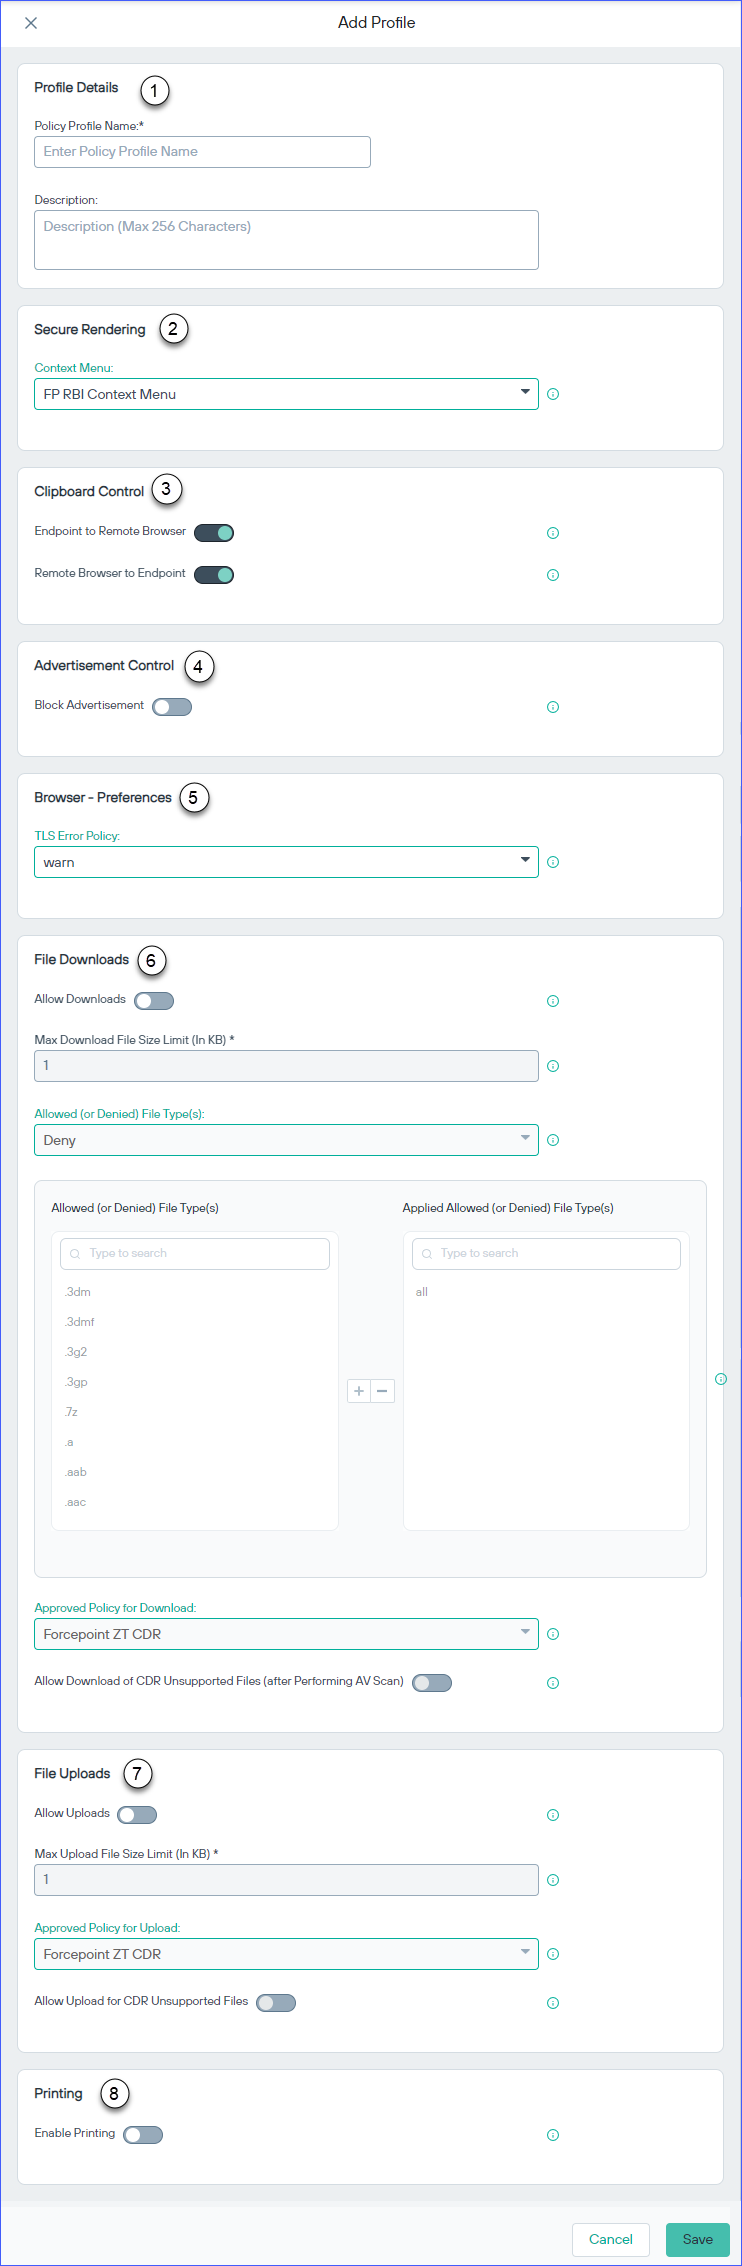
- Click +Add Profile. Following dialog is displayed:
- 1
- Profile Details: Enter the Policy Profile Name and Policy Profile Description. The Policy Profile Name cannot be empty.
- 2
- Secure Rendering: Select the Context Menu type from the drop-down menu. Select the Browser Context Menu for more native browsing experience. Select the FP RBI Context Menu for stricter security control. Forcepoint recommends the use of the FP RBI Context Menu when CDR is enabled. Enable the Browser Context Menu when necessary for productivity application shortcuts. The Browser Context Menu's Save As option will bypass RBI's CDR file processing and should only be used on trusted sources.
- 3
- Clipboard Control: Under Clipboard Control, click the toggle switch to disable the Endpoint to Remote Browser
option. Note: Endpoint to Remote Browser option is enabled by default. It allows users to perform copy and paste action from endpoint to remote browser. The maximum number of characters that can be copied and pasted is 7000.
- 4
- Advertisement Control: Under Advertisement Control, click the toggle switch to enable or disable the Block
Advertisement option. Note:
- By default, the Block Advertisement option is disabled.
- When this option is enabled, the advertisements are blocked on the isolated page.
- To display the number of ads that are blocked for a user, the Ads Blocked column is added in the table under the Browse Activity Summary section, in the tab.
- 5
- Browser Preferences: Under Browser – Preferences, select the TLS Error Policy type from the drop-down menu. The TLS Error Policy specifies the behavior of the Isolation browser when it navigates to a website with an invalid TLS certification.
- 6
- Safe Preview: Enables or disables the Safe Preview mode, that allows a user to safely preview a file in a pop-up window before the user can download the file.Note:
- You must disable the Safe Preview mode to allow a user to directly download a file without the need to safe preview the file.
- The user must have the pop-ups feature enabled in the browser for the Safe Preview mode to function properly.
- This mode is enabled by default.
- The Safe Preview mode is supported only for the following file formats:
- Image Files (jpg, jpeg, png, gif, tiff, ai, and raw)
- Microsoft 365 documents (xls, xlsb, xlsx, xltx, xlsm, ppt, pptx, pptm, pot, potm, doc, docx, dot, dotm, dotx and xml)
- Microsoft Visio (vsdx)
- OpenOffice Documents (odt, ods and odp)
- Portable Document Format (pdf)
- Rich Text Format (rtf)
- 7
- File Downloads: Under File Downloads, enter the relevant information:
- Allow Downloads: Enable this option to allow users to download files.
- Max Download File Size Limit (in KB): Enter the maximum file size for downloads in kilobytes. The maximum allowed file size is 50000 KB (50 MB).
- Allowed (or Denied) file type(s): Choose to Allow or Deny specific file types from downloading. Leave all as the only option to allow or deny all file types, or enter one or more file types into the field (all will be ignored if at least one file type is listed). For example, if you enter .exe,.doc, then EXE and DOC file types only will be allowed or denied.
- Approved Policy for Download: Choose the file download policy option:
- Forcepoint ZT CDR: During download, files will be scanned and sanitized using Forcepoint ZT CDR technology.
- OPSWAT CDR: During download, files will be scanned and sanitized using the OPSWAT Deep CDR technology.
- AV Scan: File downloads are scanned by antivirus only.
- NoScan: File downloads are not scanned.
Note: OPSWAT CDR option is visible in the file download policy even if, it is not configured. If RBI administrator selects this option, an error message is displayed saying the configuration is not saved. For more information about OPSWAT Configuration, see Settings. - Allow Downloads of CDR Unsupported Files after Performing AV Scan: After performing AV Scan, enable this option to download files that are not supported by OPSWAT or Forcepoint ZT CDR. If you do not want to download the files, disable this option.
- 8
- File Uploads: Under File Uploads, enter the relevant information:
- Allow Uploads: Enable this option to allow users to upload files.
- Max Upload File Size Limit (in KB): Enter the maximum file size for individual uploads in kilobytes. The maximum allowed file size is 400000 KB (400 MB).
- Approved Policy for Upload: Choose the file upload policy option:
- Forcepoint ZT CDR: During upload, files will be scanned and sanitized using Forcepoint ZT CDR technology.
- OPSWAT CDR: During upload, files will be scanned and sanitized using OPSWAT Deep CDR technology.
- NoScan: File uploads are not scanned.
Note: OPSWAT CDR option is visible in the file upload policy even if, it is not configured. If RBI administrator selects this option, an error message is displayed saying the configuration is not saved. For more information about OPSWAT Configuration, see Settings. - Allow Upload for CDR Unsupported Files: Enable this option to upload files that are not supported by OPSWAT or Forcepoint ZT CDR.
- 9
- Printing: Under Printing, click the toggle switch to enable or disable the printing option. Note:
- By default, the printing option is disabled.
- When this option is enabled, a user or user group can perform a print action.
- When this option is disabled, a user or user group cannot perform a print action. If a user or user group tries to perform a print action, an error message that states “Print action is restricted by your organization’s policy. Please contact your administrator for more information” is displayed.
- Click Save. The profile is saved