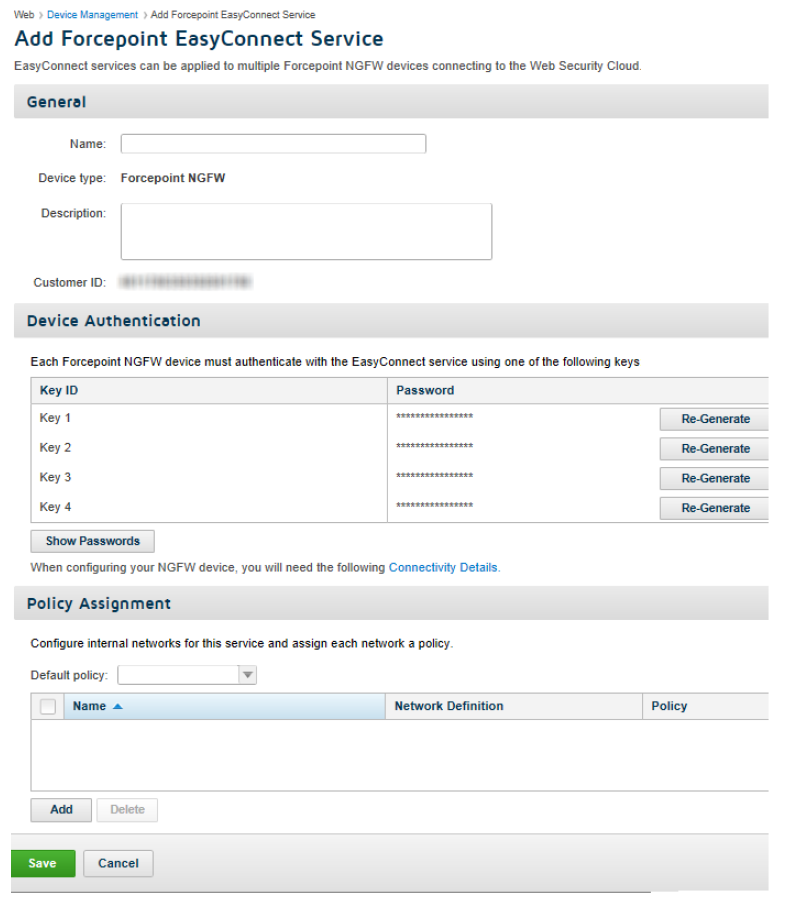
Adding or editing an EasyConnect service
Use the Add or Edit buttons on the Device Management page to add an EasyConnect service or change the configuraion settings for an existing sesrvice.

To add a new EasyConnect service:
Steps
- Click the Add icon and select Add EasyConnect Service.
-
Under General, add or update your service Name.
Forcepoint NGFW is automatically added as the Device Type and the field is disabled.
- Provide a Description (up to 512 alphanumeric characters).
- Customer ID is generated by the portal and is a display only field. This value can be copied for use when configuring the service in the NGFW Security Management Center.
-
The Device Authentication table lists the Key ID and Password of the 4 keys generated by the portal and used
to authenticate devices with the cloud service.
The table cannot be edited but key values can be copied, and passwords can be regenerated by clicking Re-Generate. Passwords are protected but can be viewed by clicking Show Passwords.
Click the Connectivity Details link to view Customer ID, port information, Domain Name Server (DNS) and the keys that have been configured. Note that you can copy the Customer ID, DNS name, and key values from this panel so they can be used when configuring the service in the NGFW Security Management Center.
Ports 8090 (HTTP) and 8011 (HTTPS) are used for communication between the EasyConnect Service and NGFW.
- Under Policy Assignment, select the Default policy to apply to traffic managed by this service.
-
If you want to apply different policies to different internal networks whose traffic is managed by the service, click Add under the Policy Assignment table,
then:
- Provide a unique Name for the network.
- Use the Type list to specify how you want to define the network (as an IPaddress, subnet, or IP range).
- Enter the network information in the format that you specified.
- Select the policy to apply to traffic from the network.
- Click Add.
Repeat these steps for each internal network managed by the service to which you want to assign a specific policy.
Note that networks (IP address ranges and subnets) may not overlap, and you can assign only one policy to each network.
- When you are finished configuring the service, click Save.