Creating the installation package from the package builder
Steps
-
On the Select Forcepoint One Endpoint Components screen, select one or more of the following:
- Forcepoint Web Security Endpoint (requires Forcepoint Web Security). If you select Forcepoint Web Security Endpoint here, you must select an option in step 4 below.
- Forcepoint DLP Endpoint (requires Forcepoint DLP)
- Forcepoint Endpoint Context Agent (requires Forcepoint NGFW)

-
On the Installation Platform and Security screen:

- Select the operating systems where Forcepoint F1E will be installed.
- If you are creating a stand-alone Forcepoint Web Security Endpoint package, or a mixed Forcepoint Web Security Endpoint and Forcepoint DLP Endpoint package, you can select Windows (32-bit or 64-bit) or Mac.
- If you are creating a stand-alone Forcepoint ECA package, you can only select Windows (32-bit or 64-bit).Note: The Linux option is unavailable for this release.
- Create the administrator password to be used to uninstall or modify Forcepoint F1E agents. If no password is specified, users with admin privileges can uninstall the
Forcepoint F1E software from the endpoint machines.
Click Show characters to display the password characters while you type.
For more information about creating an anti-tampering password, see Guidelines for creating an anti-tampering password, page 21.
For security purposes, anyone who tries to modify or uninstall Forcepoint DLP Endpoint or Forcepoint Web Security Endpoint software is prompted for a password. Standalone Forcepoint ECA installations are not affected by this password.
When Forcepoint F1E contacts the management server, this password is overwritten with the password specified by an administrator on the server. Set this password in one of the following locations:- Forcepoint DLP Endpoint: In the Data Security module of Forcepoint Security Manager, go to Settings > General > System > Endpoint, then on the General tab, select Enable endpoint administrator password and enter and confirm a password.
- Forcepoint Web Security Endpoint (Hybrid module): In the Web Security module of Forcepoint Security Manager, go to Settings > Hybrid Configuration > Hybrid User Identification, then enter and confirm a password.
- Forcepoint Web Security Endpoint (Cloud module): In the Forcepoint Cloud Security Gateway Portal, go to Web > Endpoint > Deployment Settings > Set Anti-Tampering Password, then enter and confirm a password.
Note that password hashes are stored in an encrypted file. The system does not store passwords in plain text.
Note: Customers requiring FIPS compliance can set the antitampering password during the Forcepoint DLP Endpoint installation only (Windows and Mac). The anti-tampering password cannot be set on the Forcepoint DLP server. Customers who do not require FIPS compliance are not impacted by this change. - To enable anti-tampering, click Protect installation directory from modification or deletion. This prevents users from deleting or modifying the folder where
Forcepoint F1E is installed.Note: Forcepoint recommends that all Forcepoint Web Security Direct Connect Endpoint installation packages enable antitampering on this screen. If anti-tampering is not enabled, some diagnostics tests do not work correctly in the Diagnostics Tool.
- To enable the collection of telemetry data, click Collect telemetry data. When you enable this option, Forcepoint F1E collects data about the Forcepoint One Endpoint
installation (such as status) and the endpoint machine (such as OS, memory, and CPU information), then sends the data back to Forcepoint for analysis.Important: Starting in Forcepoint F1E v20.12, the Collect telemetry data option is enabled by default.
- When you are finished, click Next.
- Select the operating systems where Forcepoint F1E will be installed.
-
On the Installation Path and Firefox Settings screen:
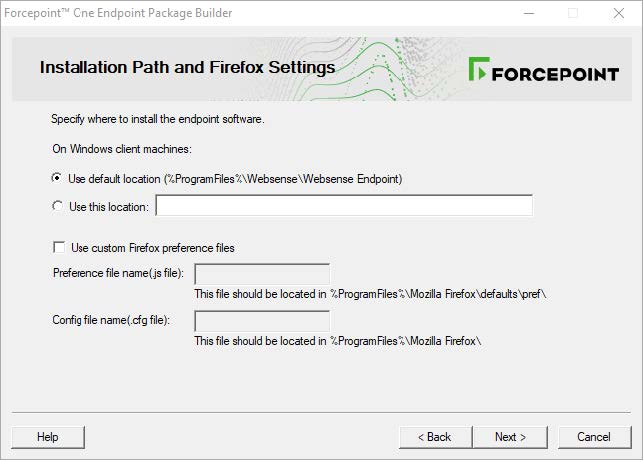
- Specify the folder where the Forcepoint F1E software will be installed on each Windows endpoint machine. The folder path must contain only English characters.
- Use default location: The Forcepoint F1E software is installed in the default folder: \Program Files\Websense\Websense Endpoint (Windows).
- Use this location: Manually type the installation path for the Forcepoint F1E software. Environment variables are supported.
If you are creating a Mac only installation package, this screen is not shown. On Mac endpoint machines, the Forcepoint F1E software is automatically installed in the /Applications folder.
- If you use custom Firefox preference files within your organization, select Use custom Firefox preference files.
In the Preference file name field, type the name of the custom preference file (e.g., autoconfig.js). This file should be located in C:\Program Files\Mozilla Firefox\defaults\pref\. If the custom file is not in this folder, Forcepoint F1E cannot use it.
In the Config file name field, type the name of the custom configuration file(e.g., mozilla.cfg). This file should be located in C:\Program Files\Mozilla Firefox\. If the custom file is not in this folder, Forcepoint F1E cannot use it.
Note: If you use custom Firefox preference files and do not add them here, the Forcepoint F1E installation process overwrites your custom files. - Click Next.
At this point in the installation, the next screen shown depends on the options selected on the Select Forcepoint One Endpoint Components screen. For example, if you selected Forcepoint DLP Endpoint, the next screen is the Server Connection screen.
Follow the instructions for the individual endpoint components below, then continue with Global Settings.
- Specify the folder where the Forcepoint F1E software will be installed on each Windows endpoint machine. The folder path must contain only English characters.