Forcepoint DLP Endpoint

Steps

  1. If you selected Forcepoint DLP Endpoint on the Select Forcepoint One Endpoint Components screen, the DLP Server Connection screen is shown after the Installation Path and Firefox Settings screen:

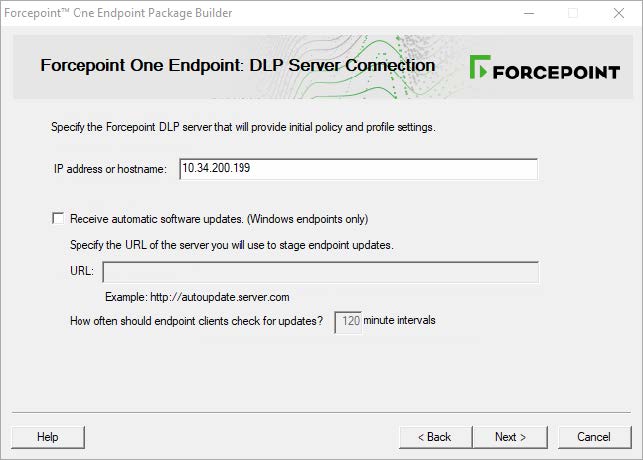
    IP address or hostname: Provide the IP address or hostname of the Forcepoint DLP server that endpoint machines should use to retrieve initial profile and policy information. When configured, endpoint machines retrieve policy and profile updates from the endpoint server defined in their profiles.

    Note: When configuring the Endpoint Profile in the Forcepoint Security Manager (Data > Settings > Deployment > Endpoint Profiles), you can change the primary server and configure additional servers for load balancing and/or failover. See Adding an endpoint profile, Servers tab fordetails.
    Receive automatic software updates (Windows endpoint machines only): When a new version of Forcepoint DLP Endpoint is released, you can upgrade the software on each endpoint machine (manually or via GPO or SMS), or you can configure automatic updates on this screen.

    You cannot use the auto-update feature in the Web Security module of the Forcepoint Security Manager to automate updates for combined web and DLP endpoints.

    This option does not apply to Mac endpoint machines.

    To automate software updates for Forcepoint DLP Endpoint:
    1. Prepare a server with the latest updates on it (see “Automatic updates for Forcepoint F1E (Forcepoint DLP Endpoint)” for details).
    2. Select Receive automatic software updates.
    3. Specify the URL of the server you created. The URL must be HTTP (i.e., http://). It cannot be secure HTTP (i.e., https://).
    4. Indicate how often you want endpoint machines to check for updates.
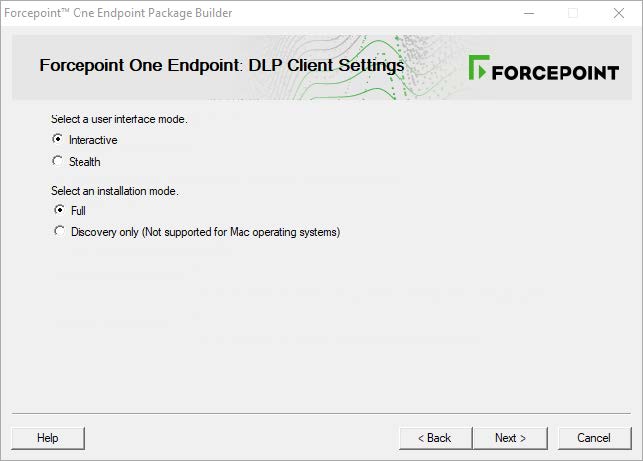
  2. Click Next to show the DLP Client Settings screen:
    Complete the fields as follows:
    User interface mode
    Select from the following 2 options:
    • Interactive: A user interface is displayed on all endpoint machines. Users know when files have been contained and have the option to save them to an authorized location.
    • Stealth: The Forcepoint DLP Endpoint user interface is not displayed to the user. In this mode, users do not know that Forcepoint DLP Endpoint is operating on their machine. The following features are affected in this mode:
      • The Forcepoint DLP Endpoint icon does not display in the task bar. Users could see the Forcepoint DLP Endpoint installation if they check the Windows Control Panel.
      • Users cannot view the client user interface. As a result,they do not have access to the connection status, the Contained Files viewer, the Log Viewer, or the bypass option. (Experienced users can see contained folders and files in the installation path.)

      • Users do not receive pop-up messages.
      • Although administrators can choose Confirm and Encrypt with user password in the Data Security manager as part of an action plan for the endpoint machine, these are not possible enforcement actions. When these options are selected, operations that violate policy are blocked. The Encrypt with profile key action still takes place, however.
      • When a user attempts to access a blocked page, a 404 error message displays rather than a block page.
    Because users do not see any notifications, stealth mode is best reserved for discovery tasks and audit-only policies.

    Note that you must reinstall the endpoint machine and deploy a new profile to switch user interface modes.

    Installation Mode
    Applies to Windows only. Select from the following 2 options:
    • Full: Installs Forcepoint DLP Endpoint with full policy monitoring and blocking capabilities upon a policy breach. All incidents are reported in the Forcepoint Security Manager. Full Mode installation requires a restart of the endpoint machine.
    • Discovery Only: Configures Forcepoint DLP Endpoint to run discovery analysis but not data loss prevention. Discovery Only installation does not require a restart.
  3. Click Next.
    • If you are only creating a Forcepoint DLP Endpoint package, the Save Installation Package screen is shown next. Continue with Global settings.
    • If you are creating a package with another agent, continue with the relevant section.