Remote Filtering Client

Steps

  1. Prepare Remote Filtering Server components as described here.
  2. If you selected Remote Filtering Client on the Select Forcepoint One Endpoint Components screen, the Internal Connections screen is shown after the Installation Path and Firefox Settings screen:
  3. On the Internal Connections screen, enter the internal IP address or hostname and internal Port of each Remote Filtering Server to which this client will connect. Use the > button to move the information to the selected list.
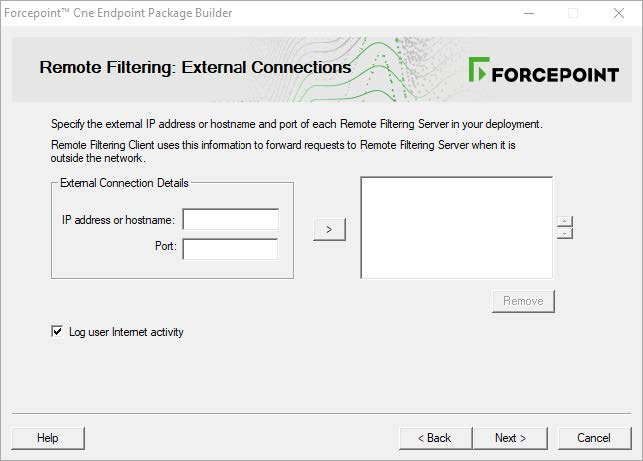
    Remote Filtering Client sends its heartbeat to these IP addresses and ports to determine whether or not it is inside the network. If you have multiple Remote Filtering Server instances, Remote Filtering Client rotates through the list in order until a functioning server is located.

    Remote Filtering Server has a 2-minute inactivity timeout period. If the client connects, and then does not send an Internet request in the timeout period, the server drops the connection. When the next request is made, Remote Filtering Client goes through its list to connect again. This protects server performance by reducing the number of unused connections that might otherwise accumulate.

  4. When you are finished, click Next to show the External Connections screen.
  5. On the External Connections screen, enter the external IP address or hostname and internal Port of each Remote Filtering Server. Use the > button to move the information to the selected list. Indicate whether or not to Log user Internet activity seen by Remote Filtering Client instances installed using this customized installation package.
  6. Click Next to show the Trusted Sites screen.
  7. Use the Trusted Sites list to enter up to 4 URLs, IP addresses, or regular expressions for sites that Remote Filtering Client users can access directly, without being filtered or logged. Click Add to enter a URL, IP address, or regular expression.
  8. Click Next to show the Client Settings screen.
  9. Indicate whether or not to Notify users when HTTPS or FTP traffic is blocked, then, if notifications are enabled, specify how long (in seconds) the message is shown.

    Enter and confirm the Pass phrase used for communication with the Remote Filtering Server. This must match the pass phrase created when the Remote Filtering Server was installed.

  10. Click Next.
    • If you are only creating a Remote Filtering Client package, the Save Installation Package screen is shown next. Continue with Global settings.
    • If you are creating a package with another agent, continue with the relevant section.