For the Forcepoint F1E agent to be able to securely communicate with your Outlook Email client and Forcepoint browser extensions, the Endpoint must be given an SSL identity, and the
client machine must be set up to trust that identity.
Before you begin
You must have OpenSSL installed on your machine.
Forcepoint recommends to create a self-signed certificate that can be bundled with the Endpoint installation package along with the private key used for generating the certificate. This
document explains how to generate this certificate using OpenSSL.
Note: You can follow the steps in this procedure only if you want to create your own SSL identity and do not want to
use the default one provided with the installer. For a full manual installation, the localhost (server.pem) certificate needs to be trusted manually in the
Keychain app. If you use Jamf and the default certificates and do not want to create the unique SSL Identity, you can place the localhost (server.pem)
certificate in Jamf to avoid manual trusting of certificate in Keychain.
Creation of an SSL Identity for your endpoints with OpenSSL uses a configuration file.
Steps
-
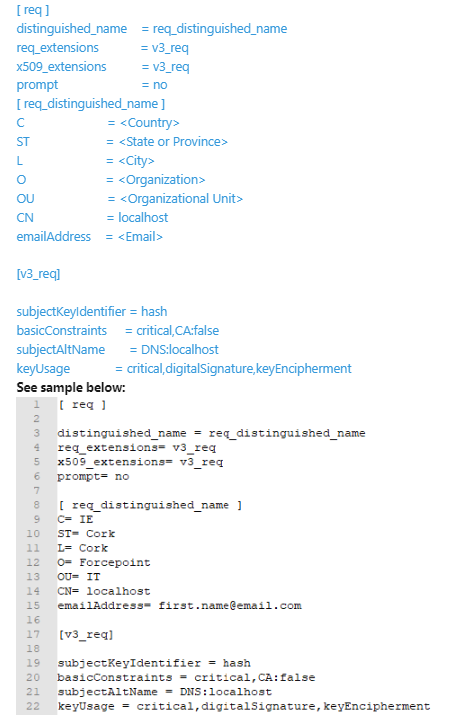
Open the configuration file template.
-
Replace the values in angle brackets (<>) with the appropriate information for your organization:
- Be sure to remove all the angle brackets from the document.
- Country name can only have a maximum of two characters entered.
- Values not in angle brackets are defaults and can be left unchanged.
- The CN must be entered as
localhost and the subjectAltName must be entered as DNS:localhost.
-
Once complete, save the file as localhost.config in a directory of your choice.
-
Open a terminal application and cd to the directory you saved the localhost.config file.
-
Run the following command from the same directory to create the key files:
openssl req -x509 -newkey rsa:4096 -keyout key.pem -out server.pem -sha256 -config localhost.config -days 10950 -nodes
The command creates the following files:
- key.pem: Private key for the SSL identity. This file is deployed to the endpoint clients.
- server.pem: Self-signed certificate for the SSL identity. This file is deployed to the endpoint clients.
-
Run the Websense Endpoint Package Builder on the management server and create new MAC Endpoint installation package.
-
Unzip the new mac Endpoint Installer FORCEPOINT-ONE-ENDPOINT-Mac.zip.
-
To place both PEM files in the same directory of the WebsenseEndpoint.pkg file, copy server.pem and key.pem into the
newly created Endpoint Mac Installer in directory \FORCEPOINT-ONE-ENDPOINT-Mac\EndpointInstaller\.
-
Zip folder back up again.
-
Install the new package on the Mac clients.
- Optional:
If you plan to install the agent via Jamf, then you must convert the certificate to its binary encoded DER format.