Configuring switches from factory default configuration
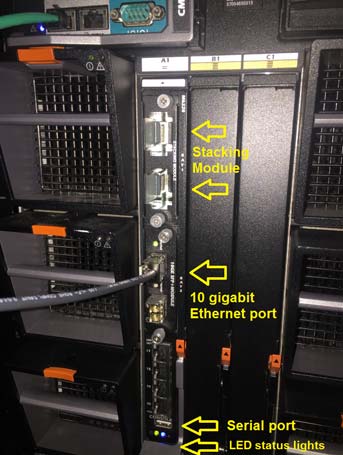
- Insert stacking module into Module Bay 1.

- Insert switches into A1 and A2.

- Connect switch cables:
- Connect A1-xg1 with A2-xg2.
- Connect A1-xg2 with A2-xg1.
- Wait a few minutes and then use one of the following methods to determine which switch is the M6220 stack master switch:
- Identify the master switch by the blue illuminated LED just below the serial console connector.
- SSH to CMC and run the following command.

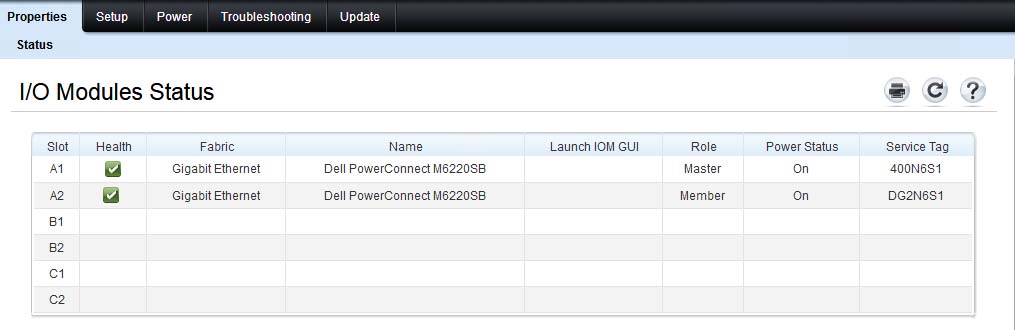
- Check the Role column in the I/O Module Status table in CMC Web UI management.
- Connect to the master switch. From a CMC SSH session, use the connect switch-1 or connect switch-a1 command.
Note:
To connect to the member switch, use the connect switch-2 or connect switch-a2 command from a CMC SSH session. If you are connected to the member switch, the console will print the following message.
Unit 2 - CLI unavailable - please connect to master on Unit 1- Configure spanning-tree (default value is 32768; priority is 57344).
- Add VLAN information (depending on customer
environment).
console#config console(config)#vlan 4000 console(config-vlan4000)#name example console(config-vlan4000)#exit console(config)# - Run the following command for interfaces 1-16 on both
switches.
console#config console(config)#spanning-tree priority 57344 console(config)#interface range gigabitethernet 1/0/1-16 console(config-if)#spanning-tree guard root console(config-if)#switchport mode trunk console(config-if)#switchport trunk allowed vlan all console(config-if)#exit console(config)#interface range gigabitethernet 2/0/1-16 console(config-if)#spanning-tree guard root console(config-if)#switchport mode trunk console(config-if)#switchport trunk allowed vlan all console(config-if)#exit console(config)#exit console#write This operation may take a few minutes. Management interfaces will not be available during this time. Are you sure you want to save? (y/n) y Configuration Saved! - Shut down reserved external interfaces
(17-20)
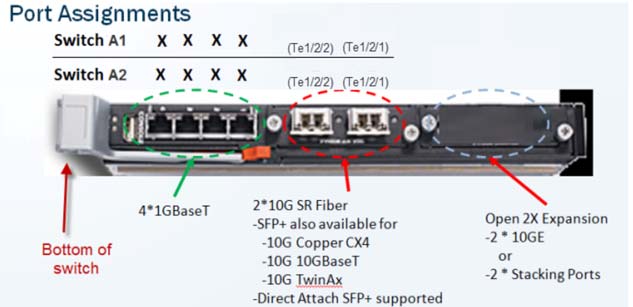
console#config console(config)#interface range gigabitethernet 1/0/17-20 console(config-if)#shutdown console(config-if)#exit console(config)#interface range gigabitethernet 2/0/17-20 console(config-if)#shutdown console(config-if)#exit console(config)#exit console#write This operation may take a few minutes. Management interfaces will not be available during this time. Are you sure you want to save? (y/n) y Configuration Saved! - Create a port channel. In the example below, the uplink ports are 10 gigabit Ethernet ports 1/2/1 and 2/2/1. They use dynamic LAG (static command is channel-group 1
mode on), which is consistent with the other side ports of the uplink
switch.
console#config
console(config)#interface tengigabitethernet 1/2/1
console(config-if-Te1/2/1)#channel-group 1 mode active
console(config-if-Te1/2/1)#exit
console(config)#interface tengigabitethernet 2/2/1
console(config-if-Te2/2/1)#channel-group 1 mode active
console(config-if-Te2/2/1)#exit
console(config)#interface port-channel 1
console(config-if-Po1)#spanning-tree disable
console(config-if-Po1)#switchport mode trunk
console(config-if-Po1)#switchport trunk allowed vlan all
console(config-if-Po1)#exit
console(config)#exit
console#write
This operation may take a few minutes.
Management interfaces will not be available during this
time.
Are you sure you want to save? (y/n) y
Configuration Saved!