Deploying both Forcepoint Email Security and Forcepoint Security Manager together in the Azure cloud
This type of deployment is only available for version 8.5.4 or later.
- Log on to the Azure Marketplace, or use a direct link:
- Forcepoint Email Security v8.5.7 in Azure
- Forcepoint Email Security v8.5.5 in Azure
- Forcepoint Email Security v8.5.4 in Azure
- If you are installing in the Azure Government cloud:
- Log into Azure Government, then click Create a resource.
- In the Search bar, search for and select Forcepoint Email Security.
- Click Create. All other steps are the same as in the Azure portal.
- In the Search bar, type Forcepoint, then select Forcepoint Email Security V8.5.4 or V8.5.5.
- To create a new Forcepoint Email Security solution, click Get it now.
- Review the terms of use and privacy policy, then click Continue to proceed to the Azure portal.
- From the Azure portal, click Create.
The Basics tab displays for configuring the email appliance and Security Manager virtual machine settings.
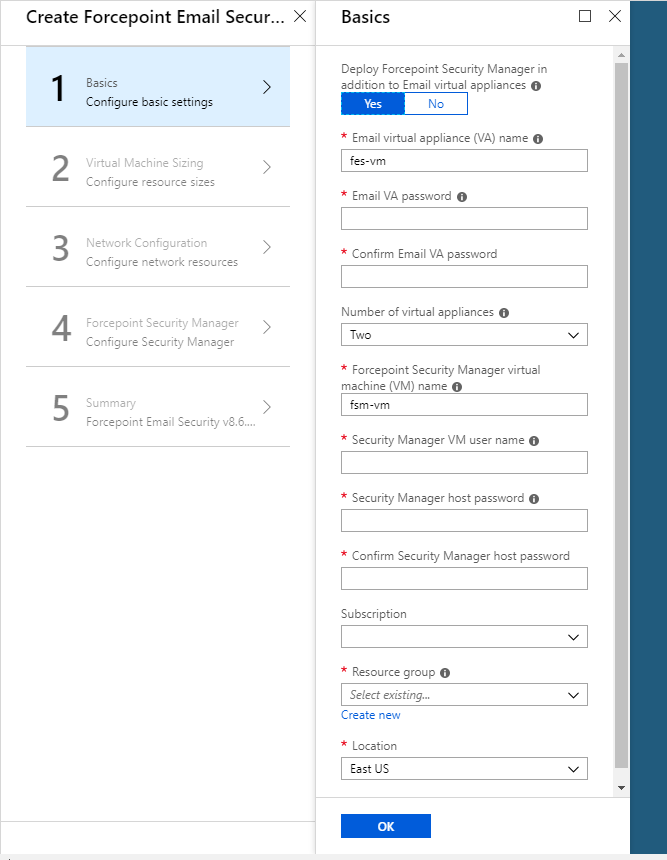
- From Deploy Forcepoint Security Manager in addition to Email virtual appliances, click Yes.
Options display to configure the Security Manager virtual machine in addition to the email appliance.
Click No if you want Security Manager to reside on an on-premises machine. See Deploying Forcepoint Email Security in Azure with Forcepoint Security Manager on-premises.
- In the text field Email virtual appliance (VA) name, enter a name for the Forcepoint Email Security virtual appliance (VA).
The name must be between 3 and 30 characters long and contain only numbers, letters, and hyphens.
- In the text fields Email VA password and Confirm Email VA password, enter and confirm the password for
connecting to the host.
The username is always “admin” on first login to Forcepoint Email Security. Additional accounts can be added later. The password must be a minimum of 12 characters and contain at least one number, one lowercase letter, one uppercase letter, and one special character.
- From the pull-down menu Number of virtual appliances, select the number of VAs to use; between 1 and 8.
We recommend using at least two VAs to ensure high availability. If only one VA is selected at this time, it is not possible to add additional VAs after deployment is complete. If two or more VAs are selected, additional VAs can be added at any point. See Add virtual machines to a Forcepoint Email Security in Azure deployment.
Load balancers are deployed by default when two or more VAs are used.
- In the text field Security Manager virtual machine (VM) name, enter the name of the Security Manager virtual machine (VM).
The name must be between 3 and 15 characters long and contain only numbers, letters, and hyphens.
- In the text field Security Manager VM user name, enter the administrator user name of the Security Manager host.
The name must adhere to Windows specifications for user names.
- In the text fields Security Manager host password and Confirm Security Manager host password, enter and
confirm the administrator password for the Security Manager host.
The password must be between 12 and 128 characters and contain at least one number, one lowercase letter, one uppercase letter, and one special character.
- From the pull-down menu Subscription, select your subscription.
- From Resource group, click Create new and enter a name for the new resource group.
A resource group is a container that holds related resources for an application. It will hold the Forcepoint Email Security VAs and the Forcepoint Security Manager VM. You must create a new resource group; using existing resource groups is not currently supported.
- From the pull-down menu Location, select the location for the VAs and VM.
- Click OK.
The settings are saved and the Virtual Machine Sizing tab displays.
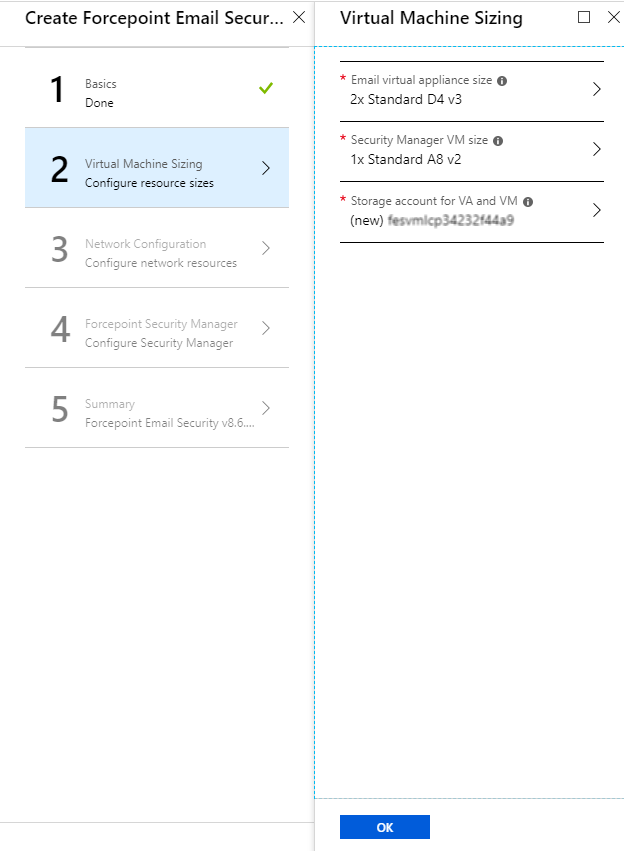
- From Email virtual appliance size, select the size of the VA you will need based on anticipated email volume, then click
Select.
Use the Search fields if you need to find a different size.
- From Security Manager VM size, select the size of the virtual machine you need for Forcepoint Security Manager.
Use the Search fields if you need to find a different size.
- From Storage account for VA and VM, to use an existing storage account, click Use existing and select the
storage account and disk type for the VAs and VM.To create a new storage account,
- Click Create new. The Create storage account tab displays.
- On the Create storage account tab, configure the Name, Account kind, Performance, and Replication settings and click OK. The new storage account is added.
- From the Virtual Machine Sizing tab, click OK.
The settings are saved and the Network Configuration tab displays.
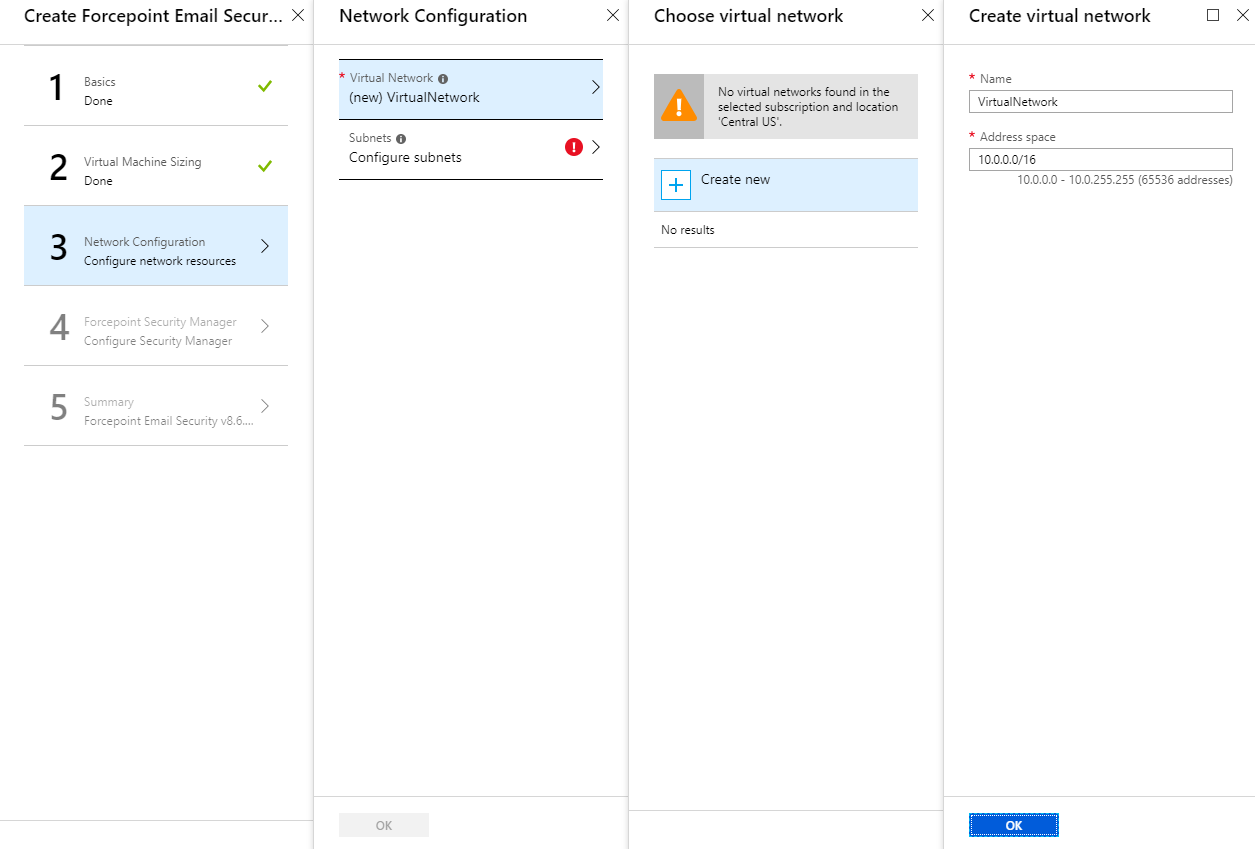
- From Virtual Network, select your existing virtual network or create a new network.To create a new virtual network,
- Click Create New. The Create virtual network tab displays.
- On the Create virtual network tab, configure the Name and Address space.
If you plan to use a remote SQL Server, you must select your existing virtual network, rather than creating a new network. When using a new virtual network, your deployment will fail if you select a remote SQL Server instance in Step 26. This is because the new virtual network has no connection to external components and cannot communicate with the remote SQL Server, which resides in a different virtual network.
- Remote SQL Server 2022 prerequisites for Forcepoint Email Security Gateway deployment:
- Install SQL Server 2022 and verify that the MSSQLSERVER service is in a running state.
- Enable Mixed Authentication Mode on the SQL Server instance. This sets
LoginMode =
                                                                                                2
in the server configuration. - Enable TCP/IP on port 1433 by using SQL Server Configuration Manager.
- Create a SQL login with the sysadmin role assigned. Use these credentials when configuring the Service Catalog UI.
- Enable Windows Remote Management on the SQL VM by running
Enable-PSRemoting
                                                                                                -Force
. Verify that port 5985 is in a listening state. - Configure Windows Firewall to allow inbound TCP traffic on ports 1433 and 5985.
- Ensure that a Windows administrator account exists on the SQL VM.
- Place the Forcepoint Security Manager VM and the SQL VM in the same VNet, or in peered VNets, so that the Forcepoint Security Manager VM can reach the SQL VM by using a private IP address.
- From Subnets, select your existing subnet or create a new network.
The minimum supported size is /28 for both virtual network and subnet. See Requirements.
- From the Network Configuration tab, click OK.
The settings are saved and the Forcepoint Security Manager Configuration tab displays.
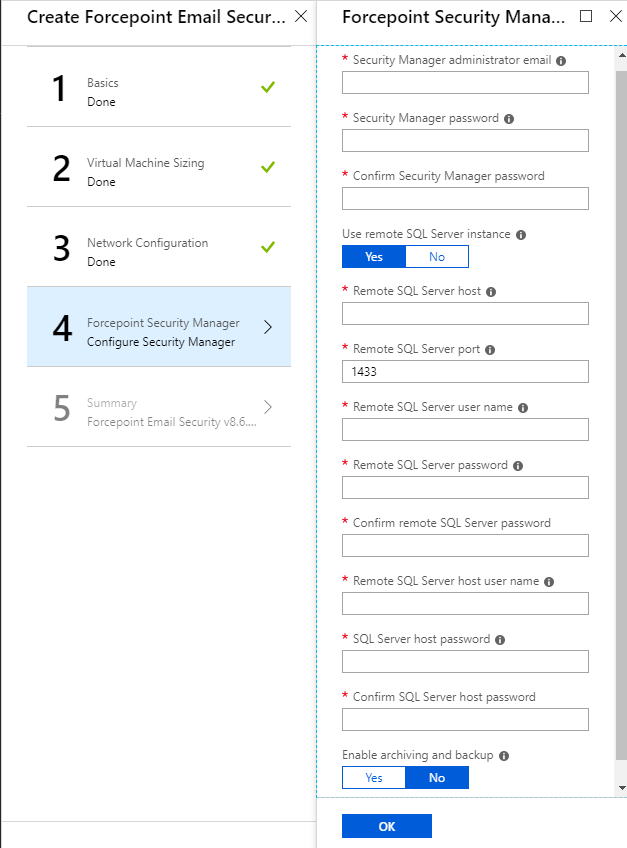
- In the text field Security Manager administrator email, enter the email address of the Forcepoint Security Manager administrator.
- In the text fields Security Manager password and Confirm Security Manager password, enter and confirm the
administrator password.
The password must be between 12 and 256 characters and contain at least one number, one lowercase letter, one uppercase letter, and one special character.
- From Use remote SQL Server instance, click Yes or No.
If you select No, a local SQL Server is used. Text fields display according to your selection.
Verify that in Step 21, you selected your existing virtual network with connection to the remote SQL Server, otherwise your deployment will fail.
- In the text fields, enter the host name, user name, password, and
port for the remote or local SQL Server.
Verify that your SQL Server uses unique host names and that all of your resources are correctly configured for communication with each other.
- From Encrypt connection to SQL Server, click Yes or No.
If you select Yes, an additional field displays for uploading a CA certificate.
If you are using an encrypted connection to a remote SQL Server instance, ensure that the FQDN of your SQL Server is shorter than 64 characters, or configure SQL Server to use a wildcard certificate with a CN shorter than 64 characters. See the knowledge article Configuring the certificate for encrypted SQL Server connection for more information.
If you select No, it is possible to configure the encrypted connection following deployment. See Configuring encrypted connection to SQL Server.
- From Upload CA certificate for SQL Server encryption, click the folder icon and navigate to the certificate
(.cer, .crt, or .pem).
You can use a root CA certificate, or an intermediate CA certificate if using a third-party CA. Ensure that the name of your CA certificate contains no special characters or the upload will fail.
- From Enable archiving and system backup, click Yes or No.
If you select Yes, incident archiving and backup is enabled for Forcepoint DLP. Additional text fields display according to your selection.
- In the text field SQL Server backup UNC path, enter the existing UNC path to the backup directory used by SQL Server.
- In the text field Security Manager backup UNC path, enter the existing UNC path to the backup directory used by Security Manager.
- In the text fields Archive location user name, Archive location password, and Archive location domain, enter the user name, password, and domain for the incident archive directory. The domain is optional.
- Click OK. The settings are saved and the Summary tab displays.
- From the Summary tab, review a summary of the Forcepoint Email Security and Forcepoint Security Manager solution you are building,
then click OK.
To change any configured settings, click one of the completed tabs. You will return to the Summary tab again after completing configuration. Final validation is performed and the Buy tab displays.
- On the Buy tab, review the Forcepoint Terms of Use, EULA, and Privacy Policy.
- To create the Forcepoint Email Security and Forcepoint Security Manager solution in the Azure cloud infrastructure, click
Create.
Forcepoint Email Security is a bring-your-own license VA, so there is no additional Azure Marketplace charge. The system reports that it is creating the solution in the configured network. This process may take between 30 and 50 minutes.