Dynamic Groups
A Dynamic group uses rules to automatically add users based on their profile attributes. When a rule is created, all existing users whose profile attribute matches the rule are immediately added to the group. As users are created or their profiles change, the system automatically re-evaluates them and adds or removes them from the group based on whether they match any rule.
A single group can have both types of members:
- Static members: Users added manually.
- Rule-based members: Users automatically added because their profile attributes match a rule.
Managing group members in the Users section
The Users section displays all group members in a table with the following columns:
| Column | Description |
|---|---|
| Name | The user's username or email address, with an avatar icon. The avatar is highlighted when the user is a member of the group. |
| Identity Source | The origin of the user account: Local, LDAP, SAML, SCIM, or Google Workspace. |
| Added By | Shows how the user became a member. For rule-based members, this shows the rule name. For manually added members, this shows the administrator's name (or "Manual" if the admin is unknown). Non-members show "-". This column is the key way to identify rule-based members. |
| Added | The date the user was added to the group (YYYY-MM-DD format). Users added in the current session but not yet saved show "Pending". Non-members show "-". (This column is hidden by default; enable it using the table's column selector.) |
| Actions | The + Add button (to add non-members) or Remove button (to remove members). The Remove button is disabled (greyed out) for rule-based members because their membership is controlled by rules. It is also disabled for members of externally sourced groups. |
Rules appear in the Add Rules section, located below Role Information.
To create a rule:
- Expand the Add Rules section.
- Enter the rule details:
- Rule Name: A label to identify the rule (e.g., "Finance team"). This is for your reference and does not affect matching.
- Attribute Key: Select a user profile attribute from the dropdown. Attributes include both system attributes (First Name, Last Name, Department, Title, Manager Email, Office Location, etc.) and custom attributes configured for your environment (such as those from Google Workspace).
- Attribute Value: Enter the value to match (e.g., "Finance"). Matching is exact and case-sensitive.
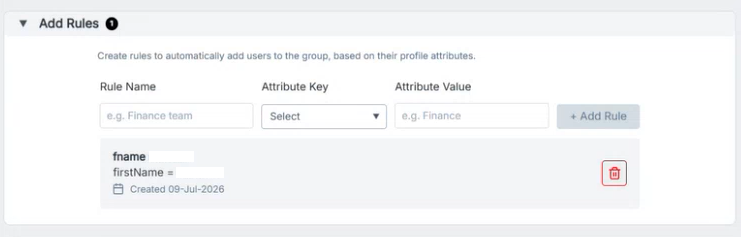
- Click + Add Rule. The button is disabled until all three fields are filled.
The rule is created immediately. All users whose profile attribute exactly matches the value are automatically added to the group. The rule counter increases, and the rule appears in the rules list below.
Filtering the Users list
Use the dropdown filter above the Users table to change the view:
- All Users: Displays every user in your tenant. Users who are members of the group appear with a highlighted avatar. Use this to add more users.
- Group Users Only: Shows only the group's current members. (This is the default view when editing a group.)
- Manually Added Users: Shows only members you added manually. Excludes rule-based members.
- [Rule Name]: Each rule in the group appears as a filter option. Select a rule name to see only the users that rule has added.
Key points for rule-based members
- Cannot be manually removed: The Remove action is disabled for users added by rules.
- Managed through rules: To remove rule-based members, delete the rule or change their profile so they no longer match the rule.
- Identified by rule name: The Added By column shows the rule name, making it easy to identify which rule added a user.