Administrator single sign-on
The Administrator single sign-on feature allows portal users to sign in to the Security Portal using a supported third-party identity provider. When enabled, this feature applies to all contacts.
Before enabling this feature, you must configure the details for your identity provider on the Account > Administrator Single Sign-on page. You must also configure your third-party identity provider to provide the cloud portal with sign-on authentication for your administrators.
To configure administrator single sign-on:
Steps
- Go to Account > Administrator Single Sign-on.
- Mark Use identity provider for administrator single sign-on.
- From the Identity provider drop-down, select SAML 2.0 Compliant Identity provider.
-
To enable your identity provider to work with administrator single sign-on, you must provide metadata from your product.
- If you select URL, locate the URL of your identity provider’s metadata and enter it in the field provided.
- If you select File upload, click Browse to locate the exported metadata file from your identity provider.
If you have previously uploaded a metadata file, the file name and date and time of upload are displayed on the page.
-
Use the links provided in Download Links to get the details needed to fully configure administrator single sign-on.
In order for the cloud portal to talk to your identity provider, you must upload cloud service SAML metadata to your product. Click the Metadata link to download this data file.
-
Click Save.
When you click Save, the specified metadata source is validated. If it is found to be invalid, the cloud portal displays an error and restores the previous configuration. This means:
- Reverting to the previous metadata source if one was configured
- Disabling the Use identity provider for single sign-on check box if you are configuring single sign-on for the first time.
-
Once you have completed the setup on this page, you must do the following to complete single sign-on activation:
- Add the downloaded SAML metadata file to your identity provider.
-
Select the required Login option to enable SSO as an administrator authentication mechanism. See Login options for more information
Important:
When using the SSO related login options, you must access the portal with the following link https://portal.bitglass.com/accounts/login/.
When configuring your identity provider for administrator single sign-on, use the following URL to obtain the Forcepoint metadata:
https://admin.forcepoint.net/login/saml.xml
Note that this metadata source is different from the metadata source for end-user single sign-on provided on the Web > End User Single Sign-On page.
You can configure your identity provider to fetch this metadata dynamically using this URL, or save the page as an XML file, and upload it to your identity provider.
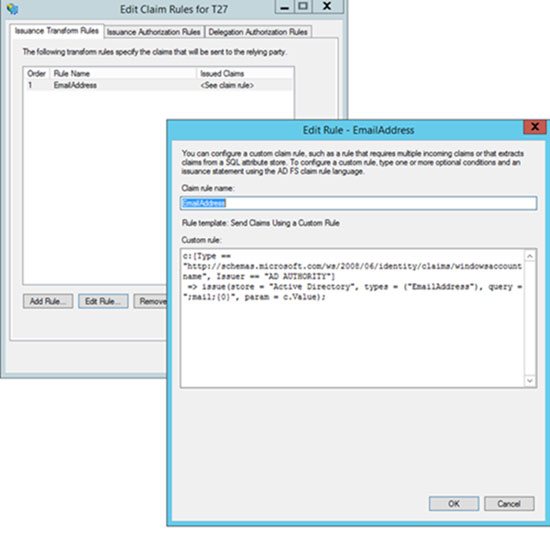
Configure your identity provider with a custom claim for a relying party trust. Do not Configure your identity provider with an existing claim rule template. If you are using ADFS as the identity provider, configure custom claims to send EmailAddress or domain to the Forcepoint service provider. The attribute names must exactly match those shown in the sample below for custom claim configuration.
For Email:
c:[Type == http://schemas.microsoft.com/ws/2008/06/
identity/claims/windowsaccountname, Issuer == "AD
AUTHORITY"]
=> issue(store = "Active Directory", types =
("EmailAddress"), query = ";mail;{0}", param = c.Value);

For Name ID:
c:[Type == http://schemas.microsoft.com/ws/2008/06/
identity/claims/windowsaccountname, Issuer == "AD
AUTHORITY"]
=> issue(Type = "NameID", Value = c.Value);