Configuring IPsec tunnels
Configure primary and secondary IPsec tunnels and associate the IKE gateway and tunnel interface.
Steps
- Navigate to Network > IPsec Tunnels > Add.
-
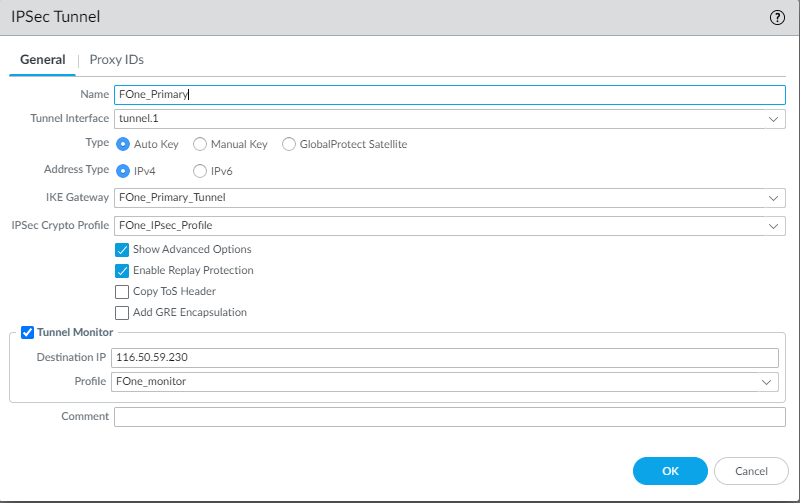
To create a primary IPsec tunnel, enter the following details:
- Enter an appropriate IPsec tunnel Name.
- Select the primary Tunnel Interface that you have created.
- Select Auto Key as Type to use an automatically generated security key.
- Select the IPv4 option as Address type as Forcepoint ONE SSE supports only IPv4.
- Select the primary IKE Gateway that you have created.
- Select the IPSec Crypto Profile that you have created.
- To enable the tunnel monitoring, select the Tunnel Monitor checkbox.
-
Enter the monitoring IP 116.50.59.230 in Destination IP.
You can obtain the Monitoring IP from Forcepoint ONE SSE by navigating to the Analyze > Tunnels > Setup Info dialog of the primary or secondary IPsec tunnel.
- Select the monitoring Profile that you have created.
-
To configure the primary IPsec tunnel with entered details, click OK.

-
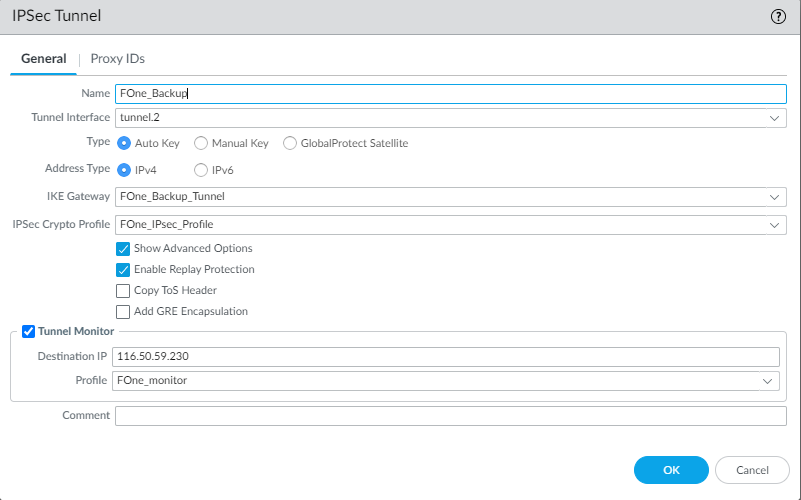
To create a secondary IPsec tunnel, enter the following details:
- Enter an appropriate IPsec tunnel Name.
- Select the secondary Tunnel Interface that you have created.
- Select Auto Key as Type to use an automatically generated security key.
- Select the IPv4 option as Address type as Forcepoint ONE SSE supports only IPv4.
- Select the secondary IKE Gateway that you have created.
- Select the IPSec Crypto Profile that you have created.
- To enable the tunnel monitoring, select the Tunnel Monitor checkbox.
-
Enter the monitoring IP 116.50.59.230 in Destination IP.
You can obtain the Monitoring IP from Forcepoint ONE SSE by navigating to the Analyze > Tunnels > Setup Info dialog of the primary or secondary IPsec tunnel.
- Select the monitoring Profile that you have created.
-
To configure the secondary IPsec tunnel with entered details, click OK.

- Commit the configuration.
-
Verify that the primary and secondary IPsec tunnels come up by navigating to Network > IPsec Tunnels.
