Customers can setup selective scanning for Microsoft 365 to gain visibility into data in OneDrive, SharePoint, and Calendar/Emails.
Steps
-
Navigate to .
-
Click the API Setup link to go to the selective scanning setup page.

The Selective Scanning page
opens.
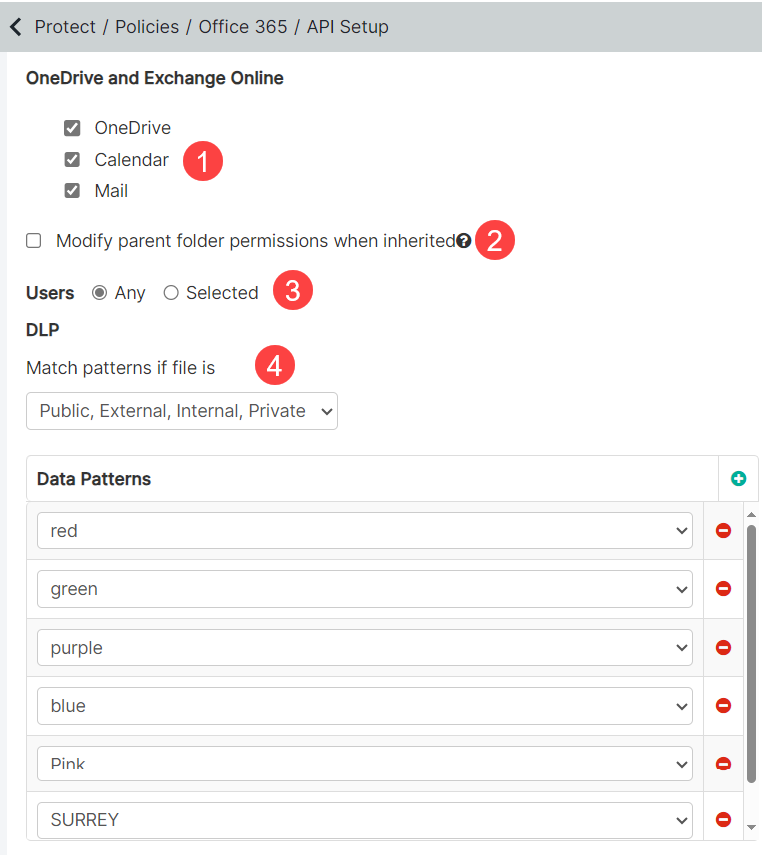
The top section allows you to
configure settings for scanning OneDrive, Calendar, and Mail and the bottom section allows you to configure settings for scanning SharePoint sites.
-
On the top section:
-
Select which parts of Microsoft 365 to include in the scan.
- OneDrive: Scan OneDrive for data at rest based on which user/group and identify the configured sharing status or data pattern. Files scanned
in OneDrive can trigger policy actions detailed below on the "Cloud Policy Setup" section.
- Mail/Calendar: Forcepoint Data Security Cloud | SSE will scan calendars and mail to provide
visibility into sensitive content (text within both the subject/body and/or attachments) based on user/group and matching share status/data patterns. Scans are for
visibility only.
-
Select the Modify parent folder permissions when inherited checkbox to remove the share permissions of the parent folder if a file matches a remove
sharing policy and the share is inherited from a parent folder. To understand the behavior of unshared file in different situations, refer to M365 Remove Sharing Behavior.
-
Set up the API to scan only a subset of users. Selecting Any under Users includes scanning of all users' files in your
corporate account.
You can include or exclude a specific group of users. However, those user groups should be present on the page. For creating users and user groups in
Forcepoint Data Security Cloud | SSE, refer to
Understanding User and
Groups.
- When no groups are added in the included group and excluded groups are selected, all users are scanned except the ones in the excluded group.
- When no groups are added in the excluded group and included groups are selected, all users belonging to the included group are scanned.
- When both included and excluded groups are selected, all users belonging to the included group except the ones belonging to the excluded group are scanned.
-
Select DLP Patterns created under to match on depending on the sharing status of the files.
For example, selecting Match patterns if file is a Public, External, Internal and selecting DLP
Patterns indicates that Forcepoint Data Security Cloud | SSE will scan all public, external, and internal files in your corporate account for
DLP patterns matching what was selected.
Note: Adding a DLP pattern on the API setup page or adjusting a DLP pattern that exists on the API setup page will initiate a new scan to rescan older files for the new
pattern match.
Important: You cannot configure data patterns alongside Forcepoint DLP data pattern. Refer to
Configuring FSM controlled policies for CASB and SWG channels to enable the Forcepoint DLP data pattern.
-
On the bottom section:
-
You can choose to include attachments inside of lists as part of the scan.
-
Select the Modify parent folder permissions when inherited checkbox to remove the share permissions of the parent folder if a file matches a remove
sharing policy and the share is inherited from a parent folder. To understand the behavior of unshared file in different situations, refer to M365 Remove Sharing Behavior.
-
List which sites you want to include in the scan or which sites you wish to exclude from your scan.
-
The DLP section allows you to configure the type of content you wish to gain visibility into such as sharing status and matching data pattern.
For example, selecting Match patterns if file is a Public, External, Internal and selecting DLP
Patterns indicates that Forcepoint Data Security Cloud | SSE will scan all public, external, and internal files in your corporate account for DLP patterns matching what was selected.
Note: Adding a DLP pattern on the API setup page or adjusting a DLP pattern that exists on the API setup page will initiate a new scan to rescan older files for the new
pattern match.
Important: You cannot configure data patterns alongside Forcepoint DLP data pattern. Refer to
Configuring FSM controlled policies for CASB and SWG channels to enable the Forcepoint DLP data pattern.
-
Once your settings are configured and you Save.
The first scan will kick off to scan for the particular sensitive data.
