Initial agent install
You can install the Forcepoint F1E agent manually in your macOS.
Steps
-
From the mac packages, copy FORCEPOINT-ONEENDPOINT-Mac.zip to the endpoint machine, then double-click the file to unzip the installation package.
macOS automatically creates a directory named EndpointInstaller, which contains a file called WebsenseEndpoint.pkg and the generate_root_ca tool.Note: You may need to modify the generate_root_ca permissions so you can double click the generate_root_ca as an executable file. To do this, open the folder where the generate_root_ca is located and run
chmod
                            777 generate_root_ca
in the terminal. -
To run the generate_root_ca tool, open the folder where the generate_root_ca is located and run generate_root_ca in
the terminal.
The _ca.cer certificate and the fpnpd.dat file generates.Note: After running the generate_root_ca tool, the installer folder will have two certificates, ca.cer and _ca.cer. These are for different purposes and only the _ca.cer has to be installed manually in the Keychain.
-
Add the _ca.cer certificate file into the keychain and trust it.
Note: If you encounter certificate issues, you should remove and re-trust the root CA. Begin by opening keychain, locate the FP root CA certificate and remove it. Restart the device to apply the changes and after restart, open the key chain and trust the certificate again.
-
If you are deploying a Forcepoint DLP Endpoint package, add the private key file key.pem and the certificate file server.pem to the
EndpointInstaller folder.

- To start the installation process, double-click WebsenseEndpoint.pkg.
- Click Continue, and agree to the license agreement.
- Click Install.
-
To install the software, enter a user name and password for a user with administrator rights.
A message appears stating to use a new network extension.
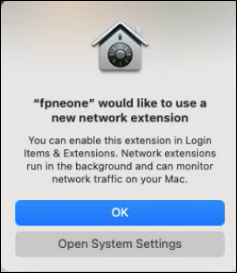
Note: If you are installing Forcepoint DLP Endpoint v21.12 or later on macOS 13 (Ventura) or macOS 14 (Sonoma), message appears for you to enable full disk access (FDA) for four new processes. (The instructions here are explained with reference to macOS 15 Sequoia. Follow the similar instructions for other operating systems).
-
To install the system extensions, do the following:
- Click Open System Settings or navigate to General > Login Items & Extensions > Network Extensions.
-
Turn on fpneone.
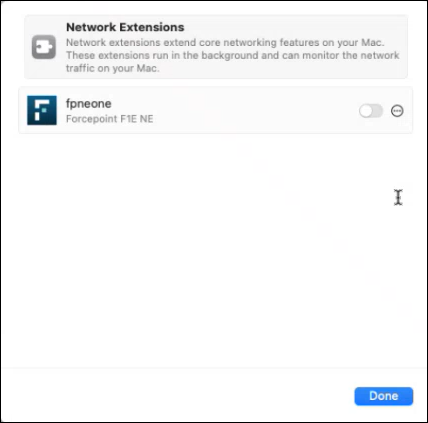
The System Extensions window opens. -
Enter password, and then click OK.
A message appears stating that the Forcepoint F1E NE App would like to add proxy configurations.
-
Click Allow.

- Click Done.
-
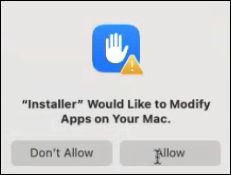
To allow the installer to modify the applications on your Mac, click Allow.
-
To grant Full Disk Access(FDA) access, navigate to Privacy & Security > Full Disk Access, and do the following.
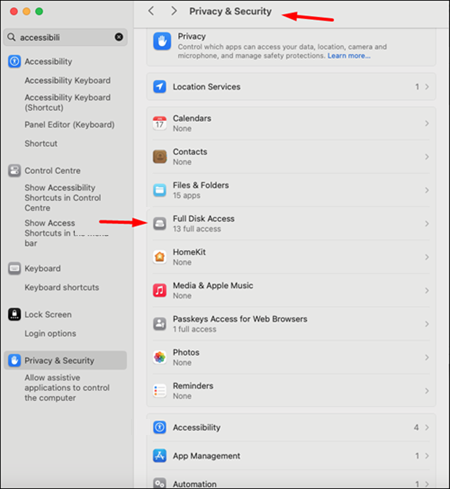
-
Click the
 button, and navigate to Library > Application Support > Websense Endpoint > DLP, select wsdlpd, and then click Open.

Verify that wsdlpd is included in the list and selected.
-
Click the
 button and navigate to Library > Application Support > Websense Endpoint > EPClassifier, select EndPointClassifier, and then click Open.
Verify that EndPointClassifier is included in the list and selected.
-
Click the
-
To grant accessibility, navigate to Privacy & Security > Accessibility, and do the following.
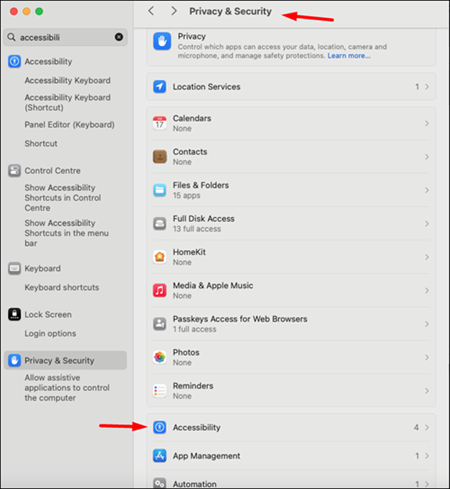
-
Turn on ESDaemonBundle, Websense Endpoint Helper, and AEServer.

-
To add AEServer in Privacy & Security > Accessibility, click the
 button and navigate to System > Library > Frameworks > CoreServices.framework > Versions > A > Frameworks > AE.framework > Versions > A > Support > AEServer.
-
Close the Privacy & Security window.
Note: If you are deploying Forcepoint DLP Endpoint using Jamf, you can enable FDA for these processes using a configuration file.
-
Turn on ESDaemonBundle, Websense Endpoint Helper, and AEServer.