Deploy using certificate-based authentication (SCEPman)
This section explains how to deploy the Forcepoint Mobile Endpoint Agent using Microsoft Intune, including adding the application, configuring certificate and VPN profiles, and assigning the required settings to manage iOS and iPadOS devices.
Steps
-
Step 1: Configure Mobile Endpoint Agent application.
-
Select iOS store app from the App type drop-down and click Select.

-
On the Add App page, click Search the App Store and search for Forcepoint Mobile. Then select the
application.

-
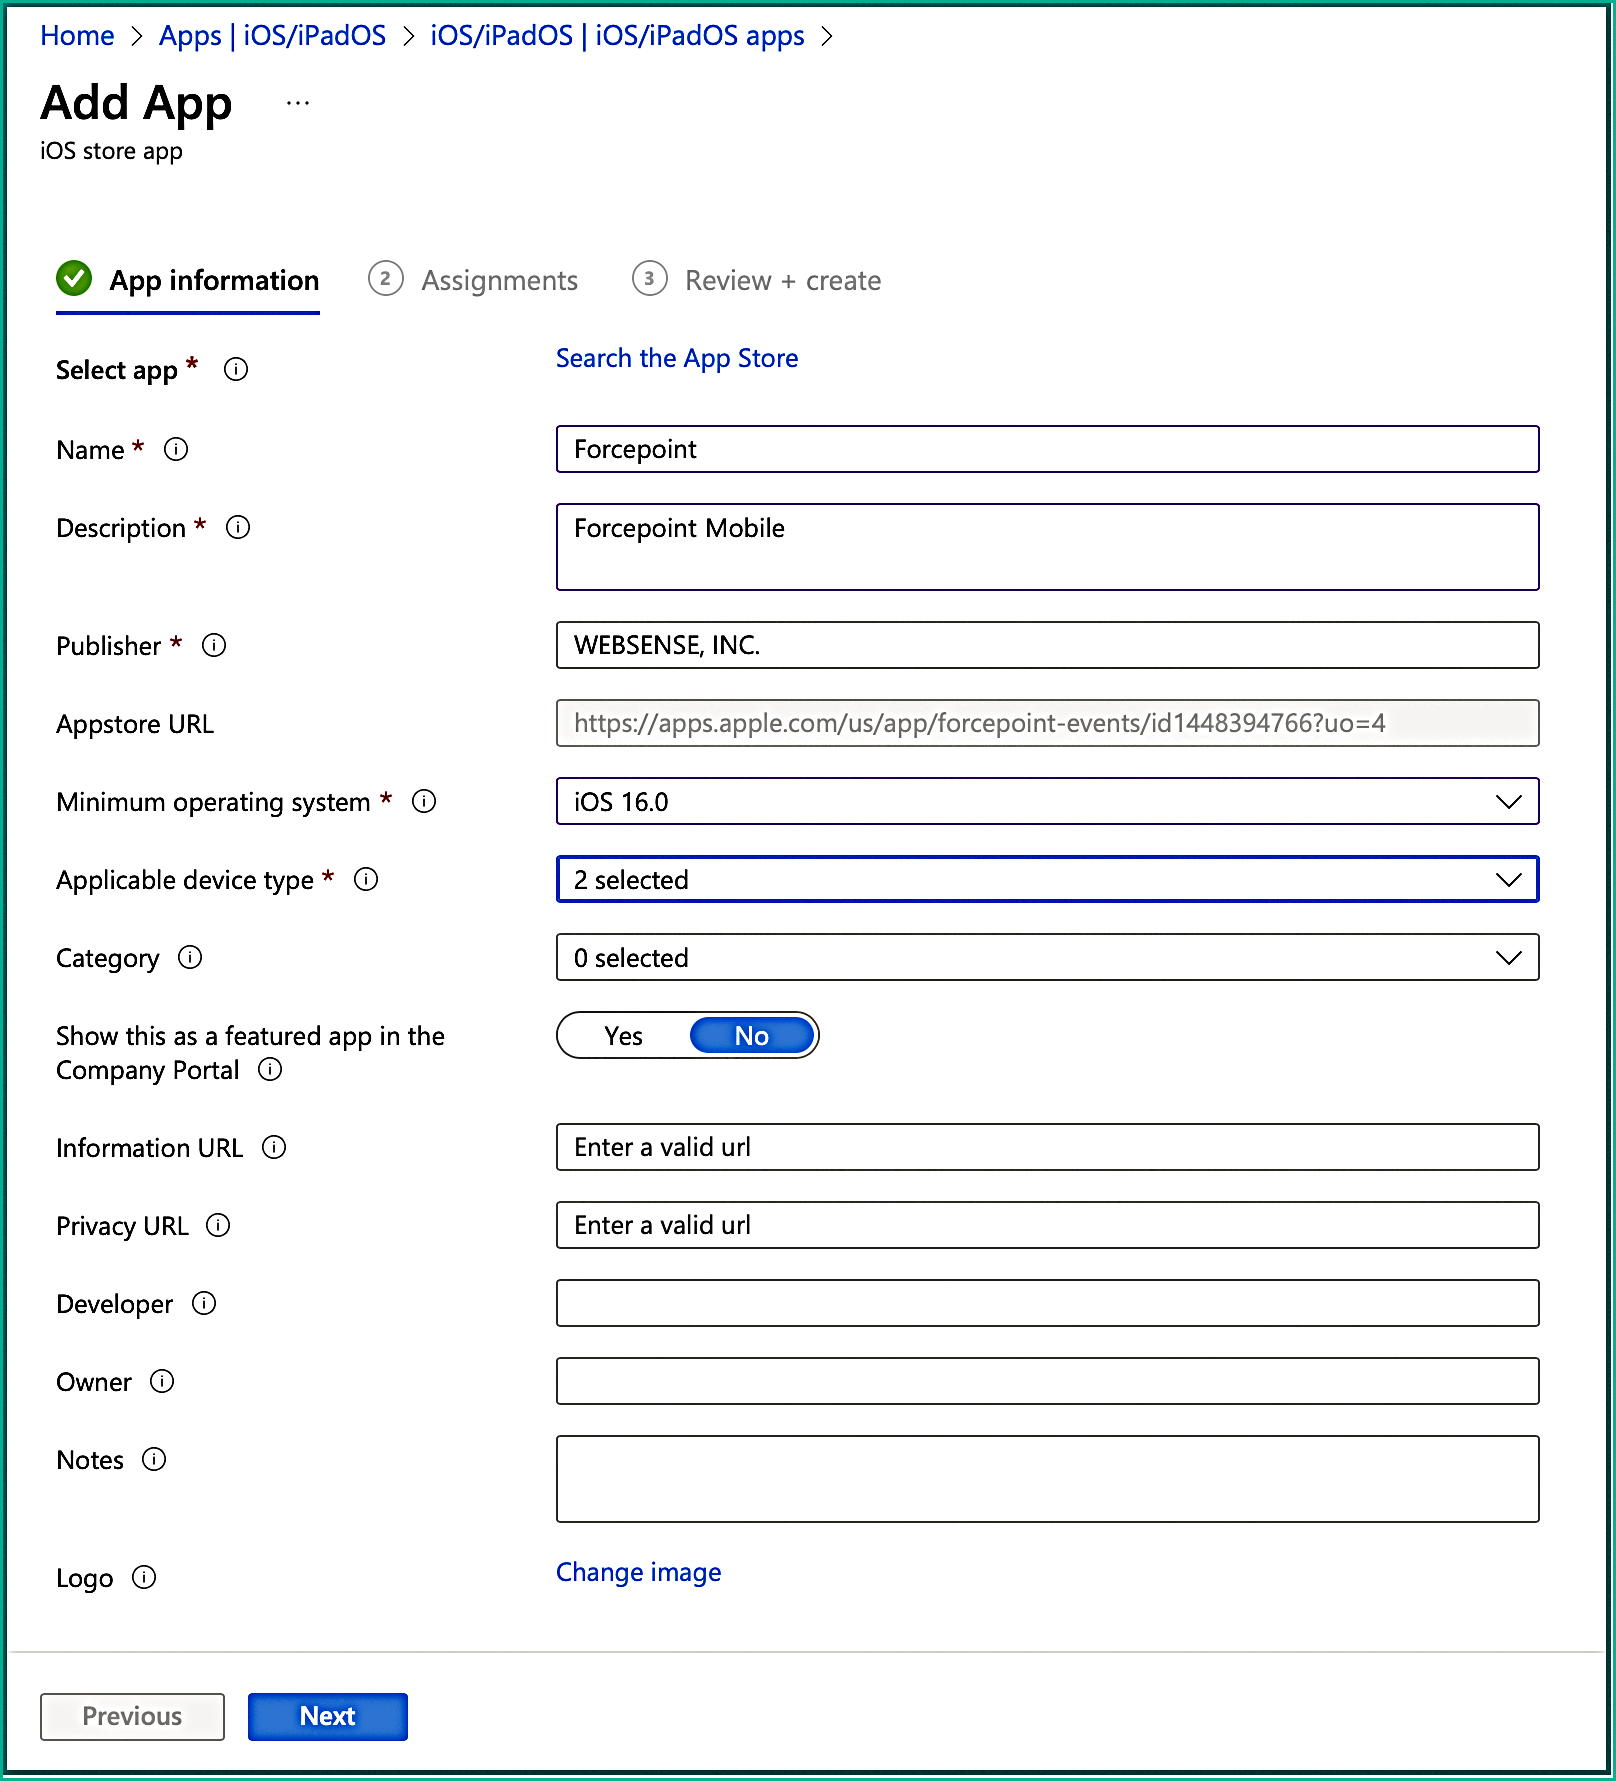
On the App Information tab, you must populate the app metadata fields such as the name, description, publisher, applicable device type, and minimum
operating system. You are only required to fill out the mandatory fields and click Next.
Following is an example of information that you can enter in the mandatory fields:
-
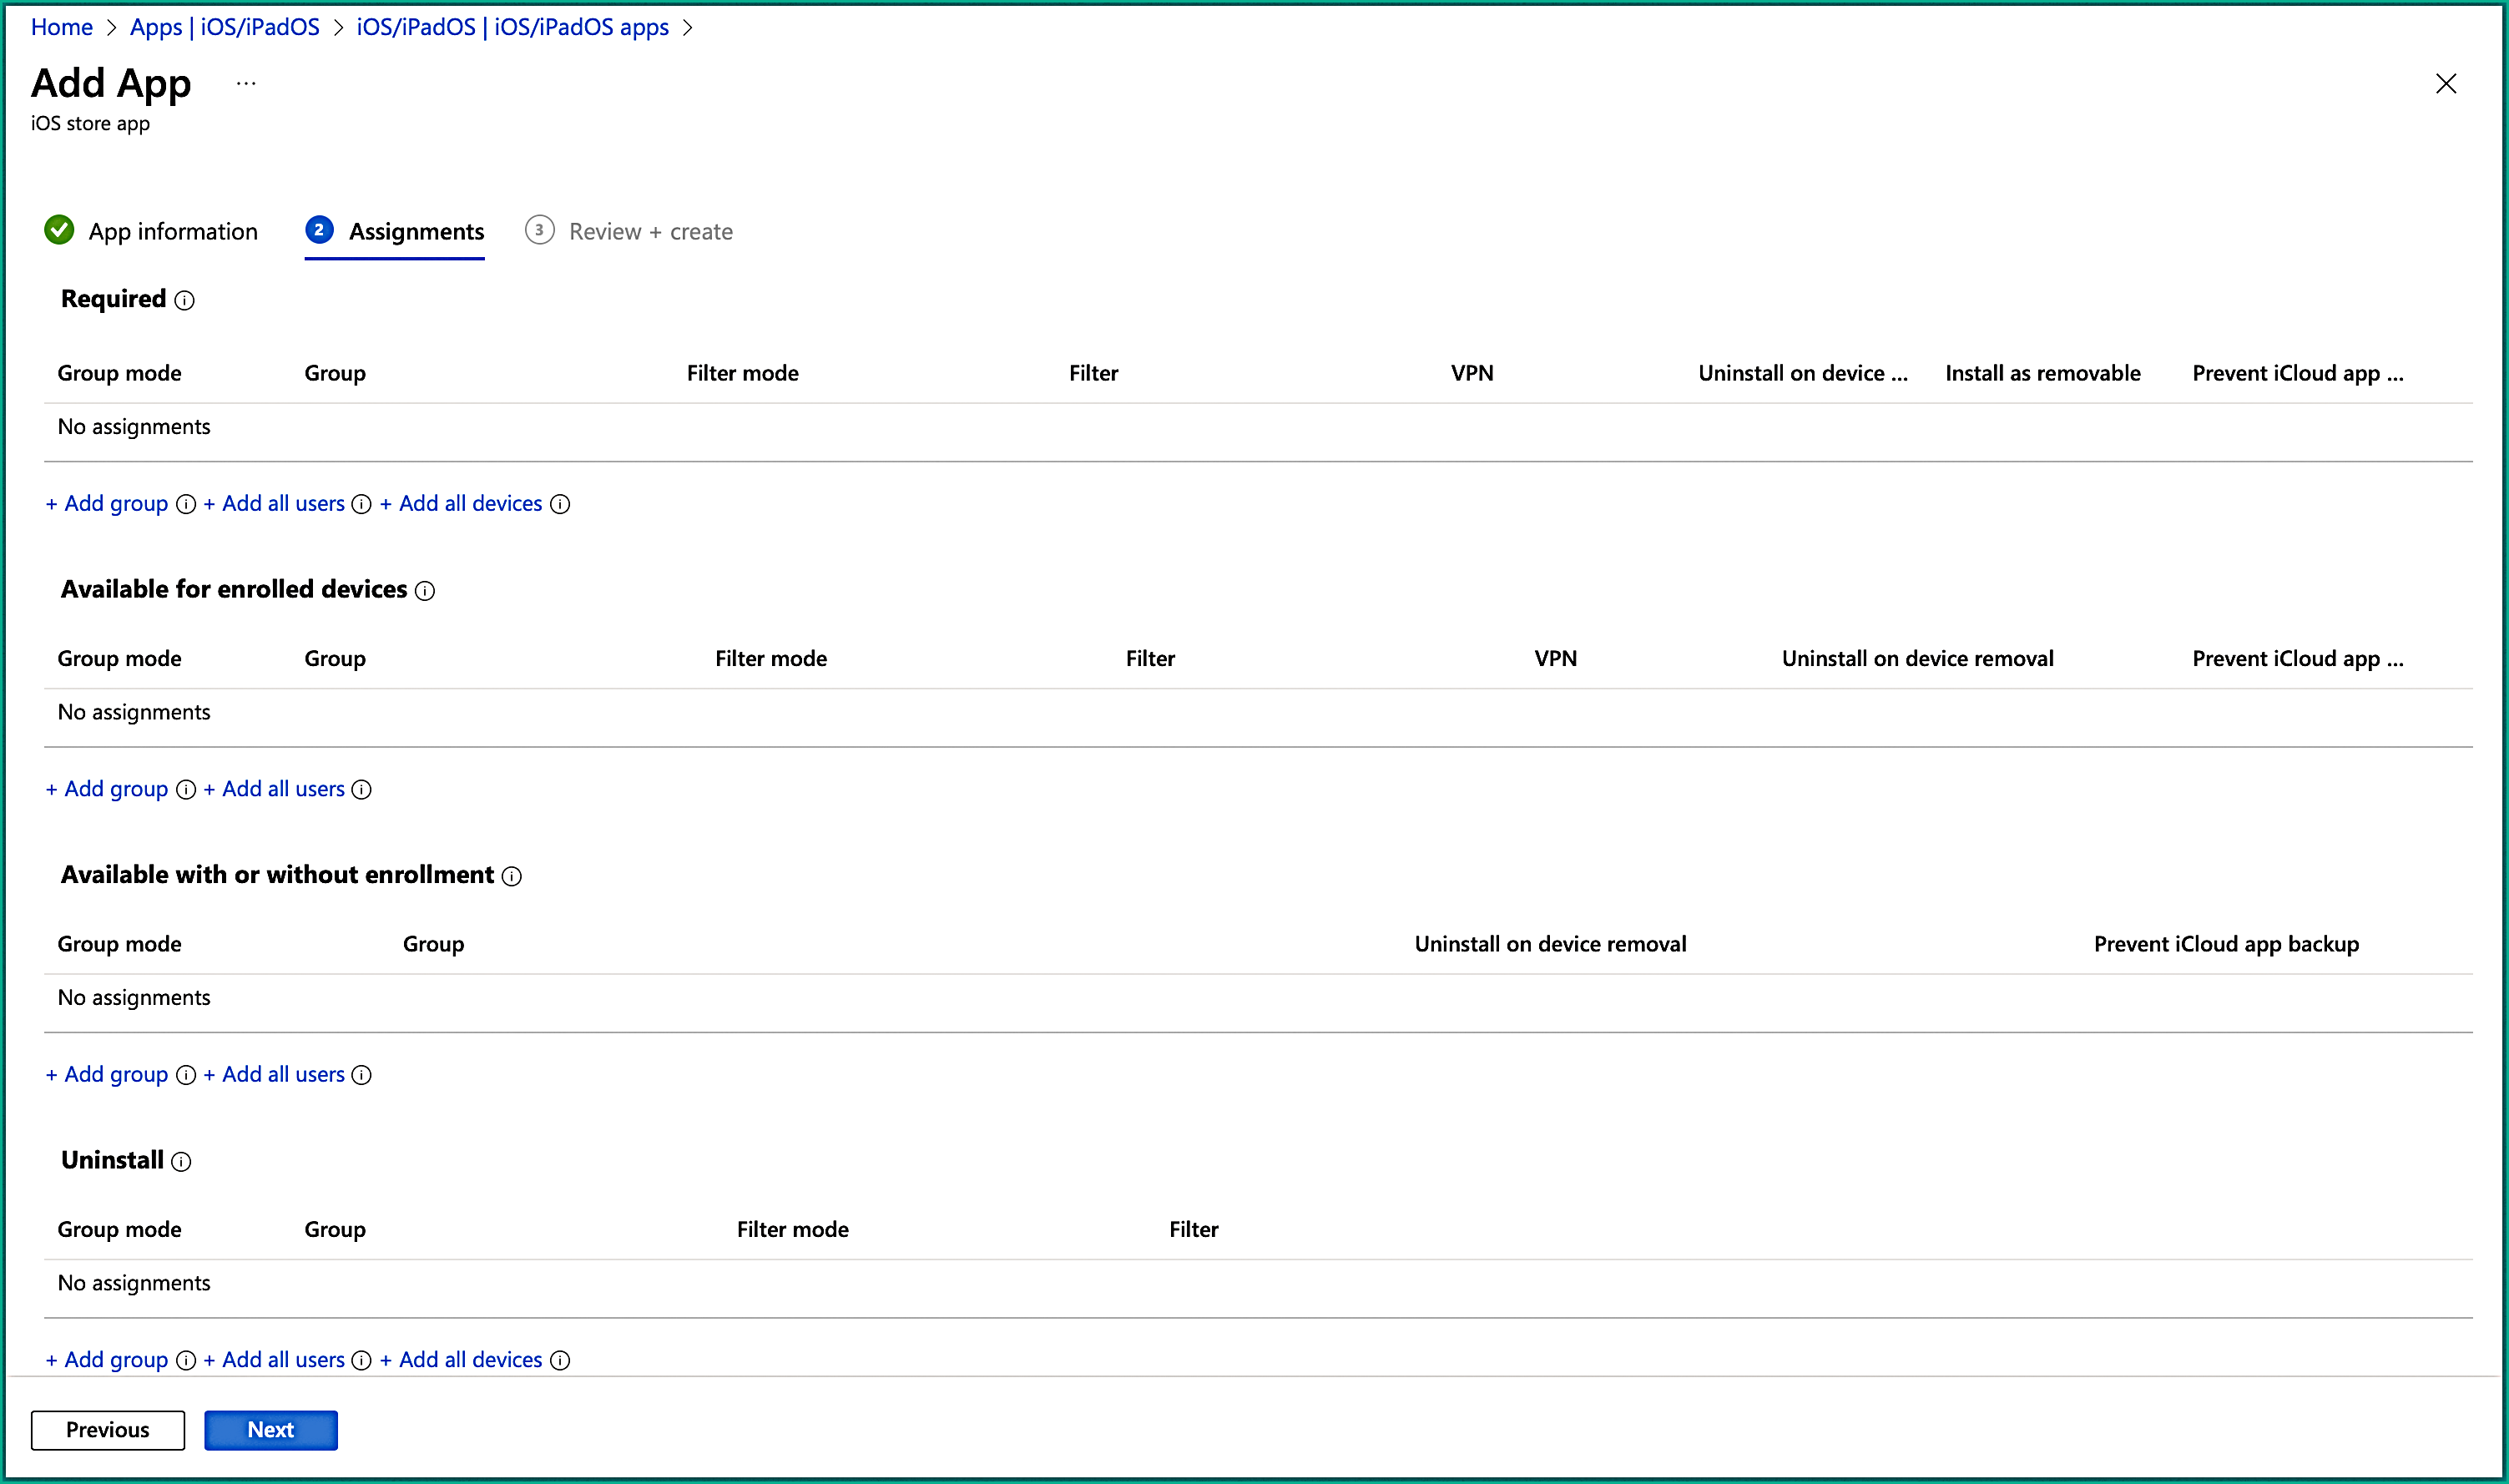
On the Assignment tab, under the Required section, choose groups that will have the solution force installed. This can be a
user group, device group, all users, or all devices. Then click Next.
-
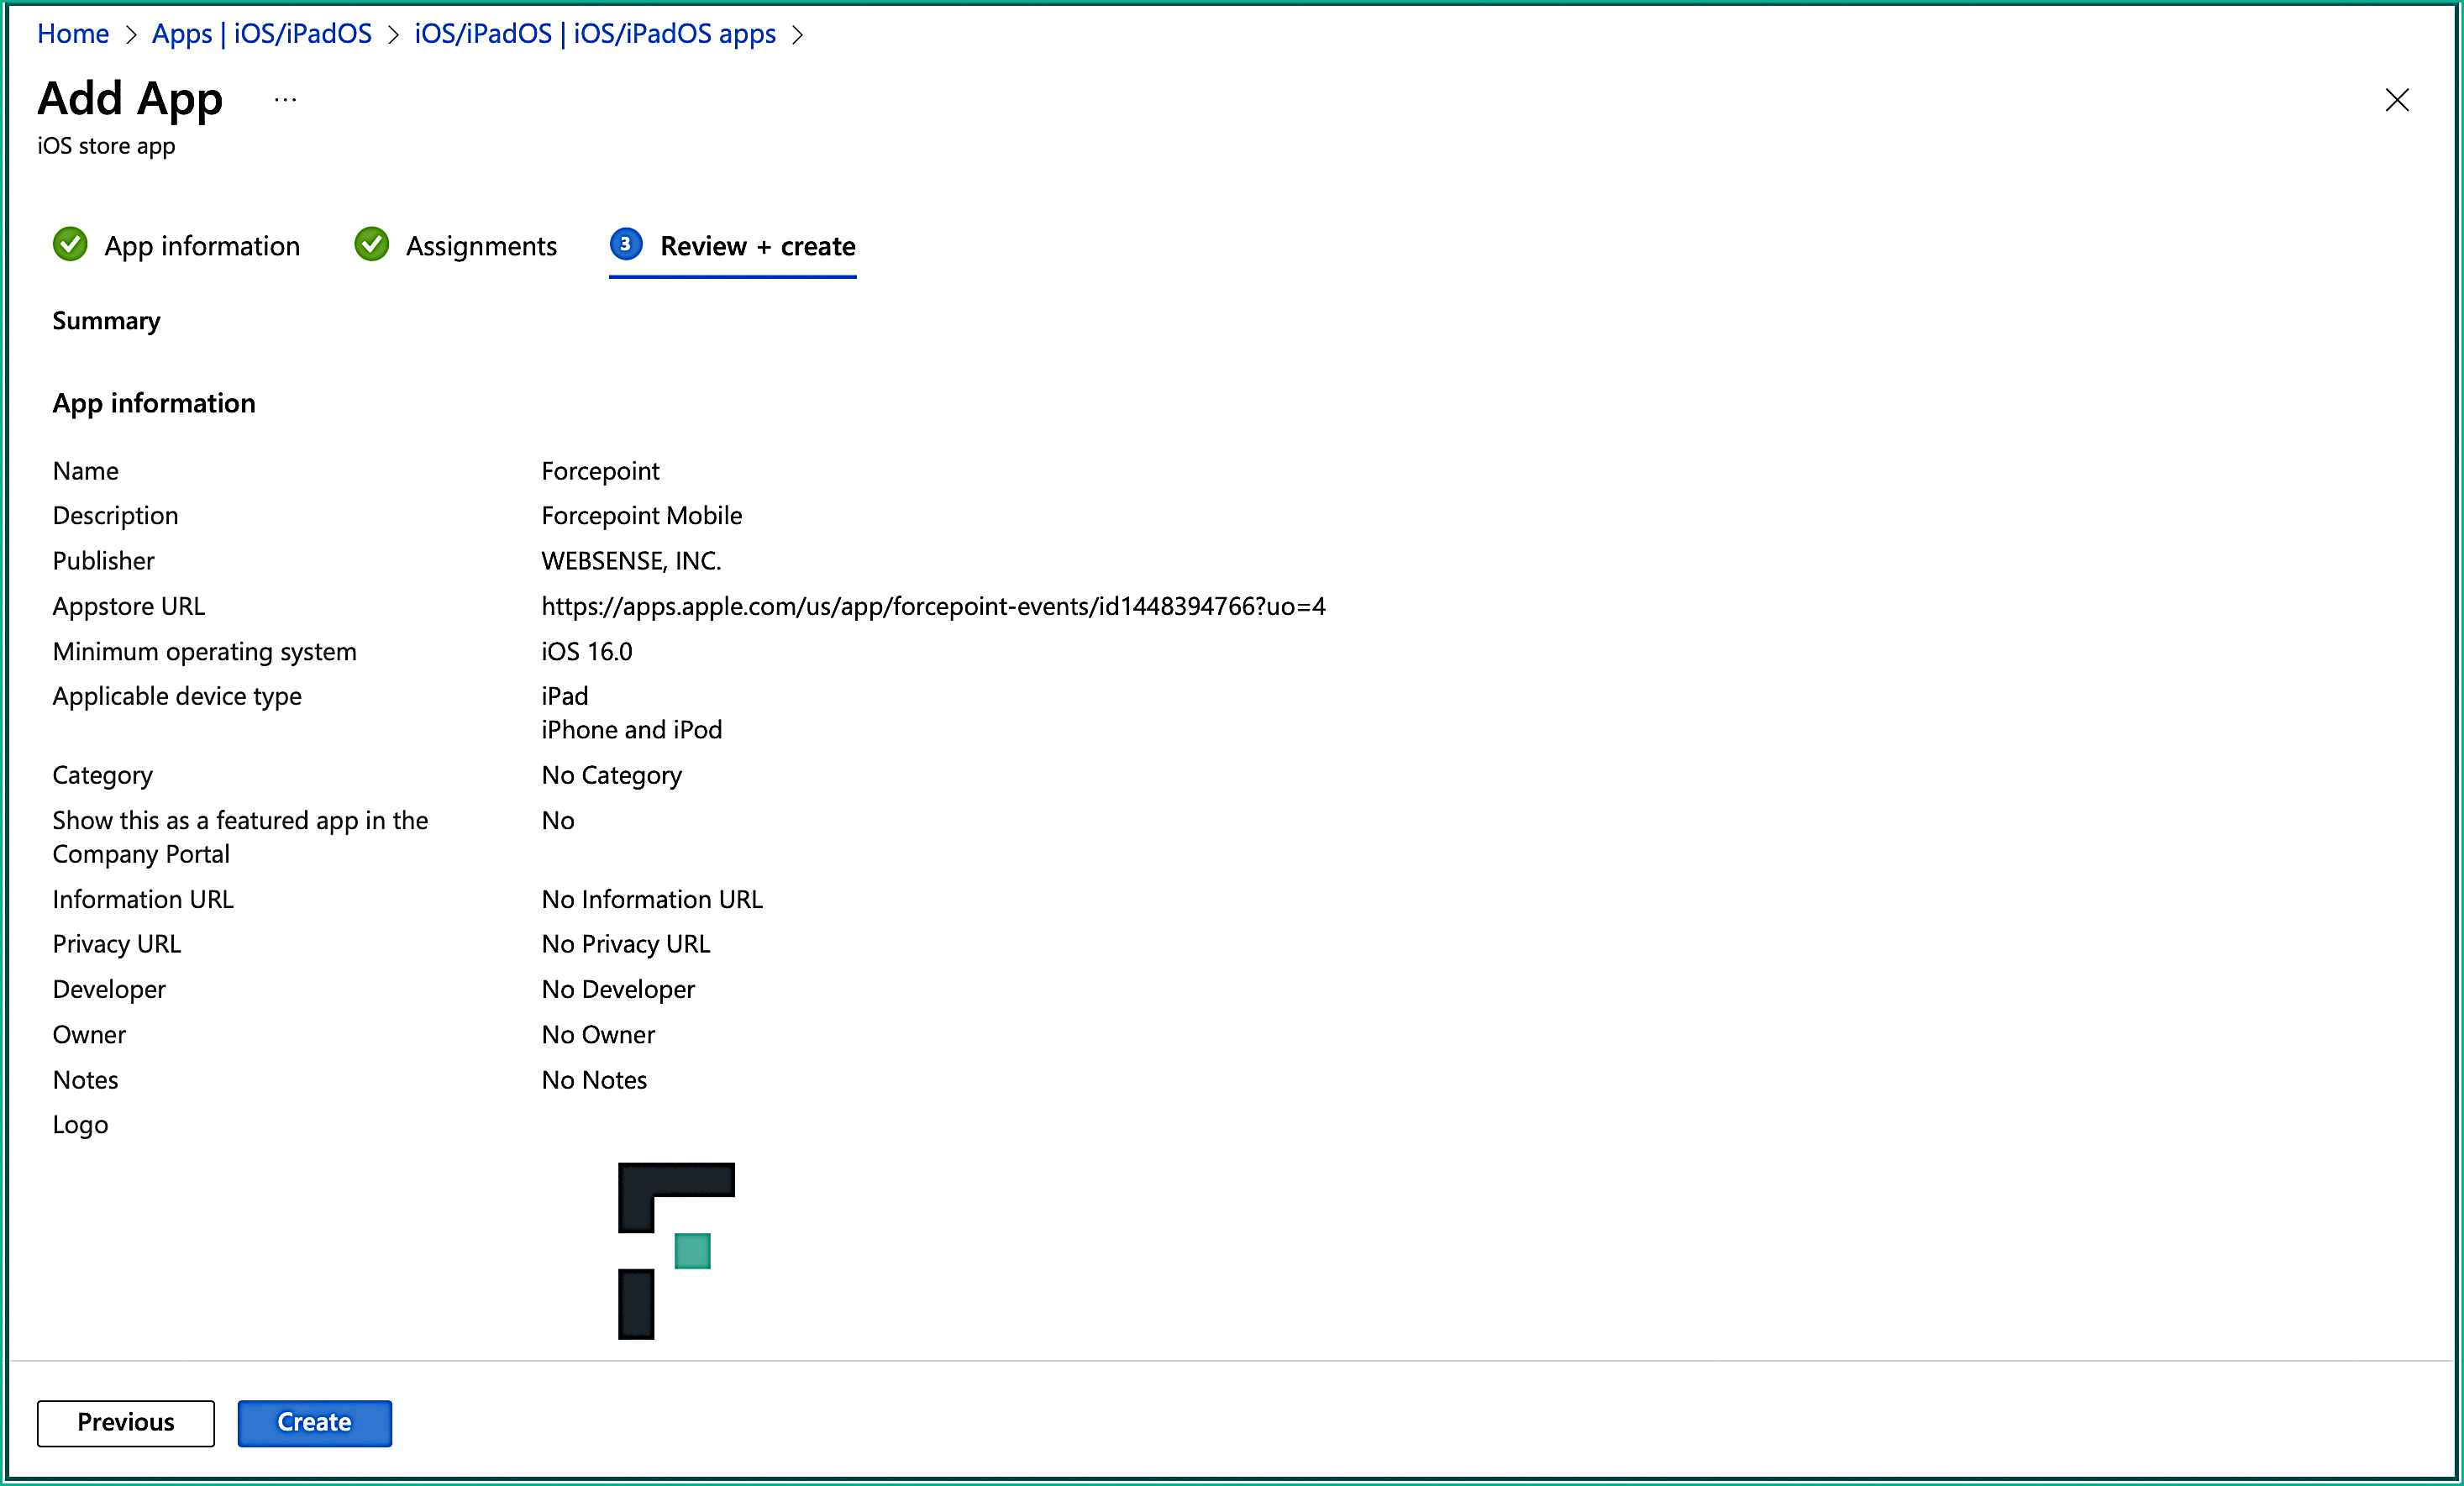
On the Review + create tab, you can confirm the settings you entered. Hitting Create will then upload the application.
-
Select iOS store app from the App type drop-down and click Select.
-
Step 2: Configure the Trusted Certificate profile.
-
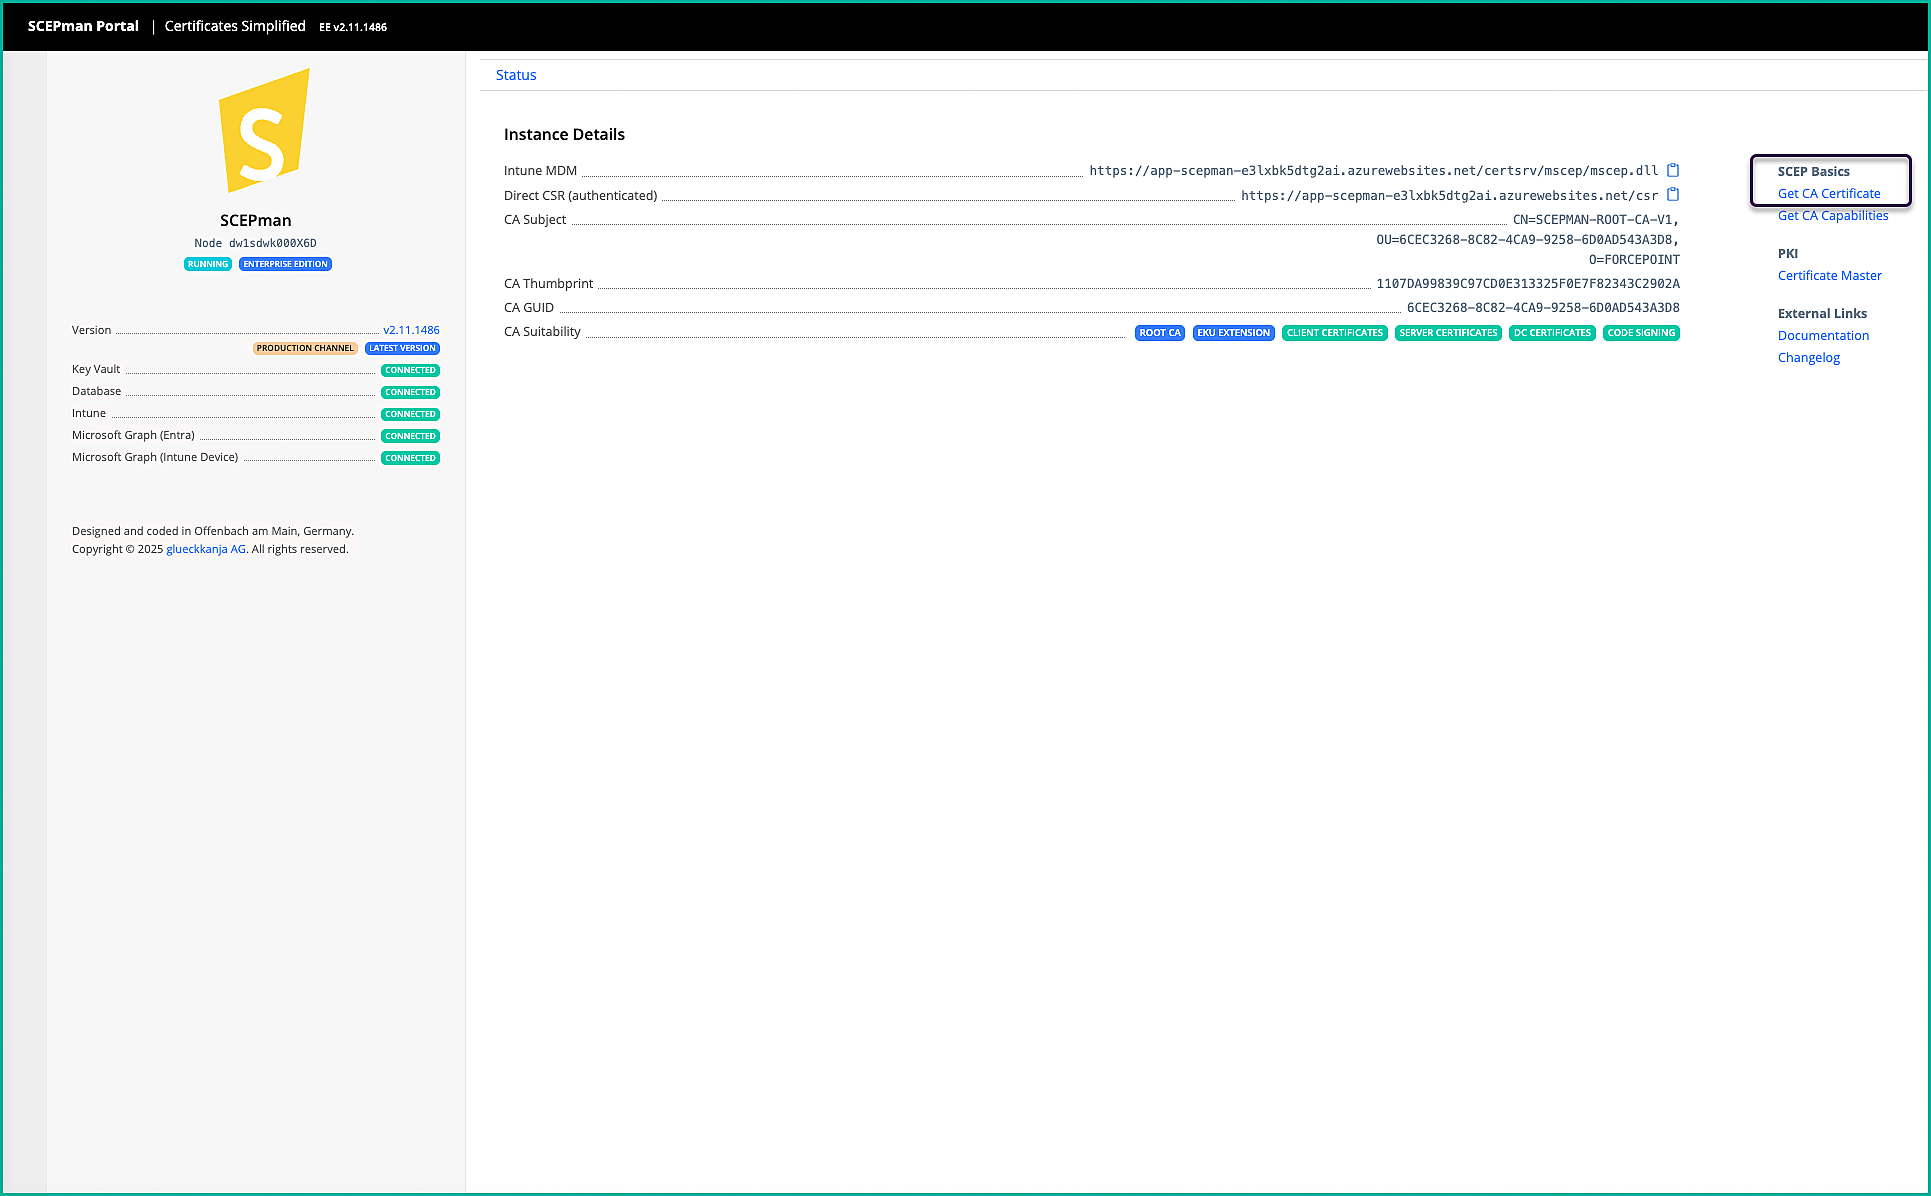
Download the Root CA Certificate from SCEPman.
- Open the SCEPman portal, navigate to SCEP Basics.
- From the Get Root CA cert option, download the CA certificate.
To learn more about deploying and configuring SCEPman, see the Deploying SCEPman in Azure and SCEPman Getting Started Guide.
Note: This is the Client Certificate, which is unique to each tenant.
-
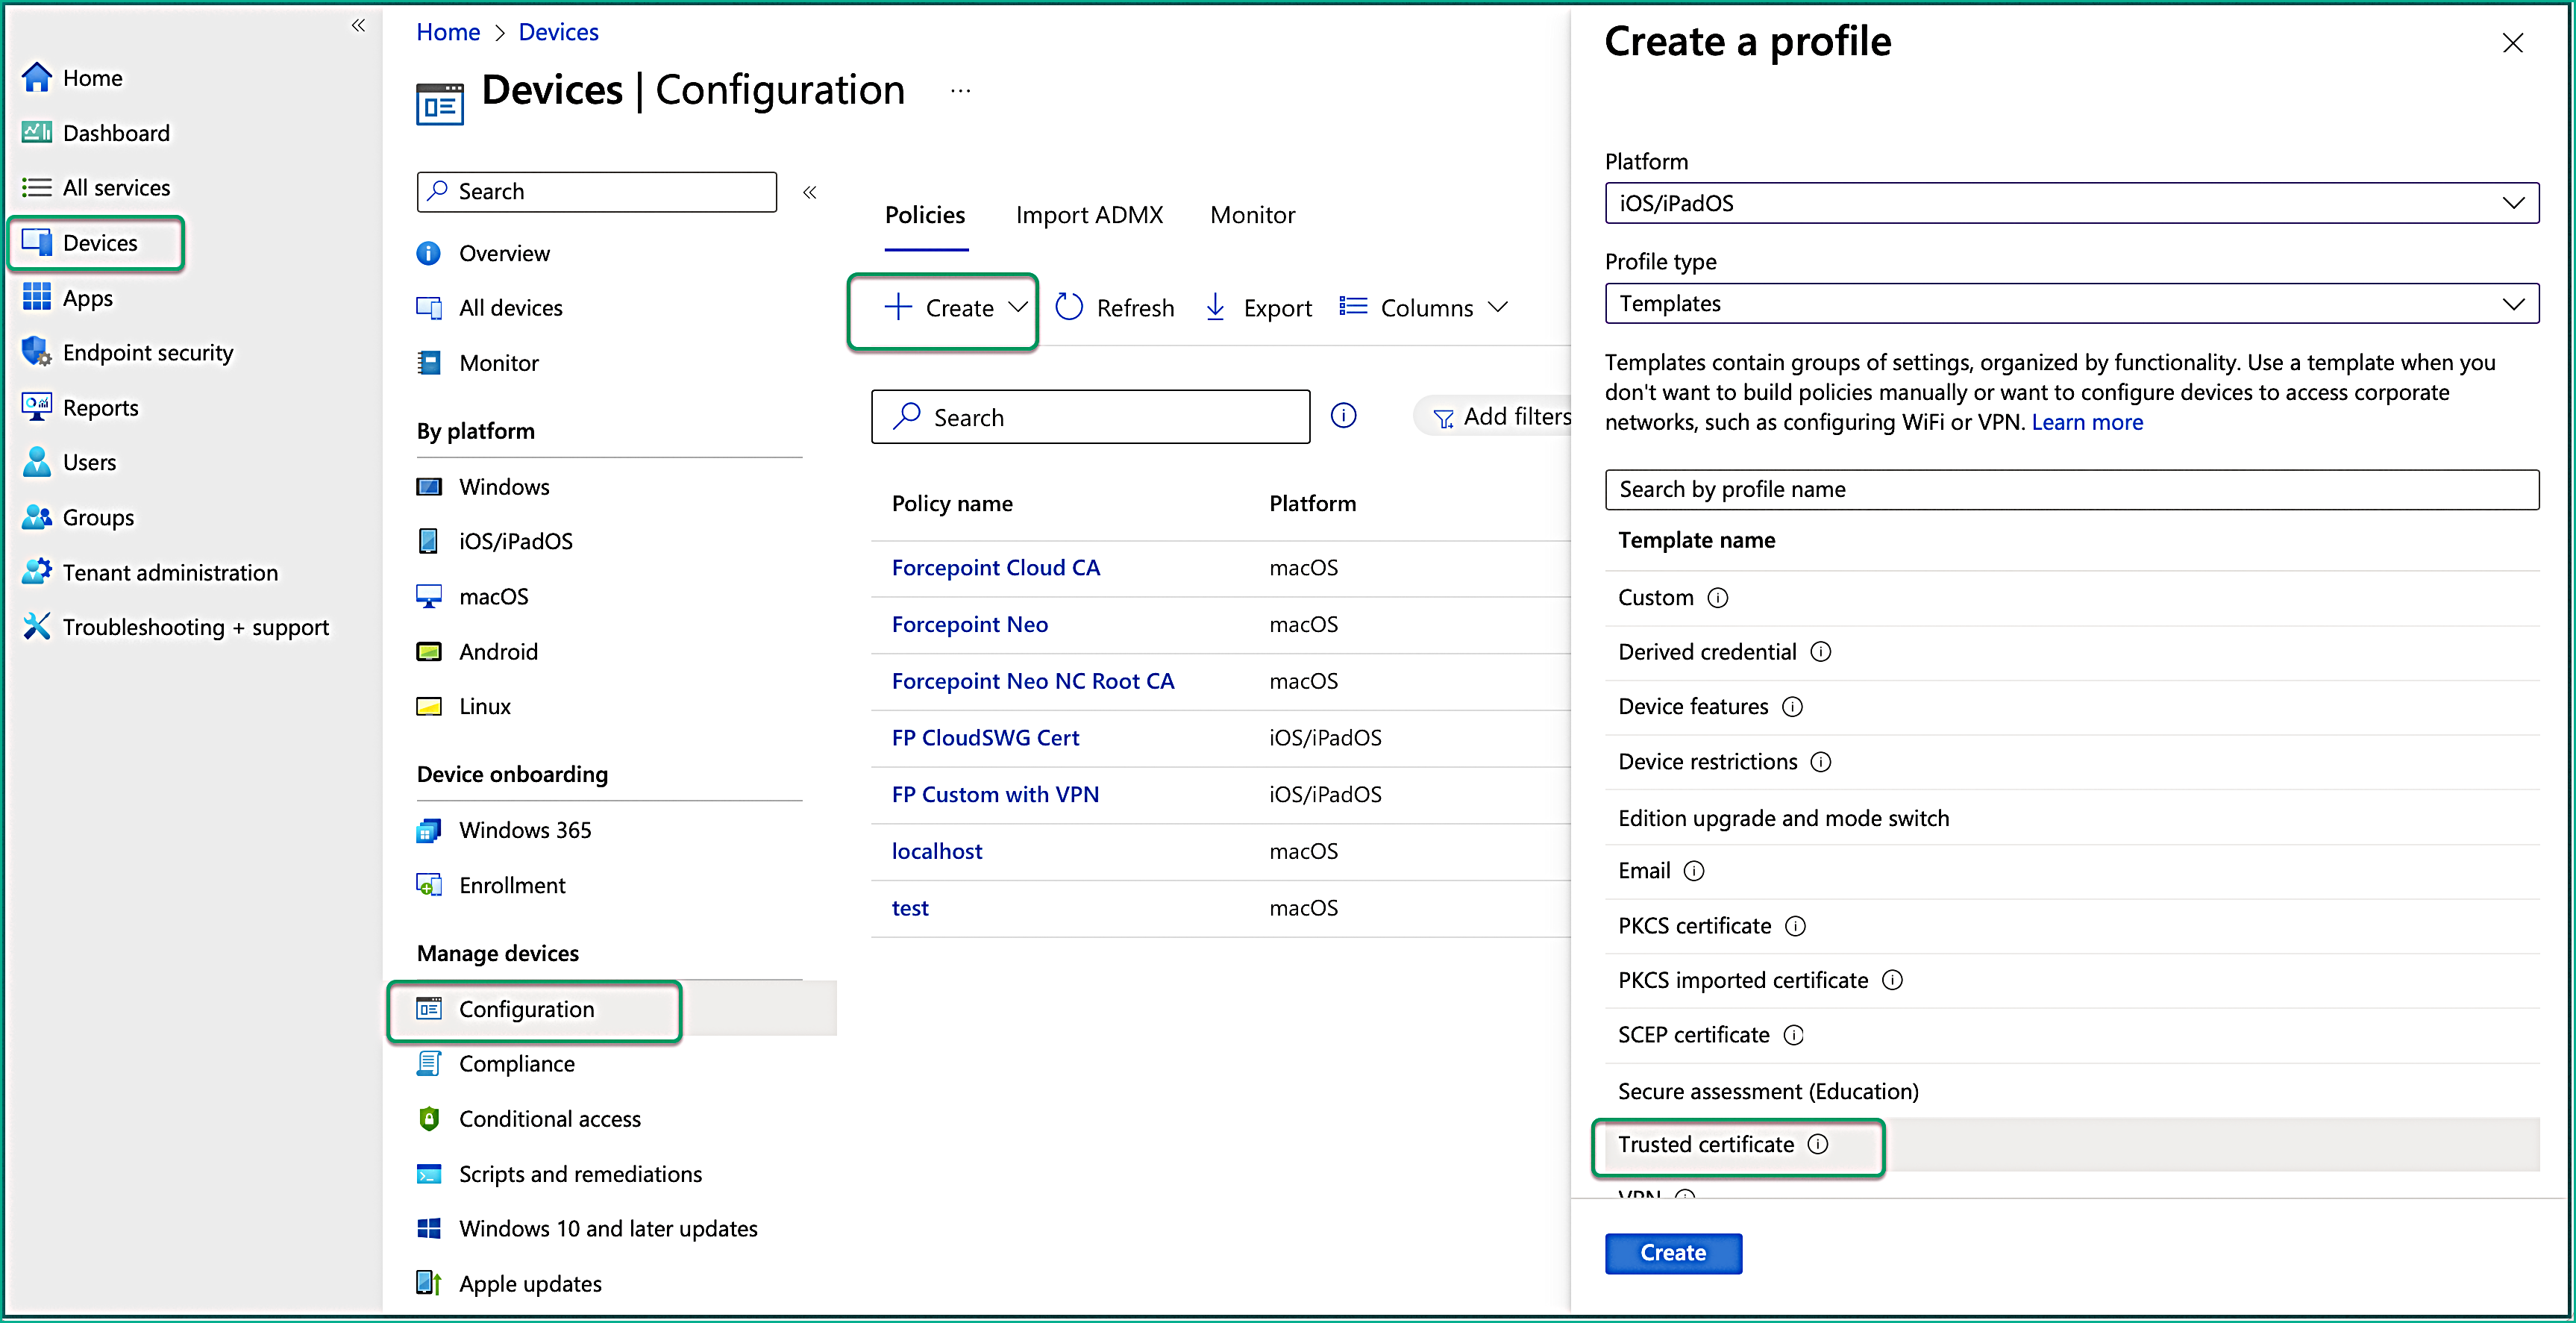
Create a new Trusted Certificate policy.
Note: The steps outlined below have been validated using Microsoft Intune and SCEPman. While similar configurations may be possible with other MDM solutions, they have not been verified.
- In the Microsoft Intune admin center, navigate to .
- Enter the following properties and then click Create:
- Platform: Select iOS/iPadOS.
- Profile type: Select Templates.
- Template name: Select Trusted certificate.
- On the Basics tab, enter the following properties:
- Name: Enter a descriptive name for the profile. Name your profiles so you can easily identify them later.
- Description: Enter a description for the profile. This setting is optional.
Then click Next.
- On the Configuration settings tab, click the folder icon to upload your previously downloaded CA certificate from the
SCEPman portal.
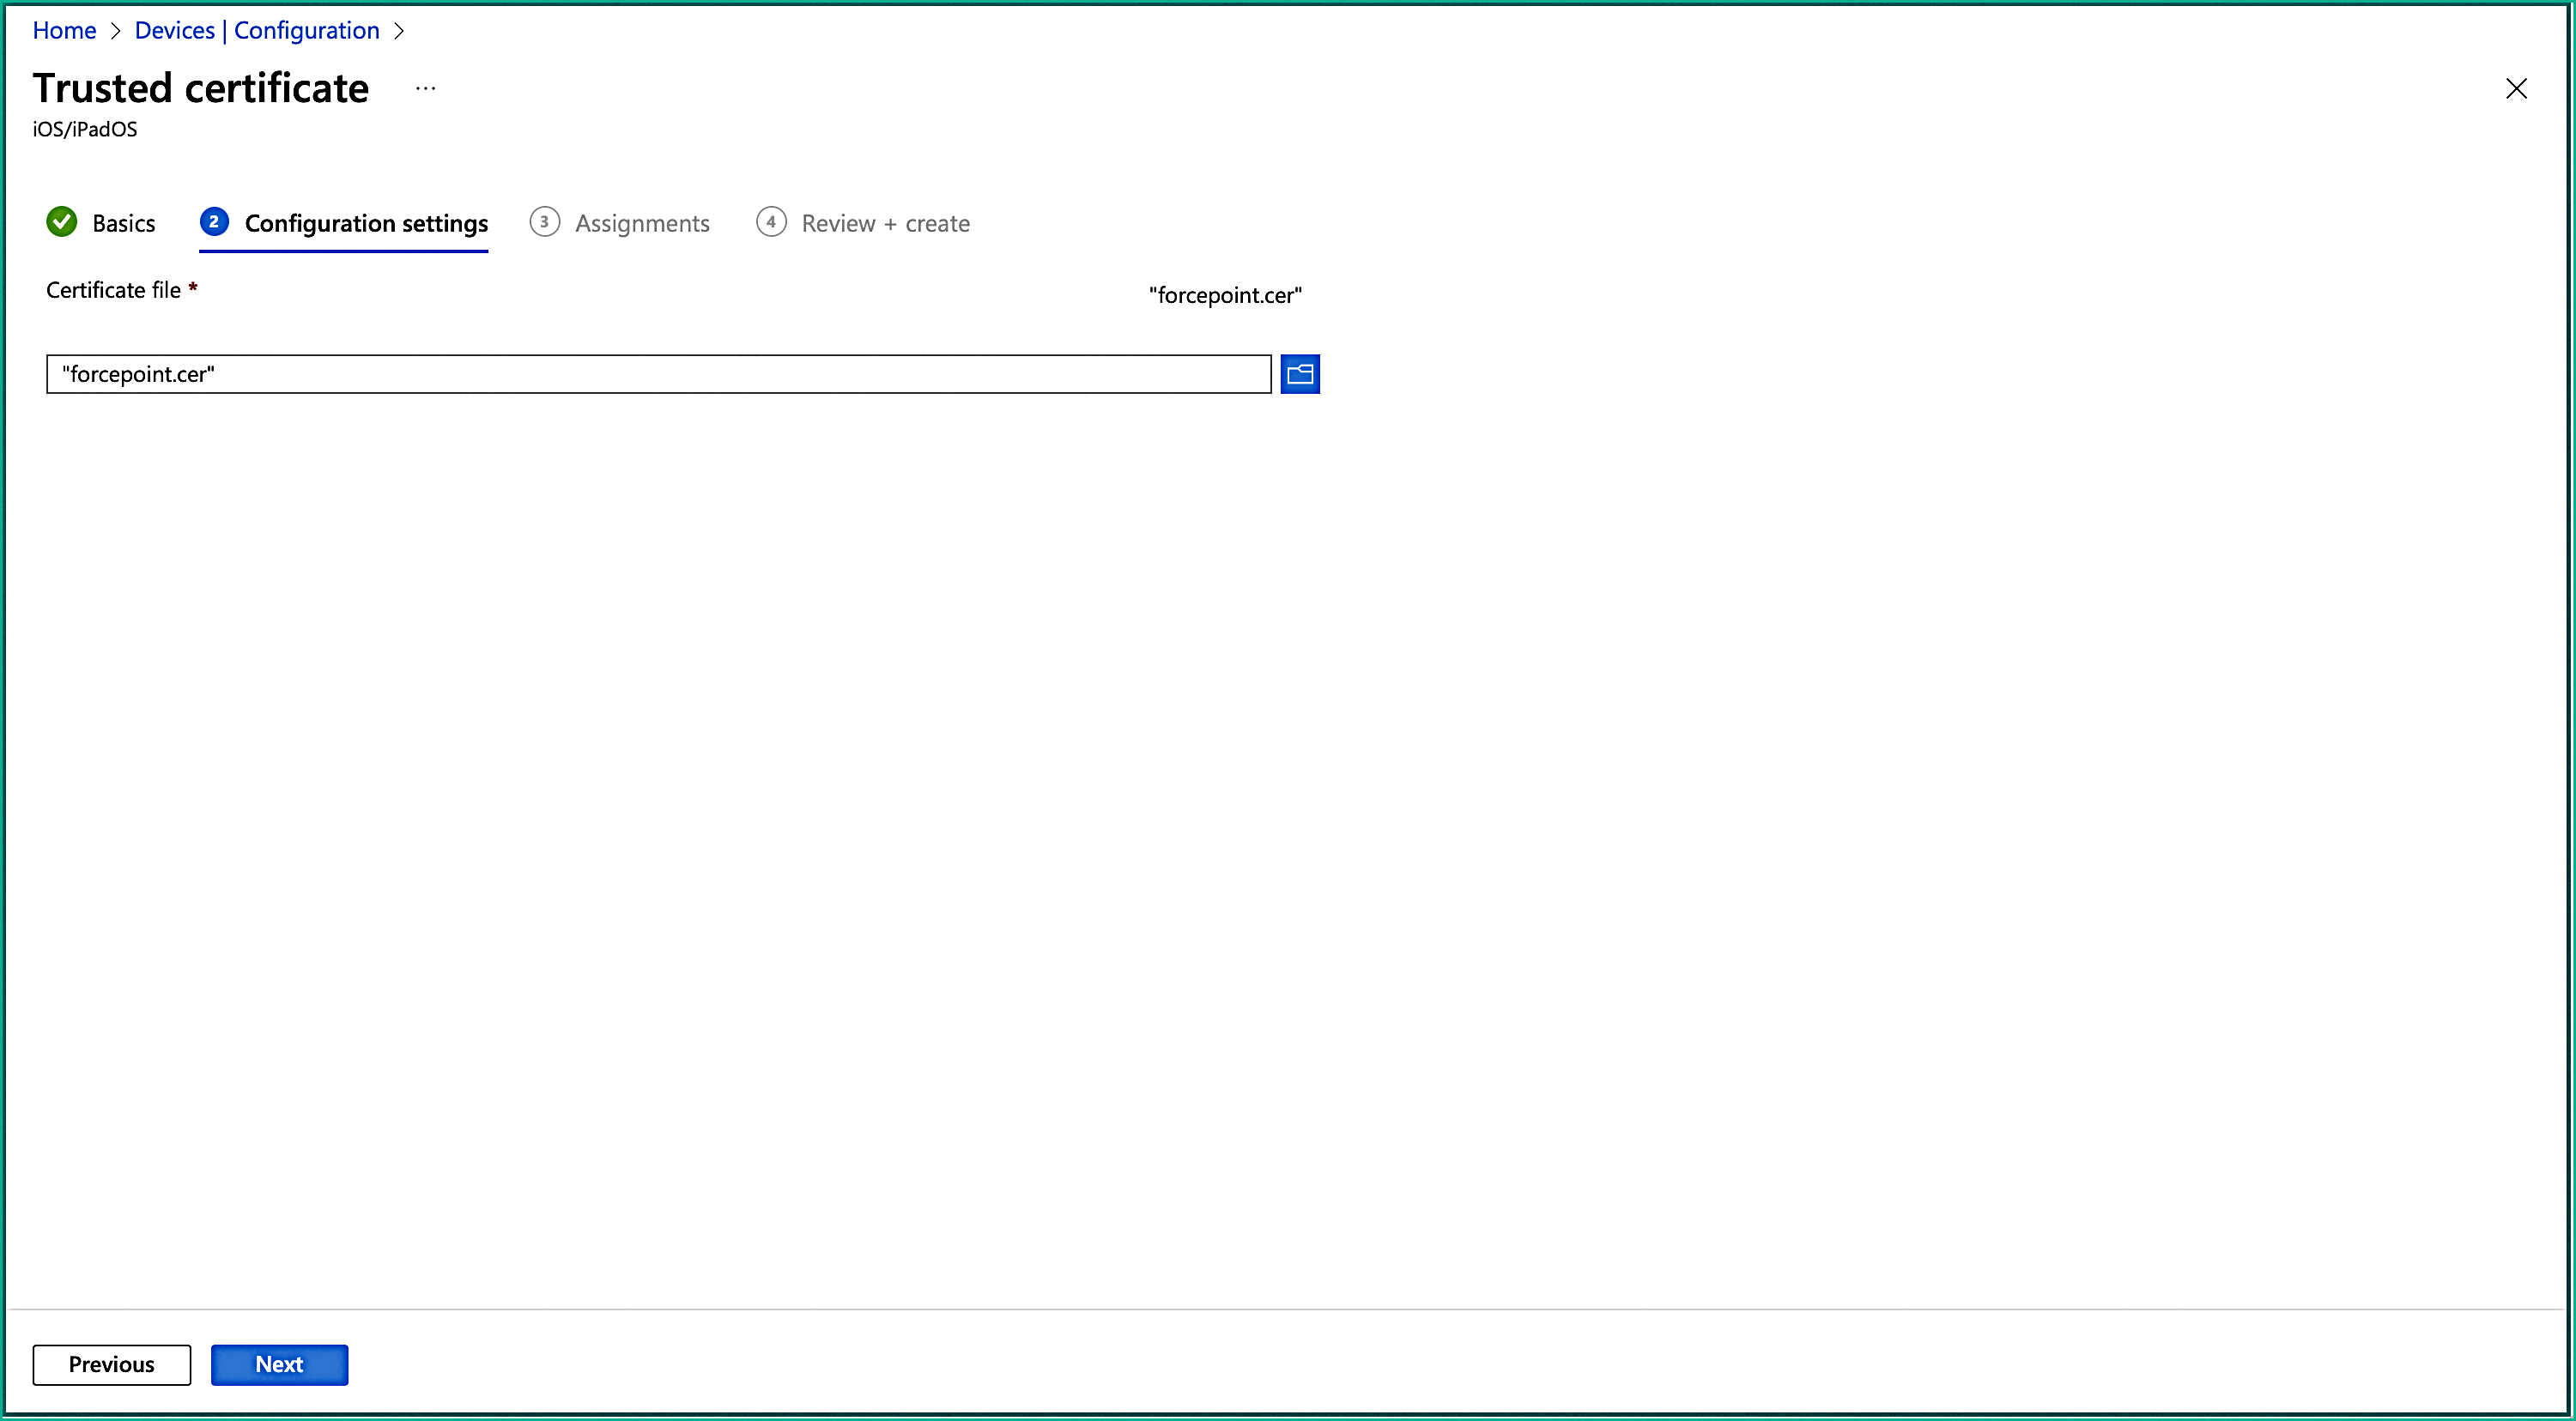
Then click Next.
- On the Assignments tab, in the Included groups section, select the groups that will have the solution force installed. This can be a user group, device group, all users, or all devices. Then click Next.
- On the Review + create tab, you can confirm the settings you have entered. When you select Create, your changes are saved, and the profile is assigned. The policy is also shown in the profiles list.
-
Download the Root CA Certificate from SCEPman.
-
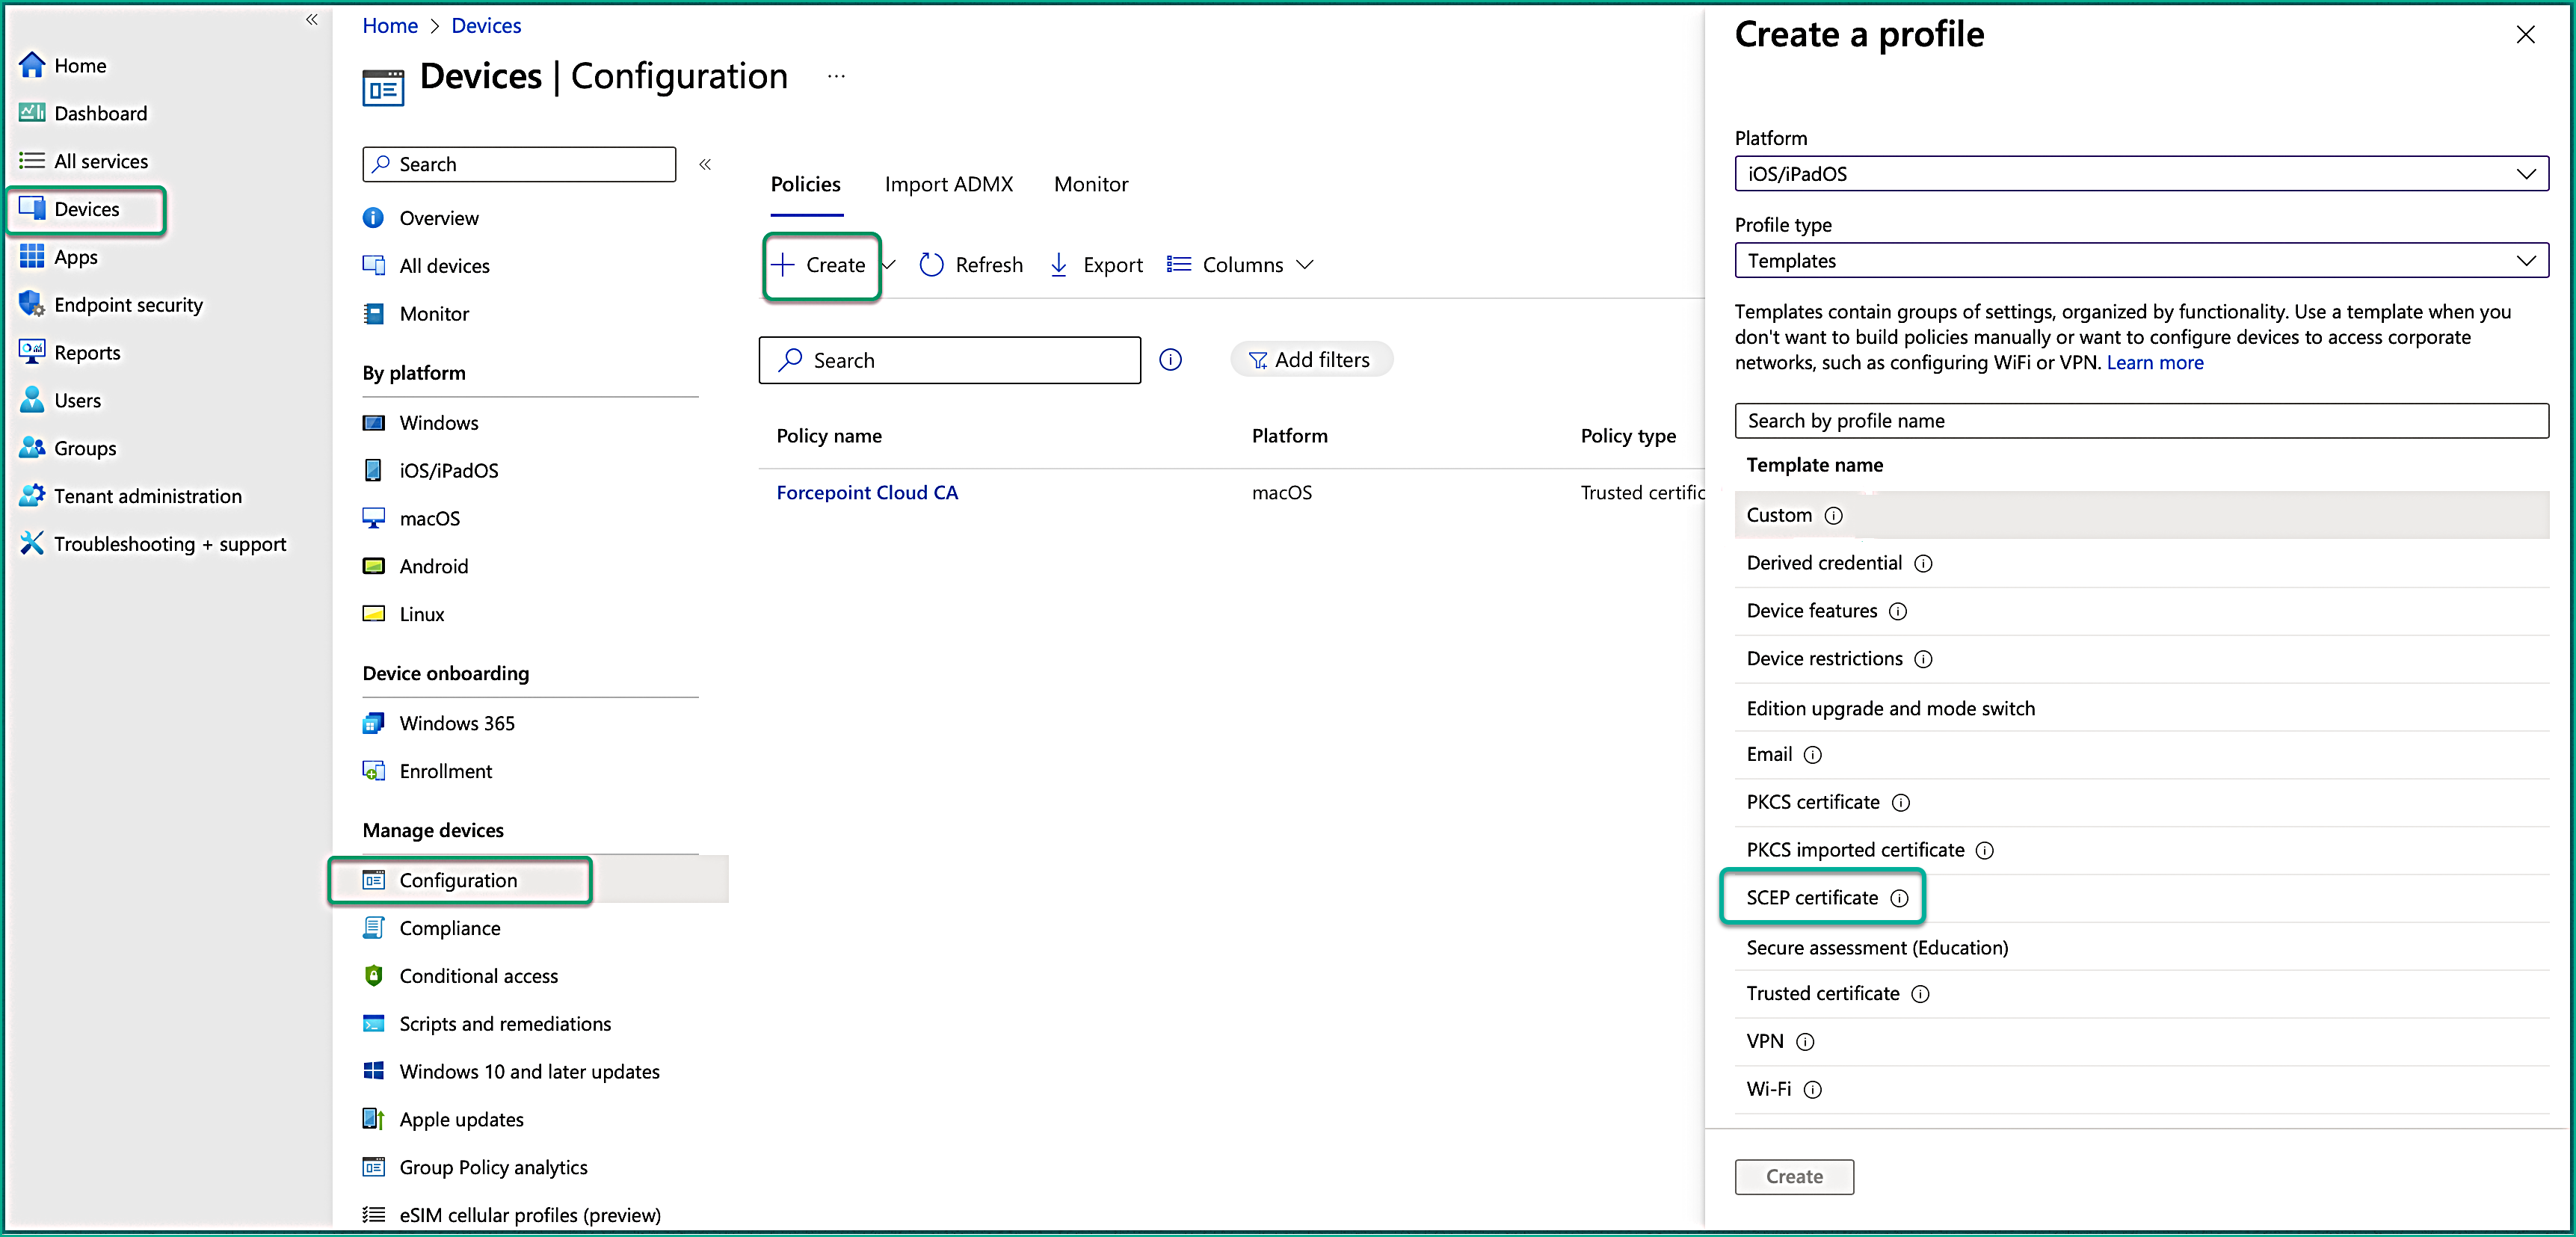
Step 3: Configure SCEP Certificate profile.
-
Enter the following properties and select Create:
- Platform: Select iOS/iPadOS.
- Profile type: Select Templates.
- Template name: Select SCEP certificate.
-
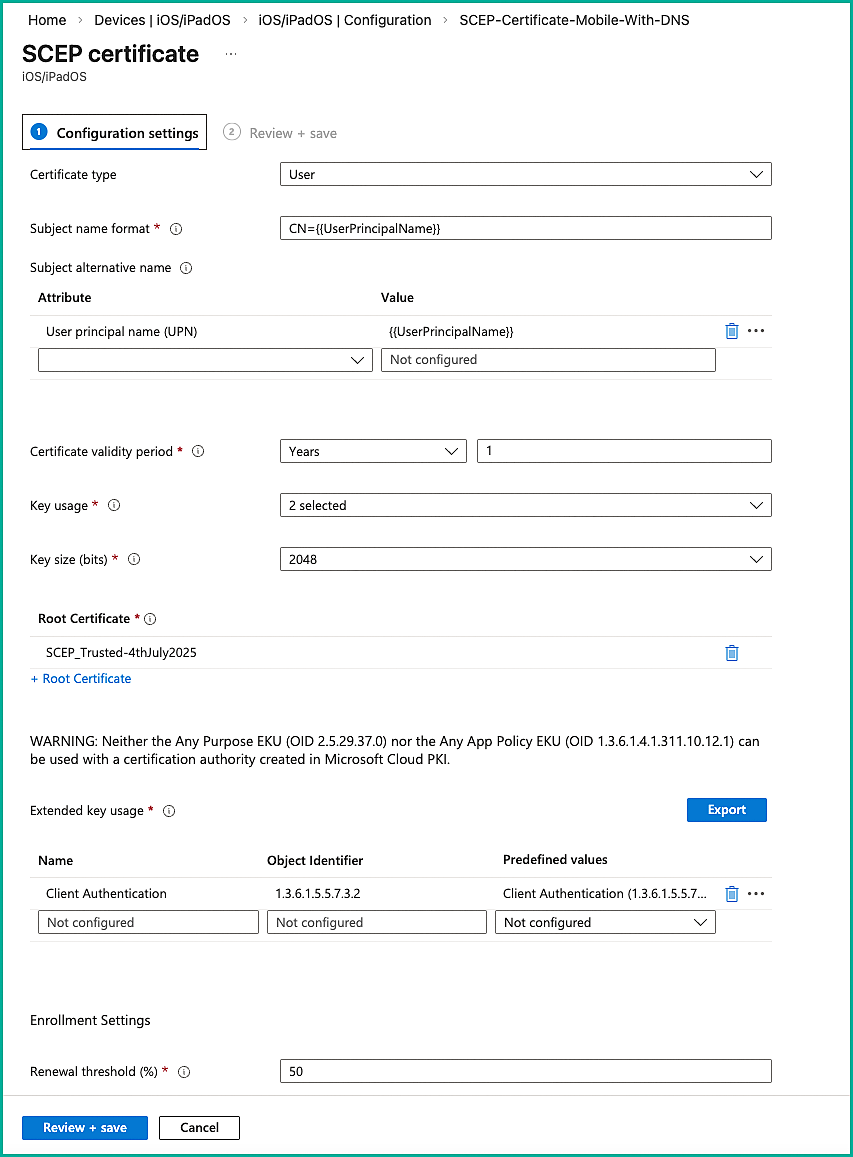
On the Configuration settings tab, configure the following settings:
Table 1. Key Value Certificate type User Subject name format CN= {{UserPrincipalName}}, OU (Organization Unit), DC (Domain Control-optional) Subject Alternative name - Attribute: User Principal Name (UPN)
- Value: {{UserPrincipalName}}
Certificate validity period Define the certificate lifecycle duration. Key Usage Select the Digital signature and Key encipherment. Key Size 2048 bits Root Certificate Select +Root Certificate and choose the Trusted certificate that you created in step 2. Extended key usage Assign Client Authentication (1.3.6.1.5.5.7.3.2), under Predefined values. The other fields will be filled out automatically. SCEP server URLs Enter the Intune MDM URL obtained from the SCEPman portal. Following is an example of information that you can enter in the mandatory fields:
Then click Next.
-
Enter the following properties and select Create:
-
Step 4: Configure the VPN profile.
-
Enter the following properties and select Create:
- Platform: Select iOS/iPadOS.
- Profile type: Select Templates.
- Template name: Select VPN.

-
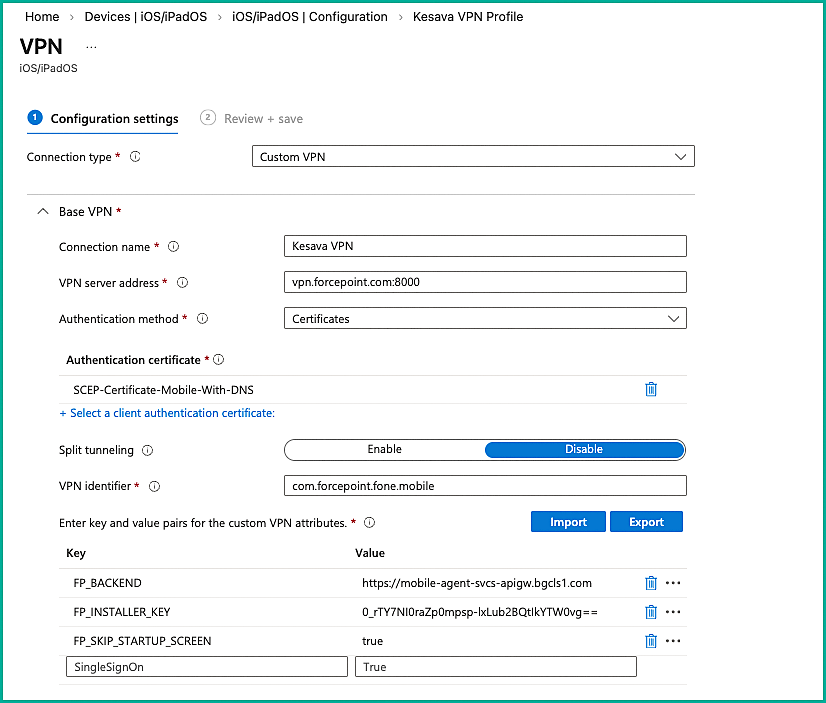
On the Configuration Settings tab, select the Custom VPN from the dropdown. Configure the following settings:
Before entering any values, open the Forcepoint Data Security Cloud portal and navigate to . Copy and save the following values:
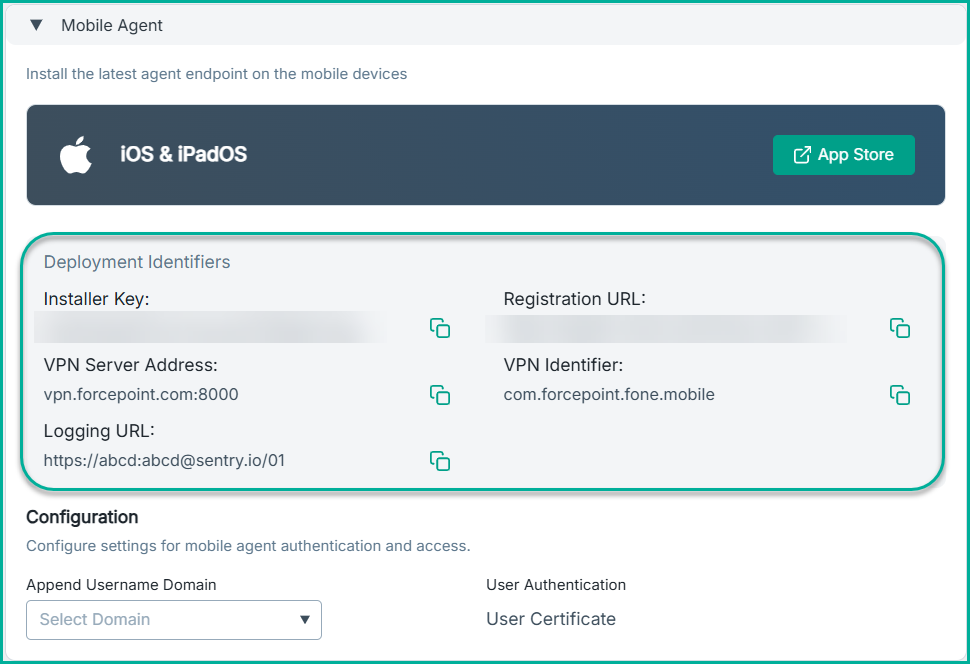
For more details about these fields, see the Global Settings page.
- Base VPN
Table 2. Key Value Connection name Enter a meaningful name for the VPN connection. VPN server address VPN Server Address from the Global Settings page. Authentication method Certificates Authentication certificate Click Select a client authentication certificate and choose the SCEP certificate created in step 3. VPN identifier VPN Identifier from the Global Settings page. Enter key and value pairs for the custom VPN attributes FP_BACKEND Registration URL from the Global Settings page. FP_INSTALLER_KEY Installer Key from the Global Settings page. FP_DS_TENANT_ID Open the Forcepoint Data Security Cloud portal and navigate to . Copy the DS ID from this page and enter it here. FP_SKIP_STARTUP_SCREEN - Select true to enable auto-start, allowing the application to launch automatically without displaying the login page.
- Select false to allow users to manually log in by displaying the login page. Users will be required to enter their credentials to access the application.
FP_LOG_URL Logging URL from the Global Settings page. Following is an example of information that you can enter in the mandatory fields:
- (Optional) Automatic VPN
If you enable this setting, the VPN remains continuously active. This configuration is recommended when the auto‑start feature (
FP_SKIP_STARTUP_SCREEN: true) is enabled in the previous step.If you want users to control when the VPN connects, do not enable Automatic VPN. In this case, users can manually enable the VPN as needed.
Table 3. key value Type of automatic VPN On-demand VPN On-demand rules Click the Add button to open the Add Row panel. Select Connect VPN from the I want to do the following drop-down and select All domains from the I want to restrict to drop-down. Following is an example of information that you can enter in the mandatory fields:

And click Next.
- Base VPN
-
Enter the following properties and select Create:
-
Step 5: Configure Forcepoint CA certificate.
-
On the Configuration settings tab, click the folder icon. Browse to the .cer file you downloaded from your Forcepoint Data Security Cloud portal and click Upload.
You can find this certificate under .

For more details, see the Global Settings page.
-
On the Configuration settings tab, click the folder icon. Browse to the .cer file you downloaded from your Forcepoint Data Security Cloud portal and click Upload.