Step 3: Configuring your LDAP server
To set up your LDAP server:
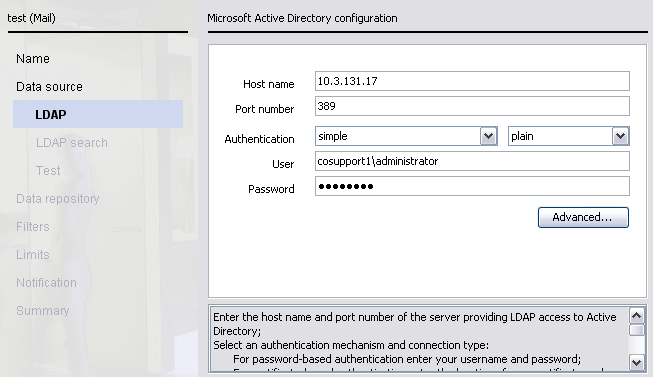
Steps
- Enter the Host name or IP address of your LDAP server.
- Enter the Port number used for LDAP communication (389 by default).
Note: If your server is an Active Directory Global Catalog server, you can specify port 3268 for a plain connection, or port 3269 for SSL. Some required attributes may be unavailable when searching the Global Catalog.
-
Select an Authentication option from the drop-down list:
- Anonymous: No authentication details are required to access the LDAP server. Some servers restrict the results returned to anonymous users.
- Simple: Enter the user name for your server, and optionally the password.
- Strong: Enter the user name and password for your server.
Note: To retrieve data, we recommend that the user identity has read-only privileges equivalent to those of a domain administrator. -
Select one of the following encryption types:
- Plain sends unencrypted text over the connection. You cannot select this option for Strong/Certificate authentication.
- SSL provides cryptographically secure communication. It can either use a certificate signed by a trust point already held in the cacerts
file, or a self- signed certificate that has been imported into the Java cacerts
directory.
To locate your Java cacerts directory, go to the Directory Synchronization Client installation directory, then navigate to /jre/lib/security.
- TLS (Transport Layer Security) offers another secured method of sending data, and requires a certificate.
-
Do one of the following:
- Click Advanced to define further LDAP settings (see Defining advanced LDAP server settings below).
- Click Next to continue to the LDAP search configuration (see Step 4: Setting up the LDAP search configuration).
If there are problems with your LDAP connection details, an error is shown in red at the bottom of the window. If an error occurs, click Back to amend your LDAP server settings.