Inbound mail flow rule to take action on a DLP processed email in Microsoft Office 365

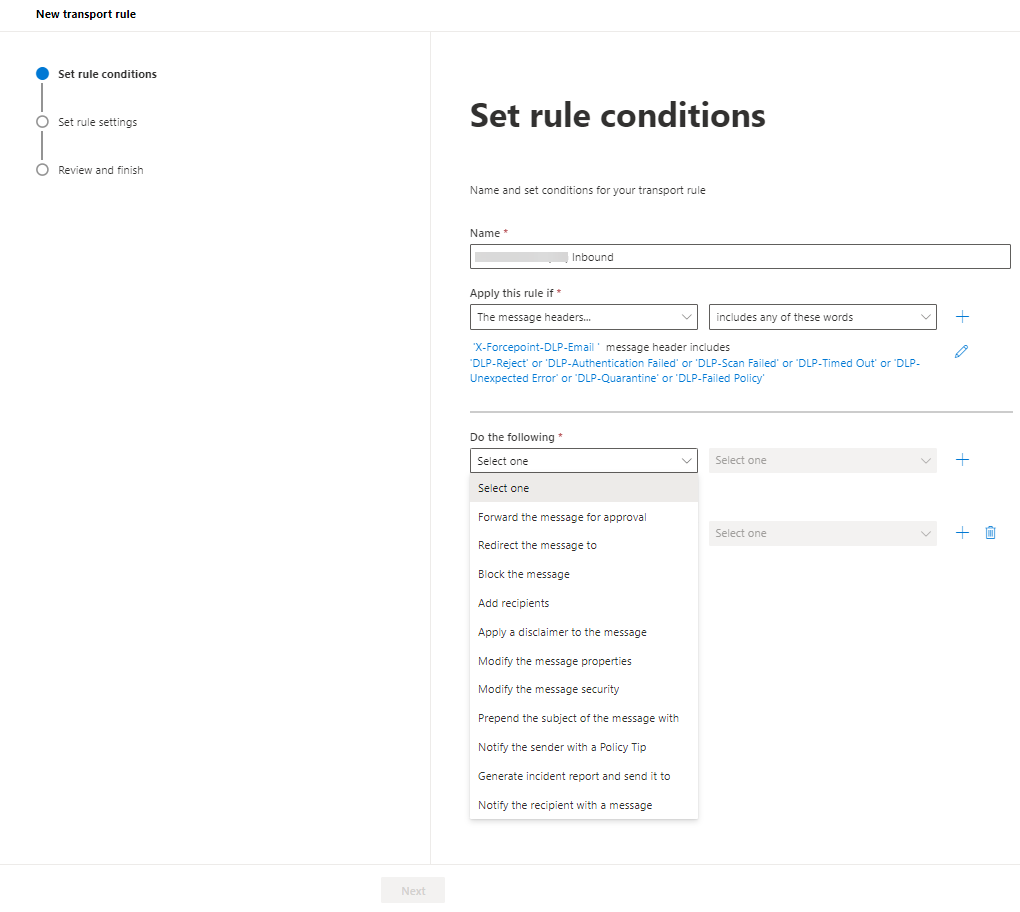
The inbound mail flow rule will process the email based on the Forcepoint X-Header value after the Forcepoint DLP scan.

The Forcepoint DLP recommendation through X-Header allows you define the action for the email messages after the Forcepoint DLP scan.

You only need to create an inbound rule in Microsoft Office 365 if you want to take any action on the email (such as block, quarantine, admin approval, manager approval, encrypt, or redirect the email). For these common Microsoft Office 365 use-cases, refer to topic Microsoft Office 365 - Use Cases.

This procedure allows you to create a customized action on the email apart from the common use-cases.

Steps

  1. In Microsoft Exchange admin center page, navigate to Mail flow > Rules. The Rules screen appears.
  2. Click Add a rule + > Create a new rule. The New transport rule screen appears.
  3. On the Set rule conditions page,
    1. Enter a unique name for the rule in the Name field, and then select the conditions, exceptions, and actions for the rule.
    2. In Apply this rule if* field:
      1. Select The message headers… from the first drop-down list.
      2. Select matches any of these text patterns from the second drop-down list.
      3. Click Enter text. The specify header name window appears.
      4. Enter message header X-Forcepoint-DLP-Email and then click Save.
      5. Click Enter words. The specify words or phrases window appears.
      6. Enter the X-Header text, that we need to perform action and then click Save.
        Note: For the Forcepoint DLP recommendation “DLP-Accept”, you do not need to create any inbound rule if you do not want to take any action on the email. This email will be sent to the recipient without any change.
    3. In Do the following* field:
      1. Select appropriate actions from the first and second drop-down list based on your preference.
      2. Add the appropriate inputs in the pop-up page for the actions that you selected.
      3. Click Save.


    4. When you complete setting the Set rule conditions page, click Next.
  4. On the Set rule settings page, configure the following settings:
    1. Select Enforced as Rule mode.
    2. Select High in Severity.
    3. If necessary, update Activate this rule on and Deactivate this rule onwith appropriate date and time.
    4. Tick Stop processing more rules.
    5. If necessary, tick Defer the message if rule processing doesn't complete.
    6. Select Header in Match sender address in message field.
    7. Add an optional comment to the rule in Comments field.
    8. When you complete setting the Set rule settings page, click Next.
  5. On the Review and finish page, verify the settings and click Finish.
  6. The Transport rule created successfully message appears. Then, click Done.

    The inbound mail flow rule is created.

    Note: After creation of the mail flow rule, it might take 30 minutes or more for the new rule to be applied to emails.

    For more information on setting up Mail Flow Rules in Microsoft Office 365, refer to the Microsoft Learn page.