Multiple Node Installation (High Availability)

Prerequisites

Firewall Rules for Internal Communication
Note: We recommend running the K3s nodes in a 10Gb low latency private network for the maximum security and performance.
K3s needs the following ports to be accessible (Inbound and Outbound) by all other nodes running in the same cluster:
Table 1.
Protocol Port Description
TCP 6443 Kubernetes API Server
UDP 8472 Required for Flannel VXLAN
TCP 2379-2380 embedded etcd
TCP 10250 metrics-server for HPA
TCP 9796 Prometheus node exporter
TCP 80 Private Docker Registry
Note: The ports above should not be publicly exposed as they will open up your cluster to be accessed by anyone. Make sure to always run your nodes behind a firewall/security group/private network that disables external access to the ports mentioned above.
All nodes in the cluster must have:
  1. Domain Name Service (DNS) configured
  2. Network Time Protocol (NTP) configured
  3. Fixed private IPv4 address
  4. Globally unique node name (use --node-name when installing K3s in a VM to set a static node name)

Firewall Rules for External Communication

The following port must be publicly exposed in order to allow users to access Forcepoint DSPM:
Table 2.
Protocol Port Description
TCP 443 FDC backend

The user must not access the K3s nodes directly, instead, there should be a load balancer sitting between the end user and all the K3s nodes (master and worker nodes):

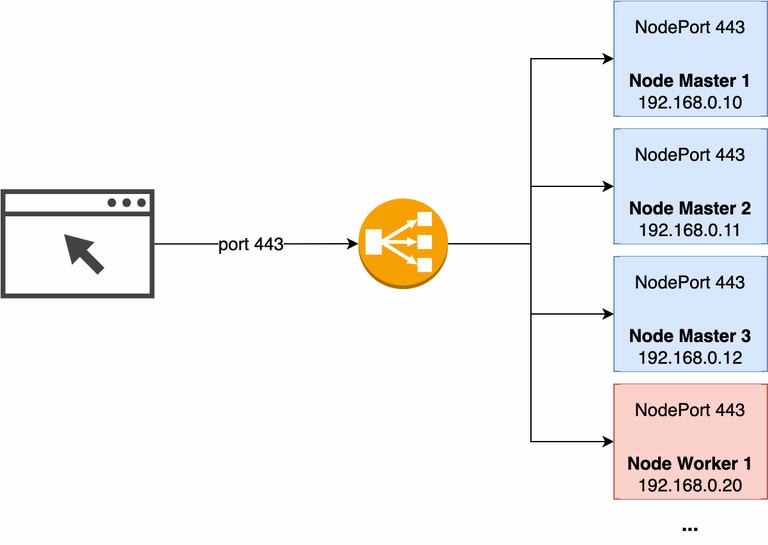
The load balancer must operate at Layer 4 of the OSI model and listen for connections on port 443. After the load balancer receives a connection request, it selects a target from the target group (which can be any of the master or worker nodes in the cluster) and then attempts to open a TCP connection to the selected target (node) on port 443.

The load balancer must have health checks enabled which are used to monitor the health of the registered targets (nodes in the cluster) so that the load balancer can send requests to healthy nodes only.

The recommended health check configuration is:
  • Timeout: 10 seconds
  • Healthy threshold: 3 consecutive health check successes
  • Unhealthy threshold: 3 consecutive health check failures
  • Interval: 30 seconds
  • Balance mode: round-robin

VM Count

At least 4 machines are required to provide high availability of the Forcepoint platform. The HA setup supports a single-node failure.

Install K3s

Note:
  • Make sure you have /usr/local/bin configured in your PATH: export PATH=$PATH:/usr/local/bin). All the commands must be executed as root user.
  • The commands have been tested on Ubuntu Server 20.04 LTS, SUSE Linux Enterprise Server 15 SP4 and RHEL 8.6.
  • For RHEL, K3s needs the following package to be installed: k3s-selinux (repo rancher-k3s-common-stable) and its dependencies container-selinux (repo rhel-8-appstream-rhui-rpms) and policycoreutils-python-utils (repo rhel-8-baseos-rhui-rpms). Also, firewalldnm-cloud-setup.service and nm-cloud-setup.timer must be disabled and the server restarted before the installation, click here for more information.
The steps below you guide you through the air-gap installation of K3s, a lightweight Kubernetes distribution created by Rancher Labs:
  1. Create at least 4 VMs with the same specs.
  2. Extract the downloaded file: tar -xf gv-platform-$VERSION.tar to all the VMs
  3. Create a local DNS entry private-docker-registry.local across all the nodes resolving to the master1 node:
    cat >> /etc/hosts  << EOF
    <Master1_node_VM_IP>  private-docker-registry.local
    EOF
  4. Prepare the K3s for air-gap installation files:
    $ mkdir -p /var/lib/rancher/k3s/agent/images/
    $ gunzip -c assets/k3s-airgap-images-amd64.tar.gz > /var/lib/rancher/k3s/agent/images/airgap-images.tar
    $ cp assets/k3s /usr/local/bin && chmod +x /usr/local/bin/k3s
    $ tar -xzf assets/helm-v3.8.2-linux-amd64.tar.gz && cp linux-amd64/helm /usr/local/bin
  5. Update the registries.yaml file across all the nodes.
    $ mkdir -p /etc/rancher/k3s
    $ cp assets/registries.yaml  /etc/rancher/k3s/
  6. Install K3s in the 1st master node:
    To get started launch a server node using the cluster-init flag:
    cat scripts/k3s.sh | INSTALL_K3S_SKIP_DOWNLOAD=true K3S_KUBECONFIG_MODE="644" sh -s - server --node-name=master1 --cluster-init
    Check for your first master node status, it should have the Ready state:
    kubectl get nodes
    Use the following command to copy the TOKEN from this node that will be used to join the other nodes to the cluster:
    cat /var/lib/rancher/k3s/server/node-token

    Also, copy the IP address of the 1st master node which will be used by the other nodes to join the cluster.

  7. Install K3s in the 2nd master node:
Run the following command and assign the contents of the file: /var/lib/rancher/k3s/server/node-token from the 1st master node to the K3S_TOKEN variable.
  • Set --node-name to “master2”
  • Set --server to the IP address of the 1st master node
    cat scripts/k3s.sh | K3S_TOKEN=$K3S_TOKEN INSTALL_K3S_SKIP_DOWNLOAD=true K3S_KUBECONFIG_MODE="644" sh -s - server --node-name=master2 --server https://<ip or hostname of any master node>:6443
    Check the node status:
    kubectl get nodes
  • Install K3s in the 3rd master node:

    Run the following command and assign the contents of the file: /var/lib/rancher/k3s/server/node-token from the 1st master node to the K3S_TOKEN variable.

    Set --node-name to “master3”

    Set --server to the IP address of the 1st master node.
    cat scripts/k3s.sh | K3S_TOKEN=$K3S_TOKEN INSTALL_K3S_SKIP_DOWNLOAD=true K3S_KUBECONFIG_MODE="644" sh -s - server --node-name=master3 --server https://<ip or hostname of any master node>:6443

    Check the node status:

  • Install K3s in the 1st worker node:
    Use the same approach to install K3s and to connect the worker node to the cluster group. The installation parameter would be different in this case. Run the following command: Set --node-name to “worker1” (where n is the nth number of the worker node)
    cat scripts/k3s.sh | $K3S_TOKEN INSTALL_K3S_SKIP_DOWNLOAD=true K3S_TOKEN=$K3S_TOKEN K3S_KUBECONFIG_MODE="644" sh -s - agent --node-name=worker1 --server https://<ip or hostname of any master node>:6443
    Check the node status:
    kubectl get nodes

Deploy Private Docker Registry and Import Docker images

  1. Extract and Import the Docker images locally to the master1 node.
    $ mkdir /tmp/import
    $ for f in images/*.gz; do IMG=$(basename "${f}" .gz); gunzip -c "${f}" > /tmp/import/"${IMG}"; done
    $ for f in /tmp/import/*.tar; do ctr -n=k8s.io images import "${f}"; done
  2. Install gv-private-registry helm chart in the master1 node:
    Replace $VERSION with the version that is present in the bundle that has been downloaded. To check all the charts that have been download run ls charts.
    $ helm upgrade --install  gv-private-registry charts/gv-private-registry-$VERSION.tgz --wait \
      --timeout=10m0s \
      --kubeconfig /etc/rancher/k3s/k3s.yaml
  3. Tag and push the docker images to the local private docker registry deployed in the master1 node:
    $ sh scripts/push-docker-images.sh

Install Helm charts

The following steps guide you through the installation of the dependencies required by FDC.
Note:
  • Perform the following steps in the master1 Node.
  • Replace $VERSION with the version that is present in the bundle that has been downloaded. To check all the charts that have been download run ls charts.
  1. Install Getvisibility Essentials and set the daily UTC backup hour (0-23) for performing backups. If you are installing Enterprise append --set eck-operator.enabled=true to the command in order to enable (BROKEN LINK TO ELASTIC SEARCH)
    $ helm upgrade --install gv-essentials charts/gv-essentials-$VERSION.tgz --wait \
    --timeout=10m0s --kubeconfig /etc/rancher/k3s/k3s.yaml \
    --set global.high_available=true \
    --set eck-operator.enabled=true  \
    --set minio.replicas=4 \
    --set minio.mode=distributed \
    --set consul.server.replicas=3 \
    --set updateclusterid.enabled=false \
    --set backup.hour=1
  2. Install Monitoring CRD:
    $ helm upgrade --install rancher-monitoring-crd charts/rancher-monitoring-crd-$VERSION.tgz --wait \
    --kubeconfig /etc/rancher/k3s/k3s.yaml \
    --namespace=cattle-monitoring-system \
    --create-namespace
  3. Install Monitoring:
    $ helm upgrade --install rancher-monitoring charts/rancher-monitoring-$VERSION.tgz --wait \
    --kubeconfig /etc/rancher/k3s/k3s.yaml \
    --set global.high_available=true \
    --namespace=cattle-monitoring-system \
    --set loki-stack.loki.replicas=2 \
    --set prometheus.prometheusSpec.replicas=2
  4. Check all pods are Running with the command:
    kubectl get pods -A

Install FDC Helm Chart

Replace the following variables:
  • $VERSION with the version that is present in the bundle that has been downloaded
  • $RESELLER with the reseller code (either getvisibility or forcepoint)
  • $PRODUCT with the product being installed (synergy or enterprise)
    $ helm upgrade --install gv-platform charts/gv-platform-$VERSION.tgz --wait \
    --timeout=10m0s --kubeconfig /etc/rancher/k3s/k3s.yaml \
    --set high_available=true \
    --set-string clusterLabels.environment=prod \
    --set-string clusterLabels.cluster_reseller=$RESELLER \
    --set-string clusterLabels.cluster_name=mycluster \
    --set-string clusterLabels.product=$PRODUCT

Install Kube-fledged

Note: Perform the following steps in the master1 node
  1. Install gv-kube-fledged helm chart. Replace $VERSION with the version that is present in the bundle that has been downloaded. To check all the charts that have been download run ls charts.
    $ helm upgrade --install gv-kube-fledged charts/gv-kube-fledged-$VERSION.tgz -n kube-fledged \
    --timeout=10m0s \
    --kubeconfig /etc/rancher/k3s/k3s.yaml \
    --create-namespace
  2. Create and deploy imagecache.yaml
    $ sh scripts/create-imagecache-file.sh
    $ kubectl apply -f scripts/imagecache.yaml

Install custom artifacts

Models and other artifacts, like custom agent versions or custom consul configuration can be shipped inside auto deployable bundles. The procedure to install custom artifact bundles on an HA cluster is the same as in the single node cluster case. Take a look at the guide for single-node clusters above.