Creating the Endpoint SSL Identity
For the Forcepoint Agent to be able to securely communicate with your Outlook Email client, the Endpoint must be given an SSL identity, and the client machine must be set up to trust that identity.
Forcepoint recommends the simplest way to do this is to create a self-signed certificate that can be bundled with the Endpoint installation package along with the private key that was used to generate the certificate. This document explains how to generate this certificate using OpenSSL. You must have OpenSSL installed on your machine before you can attempt the steps below.
Resources
Creation of an SSL Identity for your endpoints with OpenSSL uses a configuration file. A template file can be downloaded here.
Creating the SSL Identity
- Download the template file provided.
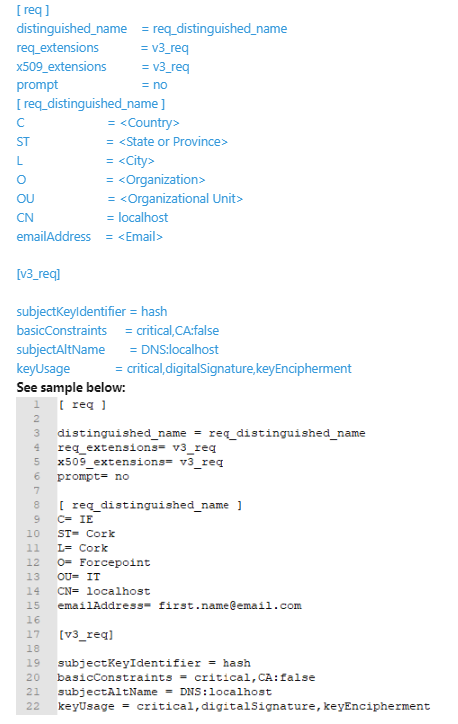
- Replace the values in angle brackets (<>) with the appropriate information for your organization.:
- Be sure to remove all the angle brackets from the document.
- Country name can only have a maximum of 2 characters entered.
- Values not in angle brackets are defaults and can be left unchanged.
- The CN must be entered as
localhostand thesubjectAltNamemust be entered asDNS:localhost.
Following is a template for the configuration file:

- Once complete, save the file as localhost.config in a directory of your choice.
- Open a terminal application and cd to the directory you saved the localhost.config file.
- Run the following command from the same directory to create the key files:
openssl req -x509 -newkey rsa:4096 -keyout key.pem -out server.pem -sha256 -config localhost.config -days 10950 -nodesThis command will create the following files:
- key.pem: Private key for the SSL identity. This file is deployed to the endpoint clients.
- server.pem: Self-signed certificate for the SSL identity. This file is deployed to the endpoint clients.
- (Optional) If you plan to install the agent via Jamf then you must convert the cert to its binary encoded DER format. In this case run the following additional
command:
openssl x509 -in server.pem -out server.der -outform DER
Next Steps: As a next step, you can either proceed with manual agent installation or choose to automatically install using an MDM solution like Jamf.