Configuring AzureAD Reverse Proxy certificate
In order to use Forcepoint Data Security Cloud | SSE reverse proxy while using Microsoft 365 with Microsoft Entra ID native authentication, you should upload a certificate and private key for your Azure AD reverse proxy domain name, that is cloudlogin-app-f91827364p.<username domain>.<tld> (example: cloudlogin-app-f91827364p.bgs-support.net).
Before you begin
- Forcepoint Data Security Cloud | SSE AzureAD reverse proxy services are currently limited to 2048 bit SSL keys. Ensure to utilize a supported bit length while generating the SSL key pair for AzureAD reverse proxy certificates.
- The uploaded certificate must be in PKCS#12 format signed by a public Certificate Authority (CA) and must also contain the intermediate CA for Forcepoint Data Security Cloud | SSE to verify your cert. If the intermediate CA is not
included with the cert you have acquired, then you will need to find and download it from your CA's website and ensure it is packaged as part of your PKCS#12 cert file:
- If you were given certificate file (with key) and intermediate CA separately (such as your cert file is in PEM or DER format), you can run the following command to combine
them into one pkcs#12 file:
openssl pkcs12 -export -out certificate.pfx -inkey certificate.key -in certificate.crt -certfile IntermediateCA.pem
- If you were provided a PKCS#12 encrypted cert file, you can extract the file and then recombine it with the intermediary CA in order to upload it into Forcepoint Data Security Cloud | SSE.
- To extract your file run: openssl pkcs12 -nodes -in certs/cert.pfx -out certs/cert.pem
- To combine the now extracted files run: openssl pkcs12 -export -out certificate.pfx -in certificate.crt -certfile IntermediateCA.pem
- If you were given certificate file (with key) and intermediate CA separately (such as your cert file is in PEM or DER format), you can run the following command to combine
them into one pkcs#12 file:
- You can upload up to two certificates with the same Azure AD reverse proxy domain name so that you can switch certificates prior to certificate expiry.
- Only one certificate can be marked as Azure AD reverse proxy certificate for each M365 tenant even if your M365 tenant has multiple domains. You need to upload a certificate for the domain selected as the Azure AD reverse proxy domain in M365 instance under the Domains section.
Steps
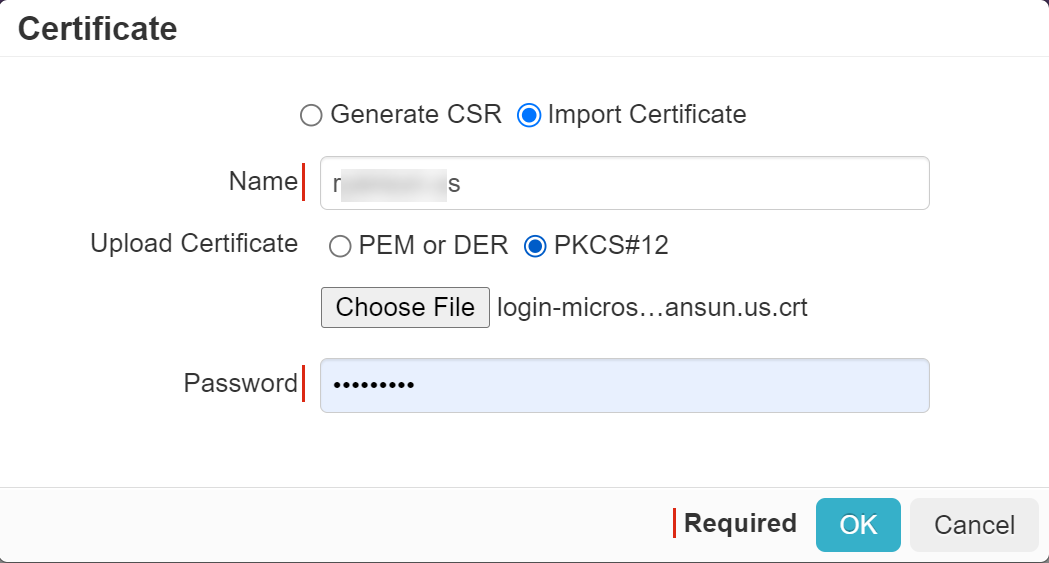
-
Provide the certificate password needed to extract the private key.
-
Locate and select your certificate again and then select the AzureAD Reverse Proxy checkbox.
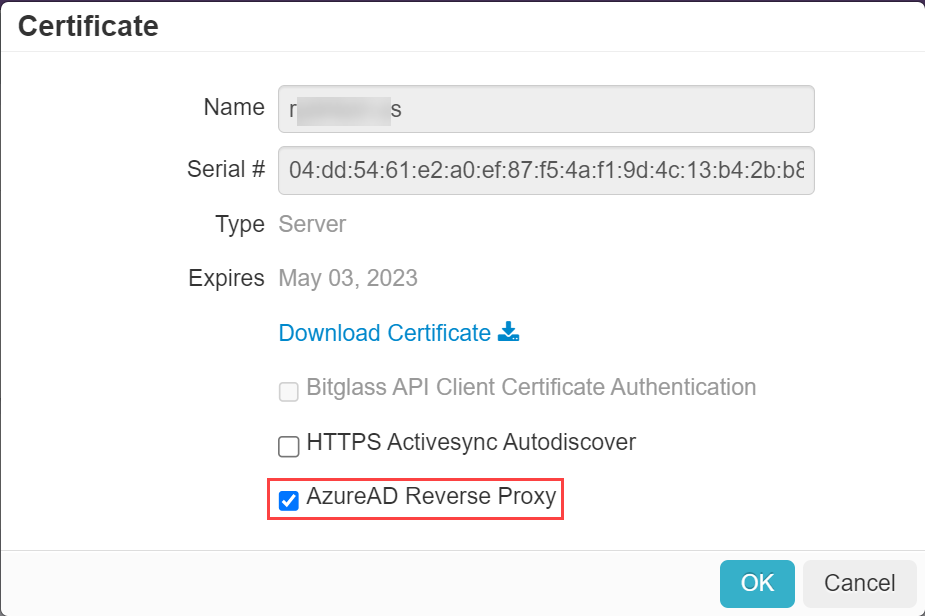
When you check the AzureAD Reverse Proxy checkbox, Forcepoint Data Security Cloud | SSE checks and validates the certificate for the cloudlogin-app-f91827364p subdomain with either the common name or one of the Subject Alternative names.