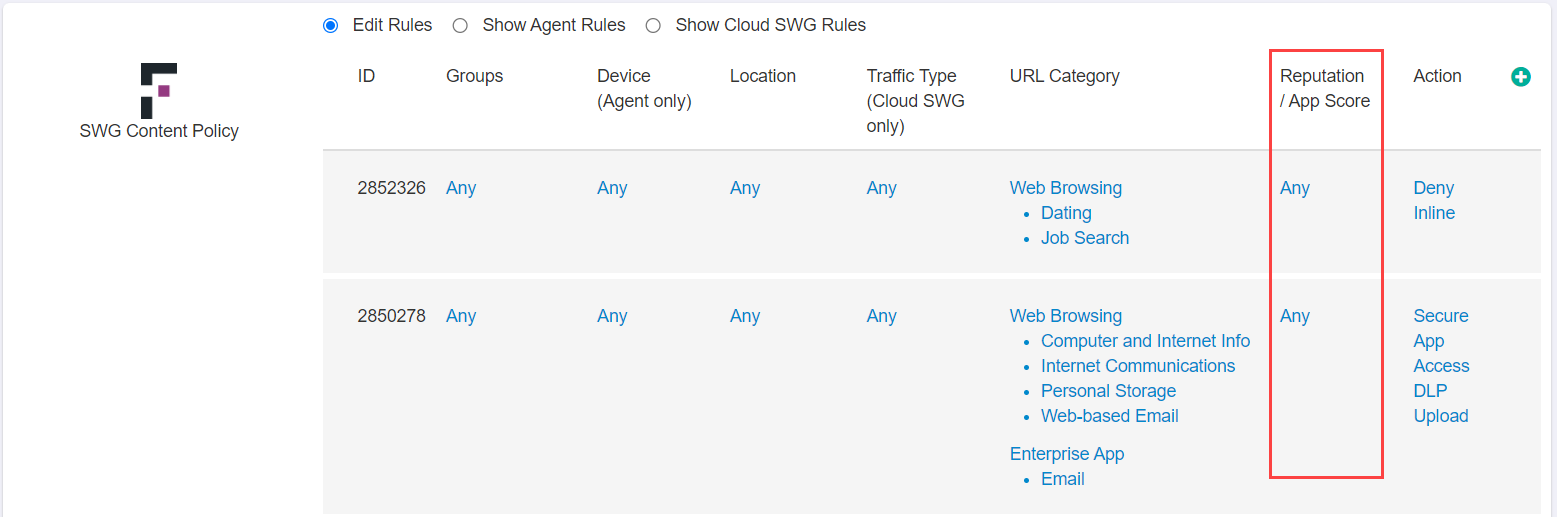
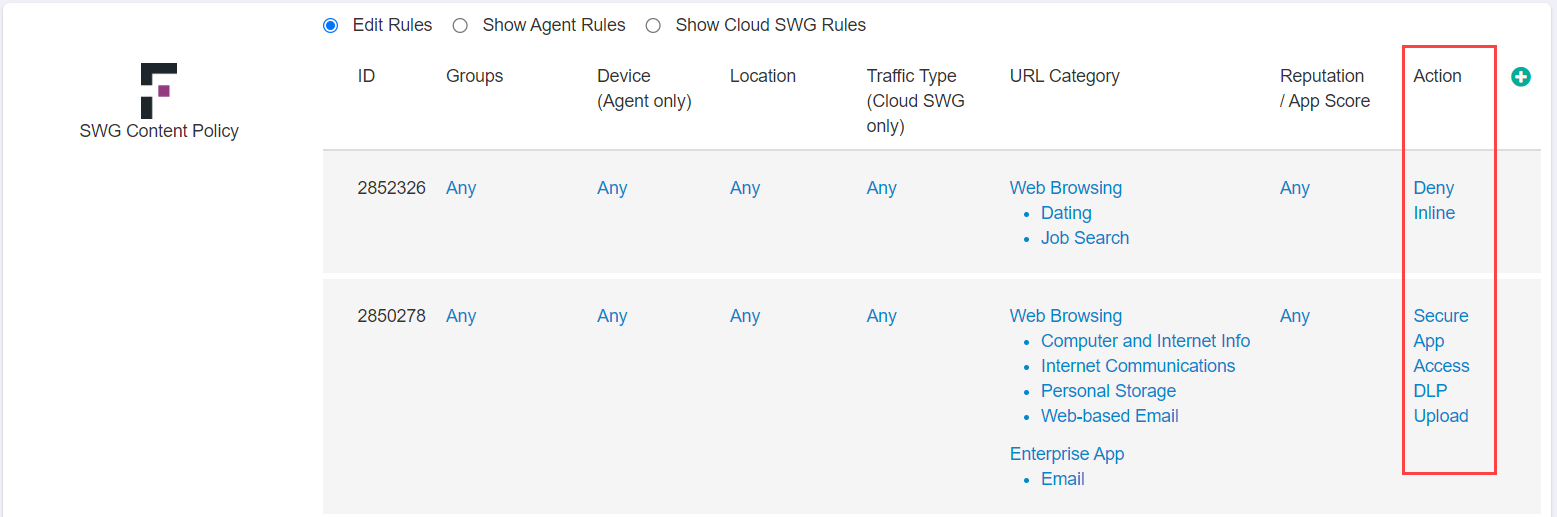
Configuring a SWG Content Policy
With the agent installed or Cloud SWG configured, admins can now configure web proxy policies to control and prevent users from accessing certain sites or domains that are untrustworthy or are possible points of data leakage.
This is in addition to all of the normal proxy policy actions that admins can configure.
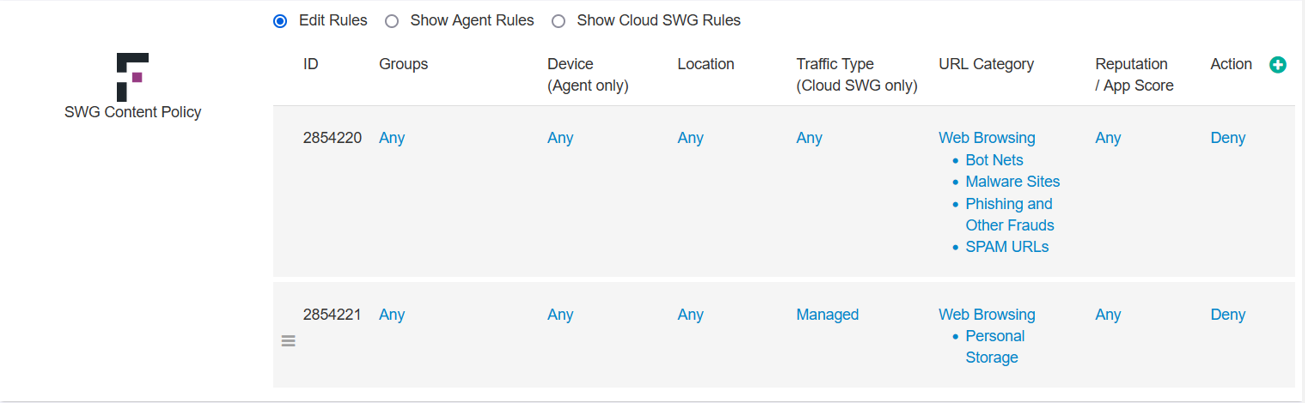
You can select one of the following options to filter the rules and make sure if the rules are configured correctly for Agent and Cloud SWG:
- Edit Rules display all columns and permit you create, edit and delete the rules. By default, this option is selected.
- Show Agent Rules display rules that are applicable only for SmartEdge Agent, that is hides Cloud SWG only column. You can only view rules when you select this option.
- Show Cloud SWG Rules display rules that are applicable only for Cloud SWG, that is hides Agent only columns. You can only view rules when you select this option.
You can configure a number of variables for configuring the Web Proxy Policy:
- Groups: Specify which user/groups the policy line will apply to.
- Device (Agent only): Specify which devices the policy will apply to. Note that you cannot select Client Certificates as an option here since the SmartEdge agent is required for policy enforcement.
- Location: Can specify which locations the policy line will apply to. For example you can enforce stricter policies when users are off the corporate network.
- Traffic Type (Cloud SWG only): Select the traffic type on which policy should be applied.
- URL Category: The URL Category column allows admins to provide controls over entire categories of applications.
- Reputation/App Score: The Reputation/App Score column allows admins to select entire groups of applications based on their Webroot or ThreatSeeker URL reputation or Forcepoint Data Security Cloud | SSE app score.
- Action: This column will allow you to control what policy action is applied to the user based on the above policy configuration. You can set them to Secure App Access (sending them the proxy), Direct App Access (to send them direct and bypass Forcepoint Data Security Cloud | SSE), or Deny. You can also set them to Isolate (to isolate a user session when browsing suspicious or risky websites) for SWG Content Policies if the RBI license is enabled for the tenant.
Let's investigate each one in depth.
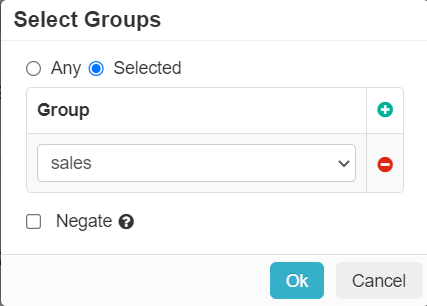
Groups
Locally defined groups or security groups and OUs pulled from active directory. You can add as many groups as are needed for the policy. You can also negate the group so that policy line applies to everyone except the group you selected.
Device
The Device column allows you to set contextual access controls based on the users device (OS/user agent, managed vs unmanaged, and so on).
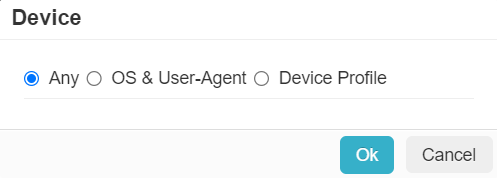
- OS & User-Agent: Allows you to match from a predefined set of common operating systems and/or User-Agent Strings.
- Device Profile: Allows you to match on Device Profiles which are managed under .
Location
The Location column allows you to restrict or control where a user is accessing the cloud application from (either geographic location or IP).
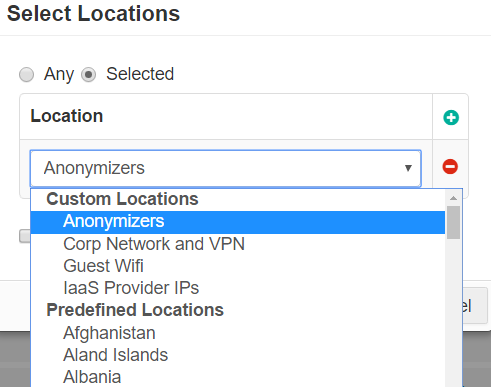
To use a location based policy for managed applications, the location object must contain the IP address of the Cloud-SWG datacenter. When the device is in the office, since traffic is tunneled to the Cloud-SWG, the Reverse Proxy sees the Cloud-SWG IP address and uses it to match the location configured in the managed app policy. Additionally, the location object should also contain other remote office locations that are also permitted.
- Custom Locations can be configured under . Custom locations also include predefined locations that are not based on countries (for example, Anonymizers and IaaS Provider IPs). These locations are managed and updated by Forcepoint Data Security Cloud | SSE.
- Predefined locations include a list of countries. Country match is done using a geo-IP lookup to match source IP address to country.
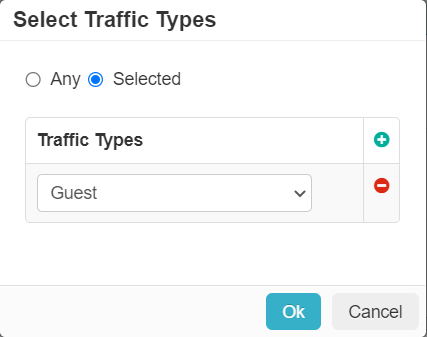
Traffic Type
The Traffic Type (Cloud SWG only) column allows you to select the traffic type so that policy can be applied to the group. You can select from the options in the drop-down or you can go to the page to create a custom traffic type.
URL Category
The URL Category column allows admins to provide controls over entire categories of applications. This allows you to configure if the end user connecting to specific category over the cloud proxy should be redirected to the domain's identity provider for authentication or not.
- For the Webroot URL Categories, you should see UI similar to the following:
Refer to Webroot URL Categories.
- For the ThreatSeeker URL Categories, you should see UI similar to the following:
Refer to ThreatSeeker URL Categories.
You can use the inbuilt URL Lookup page to know the ThreatSeeker URL Categories, Enterprise App Categories, Web Browsing Categories along with their respective reputation scores for the entered URL or IP. Refer to Understanding URL Lookup page to know in detail.
Webroot URL Categories
You can select Webroot URL category from the options in the dropdown or you can go to the Common Objects page and create your own.
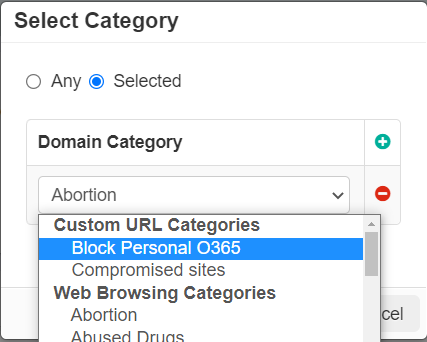
- Click into the URL Category column link to open the dialog options for choosing which categories you will be controlling.
- In the Select Category dialog window, you will have two options: Any (which will apply the policy line to all categories)
and Selected where you can add the categories to the policy line. Click on Selected:
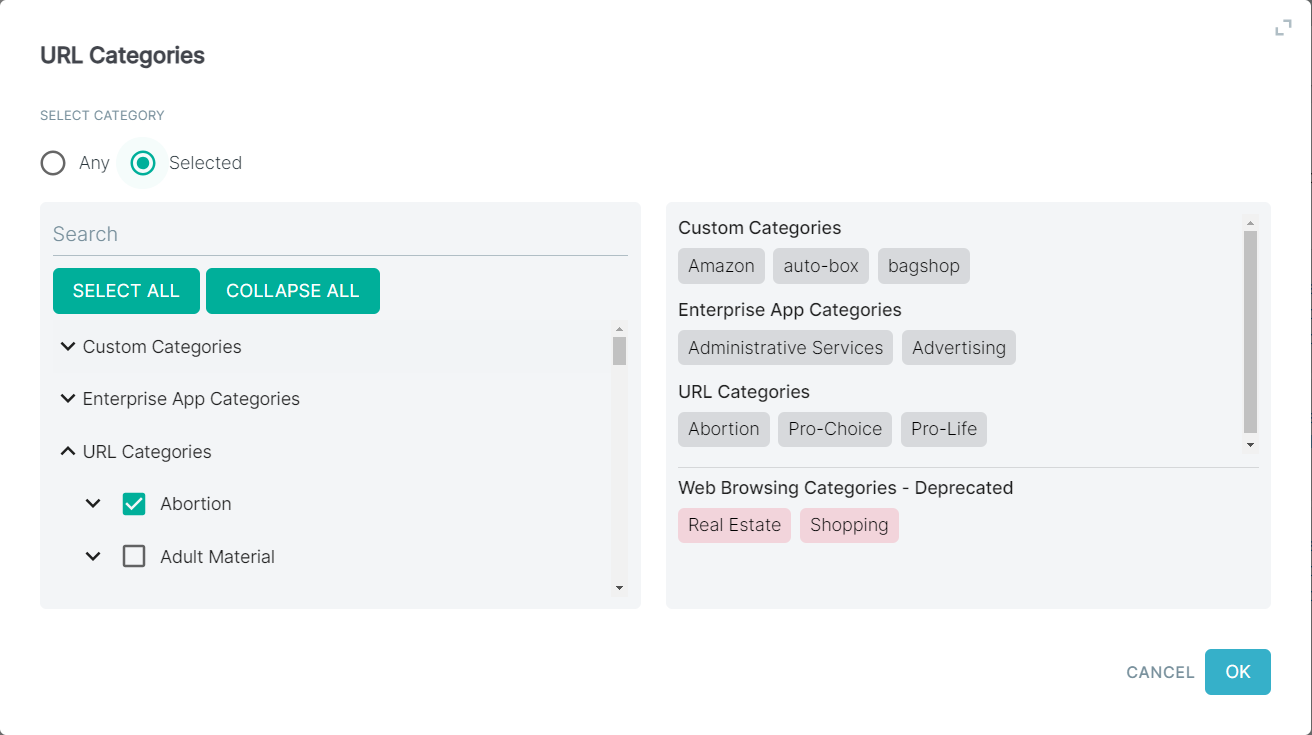
- You will notice 3 different Sections for Categories.
-
Custom URL Categories: These can be defined on the page where you can create a custom domain category to use in policies (that is creating a allow list or a custom list of domains to block).
On clicking Save on the page, the save action will fail and will display an error message if the number of unique custom URLs is more than 3000 across all or any of the SWG policies.
- Web Browsing Categories: This list of categories is sourced from Webroot and can be reviewed on their site.
- Enterprise App Categories: This is the list of categories that Forcepoint Data Security Cloud | SSE tracks and identifies and can be seen when looking through our cloud app repository.
-
- Click the green plus icon and select the desired category from the dropdown. You should select maximum of 50 categories per a policy rule.
- To save the policy, click Save on the Policies page.
When you click Save after adding more than 50 categories per a policy rule, then the Error saving, status: error - Please check the following policies with IDs xxxx to ensure the amount of URL Categories per policy are 50 or under. error is displayed. You can avoid this error by creating two or more policy rules within SWG policy, with each policy rule having a URL category limit set to 50 or fewer.
ThreatSeeker URL Categories
You can select ThreatSeeker URL category from the options in the drop-down or you can go to the Common Objects page and create your own.
You can select all the ThreatSeeker URL Categories by selecting the All option or select desired category or categories by selecting the Selected option.
- Click the categories from the policy. This opens the URL Categories dialog.
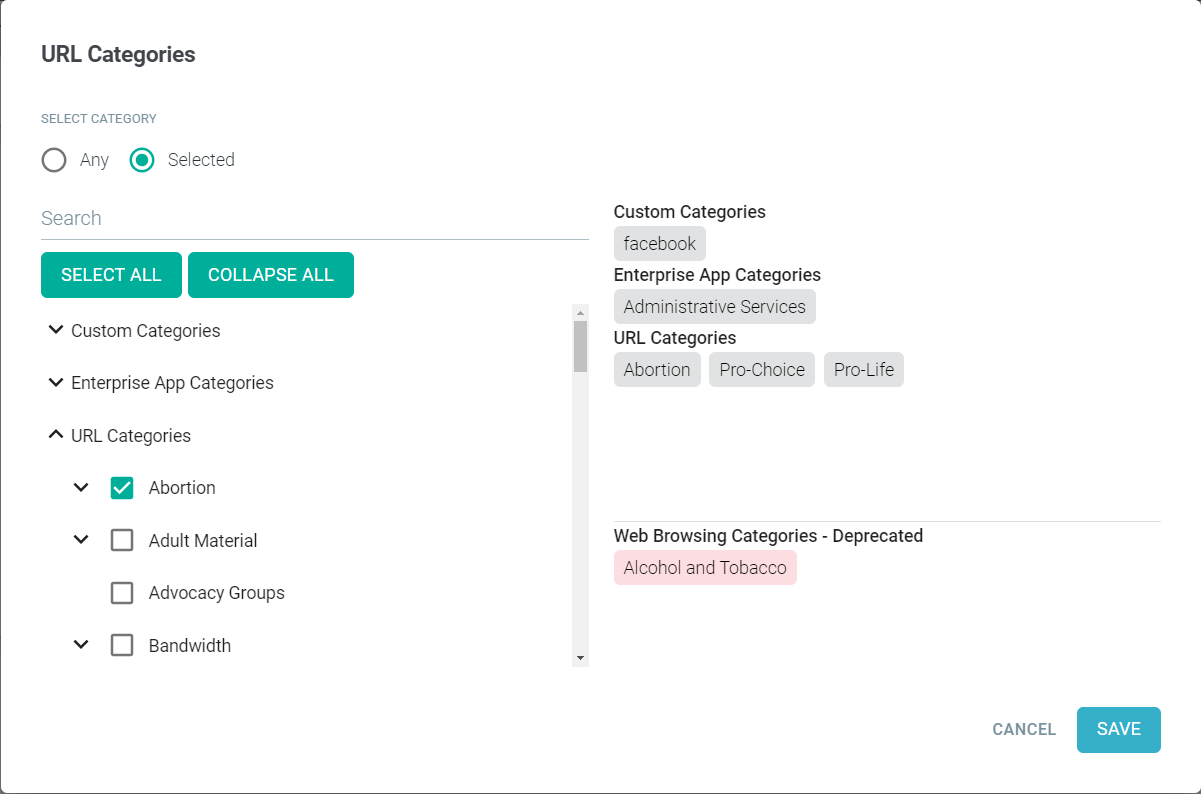
When ThreatSeeker URL Categories feature is enabled and when you modify an existing policy containing Webroot URL categories, then the URL Categories dialog displays the selected Webroot URL categories in red chips under the Web Browsing Categories - Deprecated section.
You should replace the Webroot URL Categories with the equivalent ThreatSeeker URL Categories. To know the mapping of Webroot to ThreatSeeker URL categories, refer to Mapping between Webroot URL Categories and ThreatSeeker URL Categories.
To submit uncategorized or incorrectly categorized sites, refer to How to submit uncategorized or incorrectly categorized sites.
- You will notice 3 different Sections for Categories.
-
Custom Categories: These can be defined on the page where you can create a custom domain category to use in policies (that is creating a allow list or a custom list of domains to block).
On clicking Save on the page, the save action will fail and will display an error message if the number of unique custom URLs is more than 3000 across all or any of the SWG policies.
- Enterprise App Categories: This is the list of categories that Forcepoint Data Security Cloud | SSE tracks and identifies and can be seen when looking through our cloud app repository.
- URL Categories: The list of ThreatSeeker URL categories.
-
- Expand the desired section and scroll down until you identify the desired category.
You can also filter categories by entering the text in the Search field.
- Expand the category if the category is associated with sub-categories.
- Select the check box next to the category or sub-categories. You should select maximum of 50 categories per a policy rule.
When you select Custom categories, Enterprise Categories or ThreatSeeker URL Categories, the selected categories are displayed as chips under their own section on the right of the dialog.
- To save the selected categories, click OK.
When you click OK after adding more than 50 categories per a policy rule, then the Please limit your entry to 50 URL categories or fewer to proceed successfully. error is displayed. You can avoid this error by creating two or more policy rules within SWG policy, with each policy rule having a URL category limit set to 50 or fewer.
- To save the policy, click Save.
When ThreatSeeker URL Categories feature is enabled and when you save the existing policy containing Webroot URL categories after modifying the policy, then the Following categories cannot be saved and need to be replaced or removed: error will be displayed.
For example:

Reputation/App Score
The Reputation/App Score column allows admins to select entire groups of applications based on their Webroot/ThreatSeeker reputation or Forcepoint Data Security Cloud | SSE app score. This allows admins to control or block entire groups of applications based on their risk level. You can use this in conjunction with the Category column to only block untrustworthy apps within a group (for example blocking risky collaboration or social media applications while allowing the trustworthy ones).
Webroot Reputation
- Click into the Reputation/App Score column to pull up the dialog window.
- In the Reputation/App Score dialog window, you will have two options: Any (which will apply the policy line to all scores) and
Selected where you can define the policy to apply to specific app scores. Click on Selected.
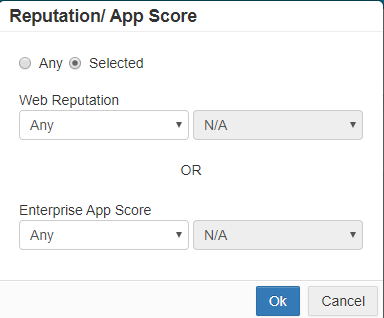
- You will notice two sections for configuration.
- Web Reputation: This is the reputation score assessed by Webroot.
- Enterprise App Score: This is the application score, based out of ten, that Forcepoint Data Security Cloud | SSE assigns to applications based on the risk score formula. This score can be customized by admins since the formula calculates this risk score based on weighting of the applications attributes and trust rating.
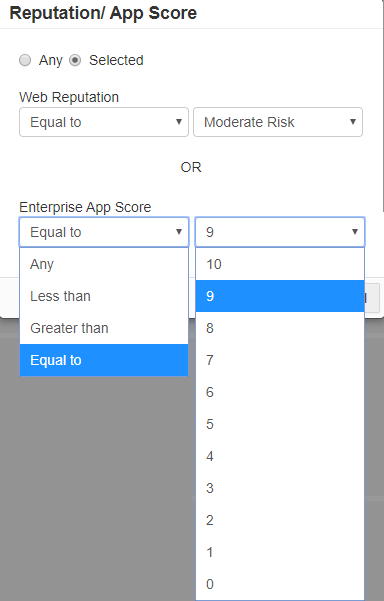
Note: Configuring both will apply the policy if it matches either configuration (webroot score or enterprise app score). - For the Web Reputation, you can set it to be Any, less than, greater than, or equal to any of the Webroot reputation:
- Trustworthy (81-100)
- Low Risk (61-80)
- Moderate Risk (41-60)
- Suspicious (21-40)
- High Risk (1-20)
You can learn about these scores or see what an individual application or domain is scored by looking it up at Webroots lookup site.
- For the Enterprise App Score, you can set it to be Any, less than, greater than, or equal to any of the Forcepoint Data Security Cloud | SSE
Enterprise App Score which is on a system of 0-10 with 0 being a low score (extremely risky) and 10 being a high score (trustworthy). You can review these scores in
the Forcepoint Data Security Cloud | SSE cloud app repository when researching applications. You can also adjust what scores apps receive by changing the weights of each
attribute that is assessed in page.
ThreatSeeker Reputation
- Click into the Reputation/App Score column to pull up the dialog window.
- In the Reputation/App Score dialog window, you will have two options: Any (which will apply the policy line to all scores) and
Selected where you can define the policy to apply to specific app scores. Click on Selected.
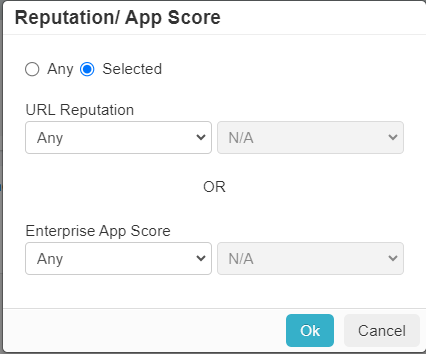
- You will notice two sections for configuration.
- URL Reputation: This is the reputation assessed by ThreatSeeker.
- Enterprise App Score: This is the application score, based out of ten, that Forcepoint Data Security Cloud | SSE assigns to applications based on the risk score formula. This score can be customized by admins since the formula calculates this risk score based on weighting of the applications attributes and trust rating.
Note: Configuring both will apply the policy if it matches either configuration (URL reputation or enterprise app score). - For the URL Reputation, you can set it to be Any, less than, greater than, or equal to any of the ThreatSeeker Reputation:
- Very Safe (90-100)
- Fairly Safe (80-89)
- Marginally Safe (70-79)
- Suspicious (60-69)
- Harmful (0-59)
When ThreatSeeker URL Categories feature is enabled and when you save the existing policy containing Webroot scores after modifying the policy, then the Following Policies cannot be saved as they have older reputation conditions and need to be updated to use the new reputation values. error will be displayed.
- For the Enterprise App Score, you can set it to be Any, less than, greater than, or equal to any of the Forcepoint Data Security Cloud | SSE
Enterprise App Score which is on a system of 0-10 with 0 being a low score (extremely risky) and 10 being a high score (trustworthy). You can review these scores in
the Forcepoint Data Security Cloud | SSE cloud app repository when researching applications. You can also adjust what scores apps receive by changing the weights of each
attribute that is assessed in page.
Actions
Finally, once you have configured all of the other columns, you can now select what action will be taken on the policy line.
- Click into the Actions column to pull up the dialog window.
- In the Actions dialog window, you will see three available options for action controls you can apply
- Secure App Access: This will proxy traffic to the application or site in question and allow you to control upload attempts to the site. You can choose to deny
the ability for users to download or upload/enter sensitive content based on pattern match. You can also configure alerts to be generated and sent to the admin or offending user. Refer
to the Configure notifications and reports for more information. To learn about configuring Data Patterns, refer to the DLP data patterns. You can refer to the
Proxy Policy Actions for more information on configuring these policy options.
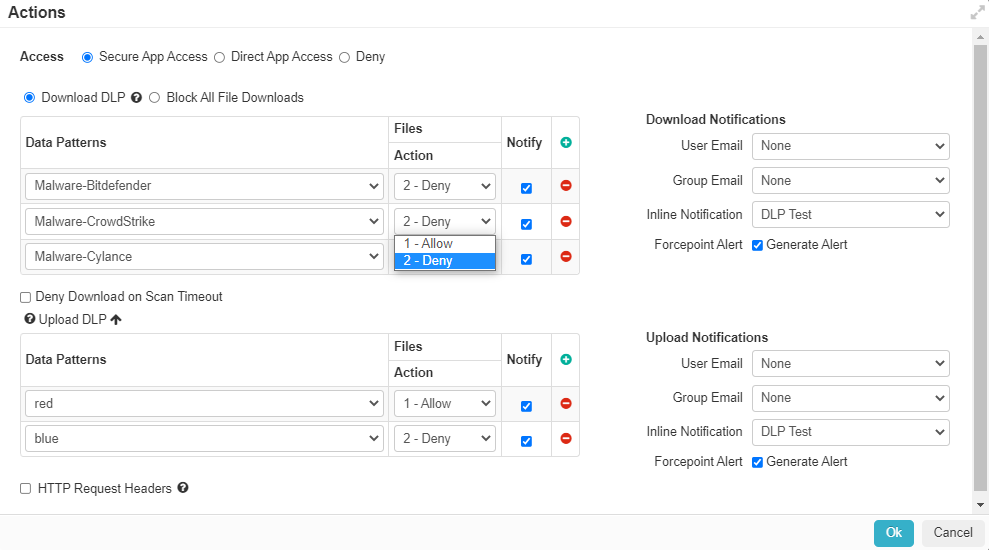
The header insertion is only supported for managed applications currently and not for the SWG (SmartEdge Agent or Cloud SWG).
Note:- The Block All File Downloads option is not supported for SWG Content Policies and will be removed from UI in a future release.
- DLP notification for inline for Web DLP (when applying inline controls over websites via the SmartEdge agent) supports all the same variables for custom notifications as managed apps except for the Application Name variable. Refer to the Notifications for more information.
- For the agentless Cloud SWG traffic, the Inline notifications for Upload DLP and Download DLP are not supported for both SWG Content Policy and for Managed Applications policies. Instead, Forcepoint recommends using the User Email notification.
- DLP is not supported on files larger than 40MB
- Direct App Access: This will allow access to the site without tracking the users actions on the site. There are no additional actions to be configured since you
are allowing users access.

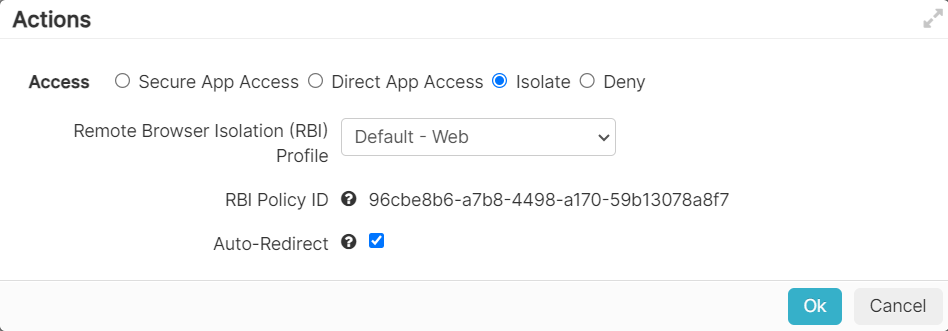
- Isolate: This option is available only if the RBI license is enabled for the tenant and if it is a SWG Content Policy. This option enables you to apply RBI
profile to policy so that when user access suspicious or risky websites, their session is isolated and behaves as per the selected RBI profile.
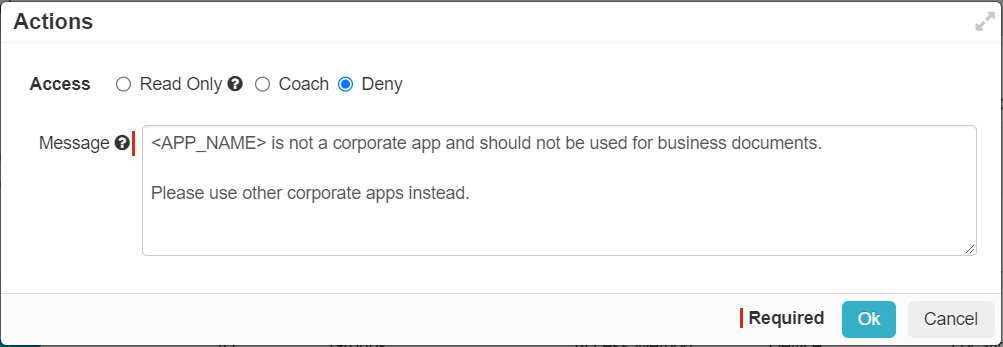
- Deny: This will deny the user access to the site or application altogether. Users will be presented with the configured inline notification message when they
attempt to access the site. To learn about configuration these messages, refer to the Notifications.Note: Inline notifications are not supported when the Action is set to Deny for the SWG Content Policy.
- Secure App Access: This will proxy traffic to the application or site in question and allow you to control upload attempts to the site. You can choose to deny
the ability for users to download or upload/enter sensitive content based on pattern match. You can also configure alerts to be generated and sent to the admin or offending user. Refer
to the Configure notifications and reports for more information. To learn about configuring Data Patterns, refer to the DLP data patterns. You can refer to the
Proxy Policy Actions for more information on configuring these policy options.