(MDM) Installing the agent for Hybrid DLP with Web Security
This section outlines the steps to install the macOS Forcepoint Agent using Jamf for hybrid DLP with Web Security Proxy Connect (PCEP) or Direct Connect (DCEP).
Steps
-
Create the endpoint SSL identity.
The following files are generated:
- key.pem
- server.pem
-
Convert the server.pem file to the .der format using the following openssl command:
openssl x509 -in server.pem -out server.der -outform DER -
Obtain the Forcepoint Cloud CA certificate:
- Go to the Forcepoint Cloud Security Gateway portal.
- Select the policy from Account > Policies, and then click Web Categories.
-
Click Forcepoint LLC root certificate(s), and save the certificate.
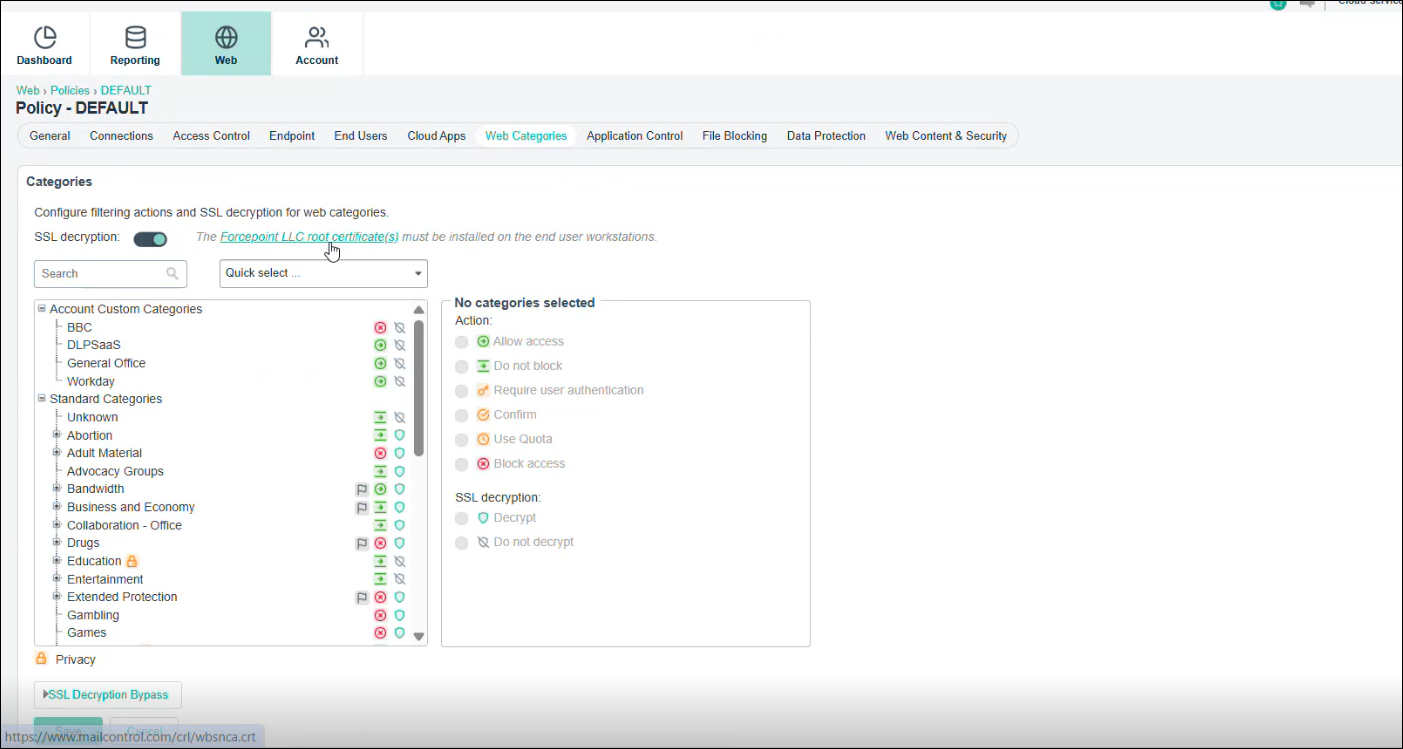
- Obtain the generate_root_ca tool from here.
-
Run the chmod +x /Users/<username>/Downloads/generate_root_ca (replace <> with your user name) command to convert the downloaded file to .exe format,
and then run the generate_root_ca.exe file in the terminal:
The _ca.cer certificate and the fpnpd.dat file generates in the installer folder.
- Obtain the ca.cer and localconfig.xml files from the DLP manager in FSM, located at C:\Program Files (x86)\Websense\Data Security\client.
-
Create an installer package for Jamf MDM deployment:
- Obtain the downloaded agent package and extract its contents.
- Create a new folder named DSEInstaller.
-
Copy the following files(downloaded in the previous steps) into the DSEInstaller folder:
- fpnpd.dat
- manifest.json
- WebsenseEndpoint.pkg
- key.pem
- server.pem
- ca.cer
- localconfig.xml
Note: If using a custom ca.cer with multiple certificates, ensure that the cert and key for the DLP manager are placed first in the ca.cer file and any other certs are place after this. - Compress the DSEInstaller folder into a zip file.
-
Open Jamf Pro and in Computers > Configuration Profiles, deploy the following files through Jamf:
- The _ca.cer and server.der certificates.
- The Forcepoint Cloud CA certificate.
- Privacy Preferences Policy Control (pppc) profile (for enabling FDA & fpneone process).
- Outlook add-in
-
Deploy the package in Jamf.
The enrolled profiles will display under the Device (Managed) section in System Settings > General > Device Management in your system, and the Full Disk Access will be enabled for the following applications configured by the profiles.
Application Path EndpointClassifier Library/Application Support/Websense Endpoint/EPClassifier/EndPointClassifier ESDaemonBundle Library/Application Support/Websense Endpoint/DLP/ESDaemonBundle.app AEserver System/Library/Frameworks/CoreServices.framework/Versions/A/Frameworks/AE.framework/Versions/A/Support/AEServer FPEPAgent Library/Application Support/Websense Endpoint/Cloud/FPEPAgent Websense Endpoint Helper Library/Application Support/Websense Endpoint/DLP/Websense Endpoint Helper.app F1EHelper Library/Application Support/Websense Endpoint/F1E/F1E Helper.app wsdlpd Library/Application Support/Websense Endpoint/DLP/wsdlpd fpprotectiond Library/Application Support/Websense Endpoint/Cloud/fpprotectiond fpbrokerd Library/Application Support/Websense Endpoint/Cloud/fpbrokerd