Add new rule to policy
Click the Add new rule button on the policy editor, or right-click a specific policy, from the context menu to select the Add new rule option to open the rule editor.
Once a new policy is saved, the policy editor will automatically display the Create rule editor. The rule status can be set to enable or disable.
A policy rule editor consists of the following parts:
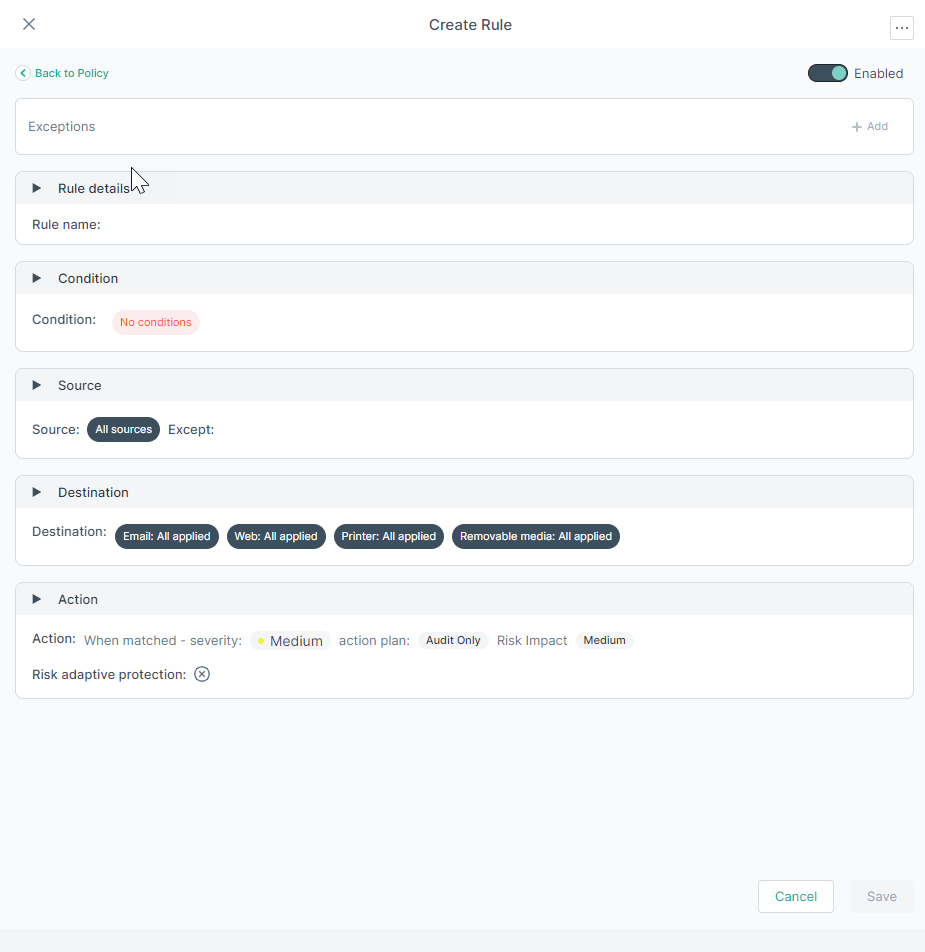
Rule details
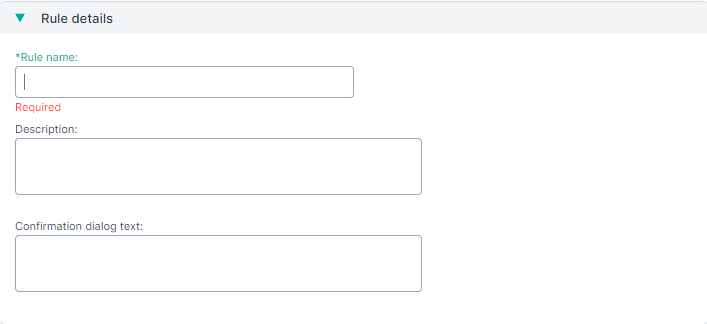
- Rule name (Required): Enter a name that will be used to save the rule.
- Description: Enter a brief description on the purpose of the rule.
- Confirmation dialog text: Enter the text that will be displayed to the user in the pop up displayed when the action plan is Confirm and this action is triggered.
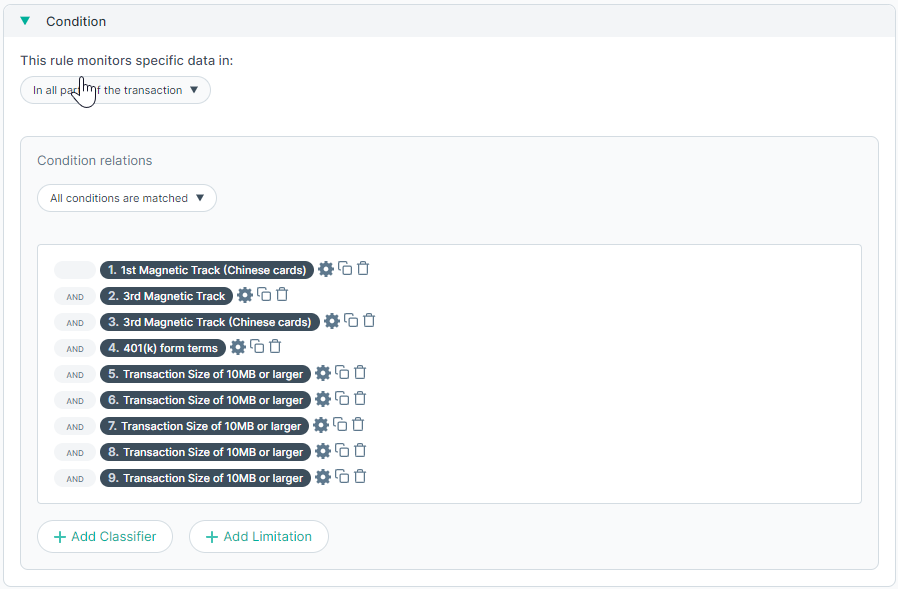
Condition
Defines the type of data that should be matched.
You can also edit the properties of the classifier by just clicking on the classifier in the list:

- 1: Settings - You can edit/modify the properties of the selected classifier.
- 2: Duplicate - You can duplicate the specific classifier.
- 3: Remove - You can delete the specific classifier.
This rule monitors specific data in: This drop-down lists options that indicate when to trigger incidents. Administrators can choose from following options to apply the conditions on:
- In all parts of the transaction: To trigger an incident if the sum of all matches in the transaction exceeds the configured threshold. For example, if the threshold is 3, then a transaction with 2 matches in the message body and one match in the subject line triggers an incident.
- In each part of the transaction separately: To trigger an incident triggered only when the threshold is reached in any one part of the transaction. For example, there would have to be 3 matches in the body text or 3 in the subject line or other message parts for an incident to be triggered.
Condition relations: Indicates when the rule should be triggered if more than one condition is defined.
Administrator can choose to set condition relations to apply conditions from any of the following options:
- All conditions are matched: Trigger the rule if all the selected conditions are matched.
- At least one condition is matched: Trigger the rule if only one of the selected conditions is met.
- User can set custom relation: Using boolean logic define when a rule should be triggered.
You can add classifiers and limitations to the condition relations.
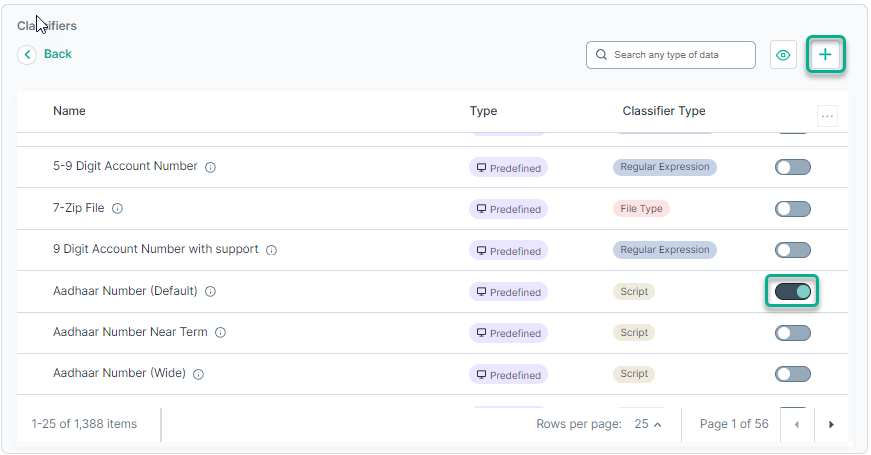
- +Add Classifier: Use this option to add classifiers to the build the condition relations.
- Click +Add Classifier.
- Enable the classifier you want to add from the list. Next, click the + sign to add it to the condition relation.
To view or edit the properties of a classifier, just click the classifier in the list:
This opens the following dialog, where you can edit the properties of a classifier:
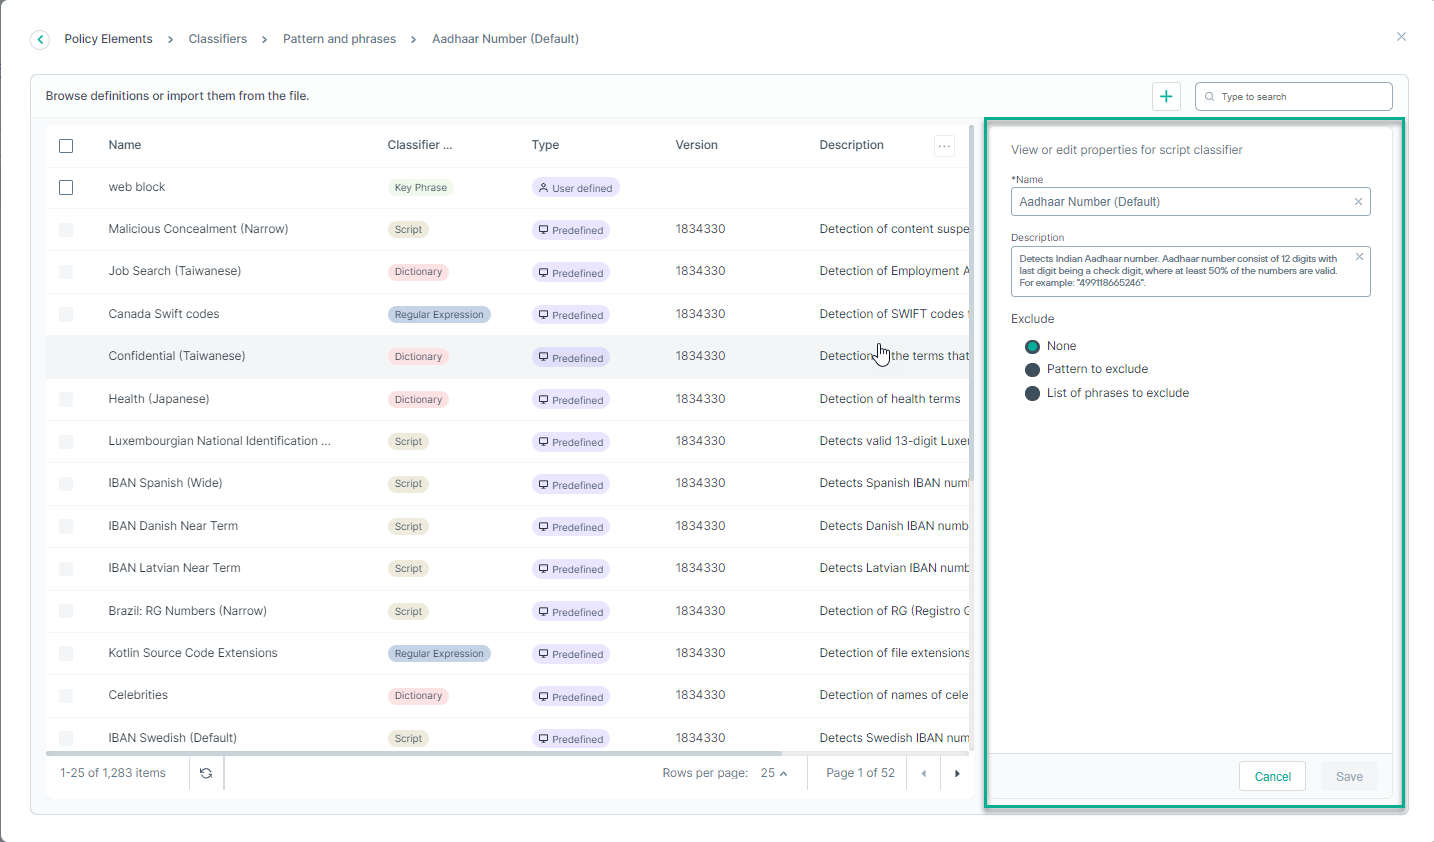
You can enter the pattern or phrases to exclude:
- None
- Pattern to exclude: Enter the pattern to exclude.
- List of phrases to exclude: Include the phrases to exclude. You can include wildcards as well.

- Add Limitation: Use the option to add limitations to the condition. You can define following:
- Transaction Size: Define to detect transactions of the specified size or larger.
- Email Attachments: Define to detect email messages with a certain number of attachments or greater.
- Email Destinations: Define to detect messages sent to a specified number of domains or greater.
Source
Identifies the sources of data, such as endpoints, devices, domains, and networks, that apply to this rule. By default, a rule applies to all sources. A rule can be applied to specific sources (Inclusions), or specific sources can be excluded from the rule (Exclusions). Use the drop-down to select between types of sources, such as Users, Group Directory, Registered endpoints, Custom computers, Domains, Networks, Business units, Organizational units, or Computers. Use the search option to locate one or more elements and then click the + icon to move the selected elements to the Inclusions or Exclusions box as required. You can also choose to add or remove multiple selections using the Add all or Remove all buttons.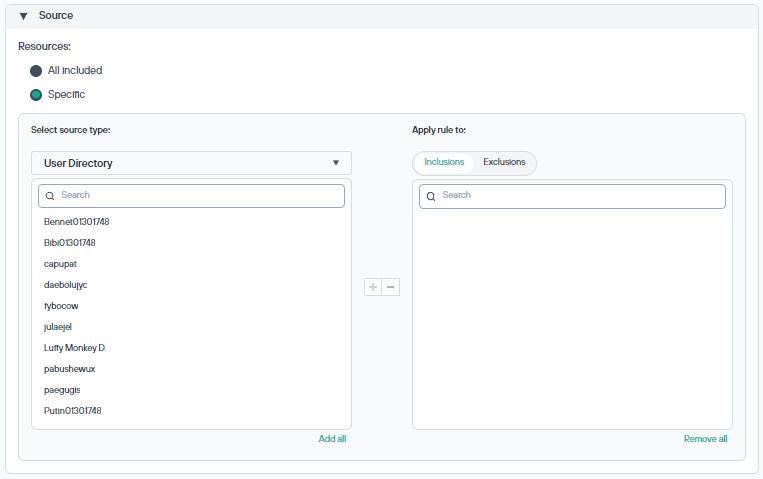
Destination
Define the destinations for data protected by this rule.
Summary of channel categories
| Category | Channel | Monitored by |
|---|---|---|
| Endpoint | Printing, Removable Media, Applications, LAN | Endpoint agent (DSE or F1A) |
| Endpoint Email | Endpoint agent (DSE or F1A) | |
| Cloud Email | Data Protection Service (DPS) | |
| Web | Endpoint HTTP, Endpoint HTTPS | Endpoint agent (DSE or F1A) |
| Web | HTTP, HTTPS, FTP | Cloud proxy |
| Apps | API, Inline | Cloud |
From the Select destination field, select the destination category: Endpoint, Email, Web, or Apps. Each category contains one or more channels, selectable via the Select type field. Use the toggle to enable or disable the selected destination.
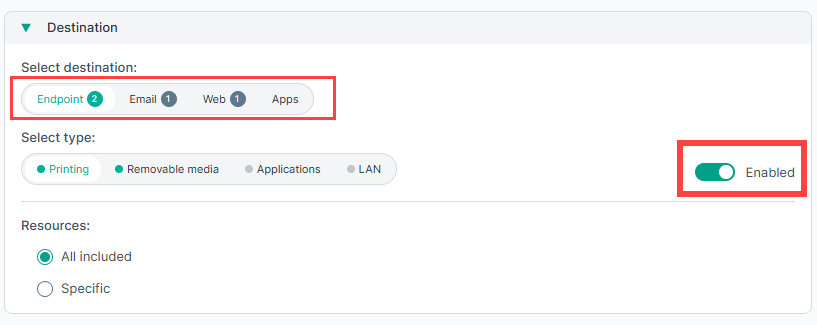
Endpoint
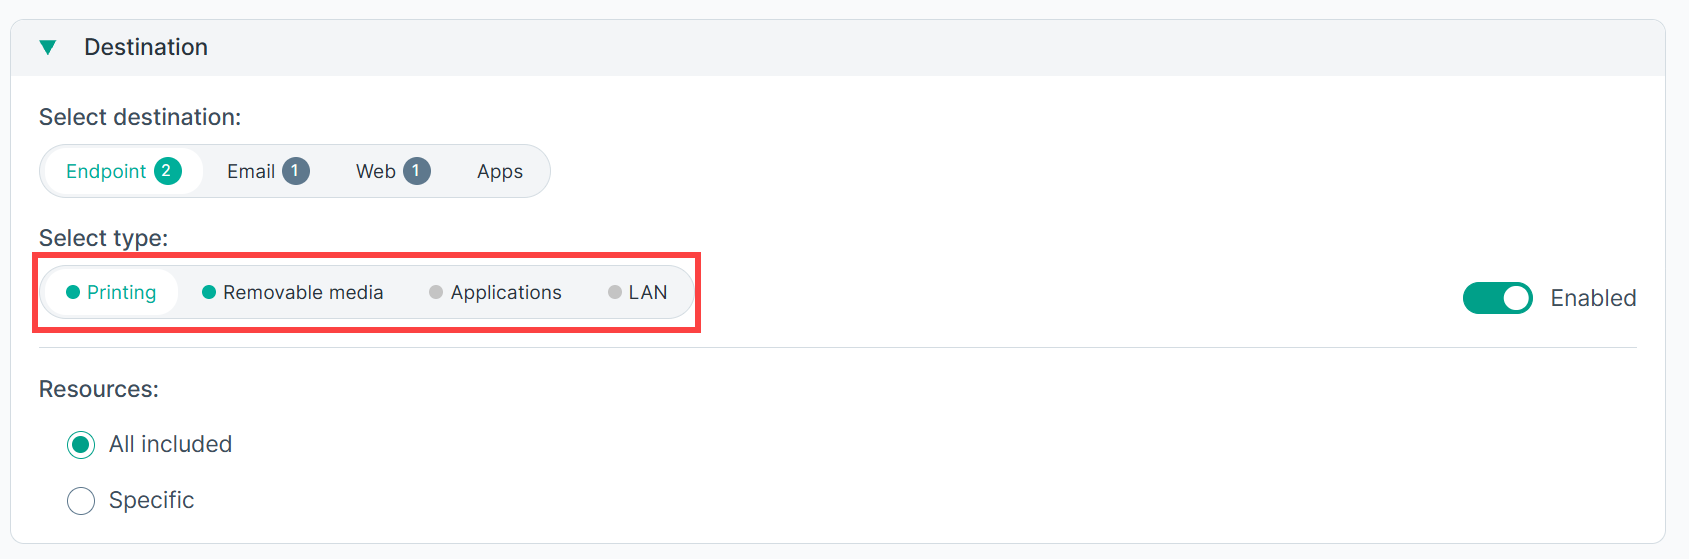
Select Endpoint to monitor channels on endpoint machines. Choose one or more channel types from Select type:
- Printing – Analyzes files that endpoint users send to printers.
- Removable Media – Analyzes media such as thumb drives, external hard drives, and other USB devices connected to endpoint machines. By default, all removable media is included.
- Applications – Analyzes content that is cut, copied, pasted, or otherwise handled by users on endpoint applications (Windows endpoints only). You can select from:
- Online application groups: SaaS and other online applications.
-
Application groups: Installed applications.
Use the search option to locate elements and click + to move them to the Inclusions or Exclusions box. You can also use Add all or Remove all to manage selections in bulk.
- LAN – Analyzes endpoint file copy over LANs. By default, outbound traffic to all networks is covered. Applicable to Windows endpoints using Windows file sharing only. You can select from the following element types: Networks, Custom computers, or Business Units.
Set the toggle to Enabled. Specify whether the rule applies to All included or Specific destinations. If Specific is selected, use the search option to locate elements and click + to move them to the Inclusions or Exclusions box as required.
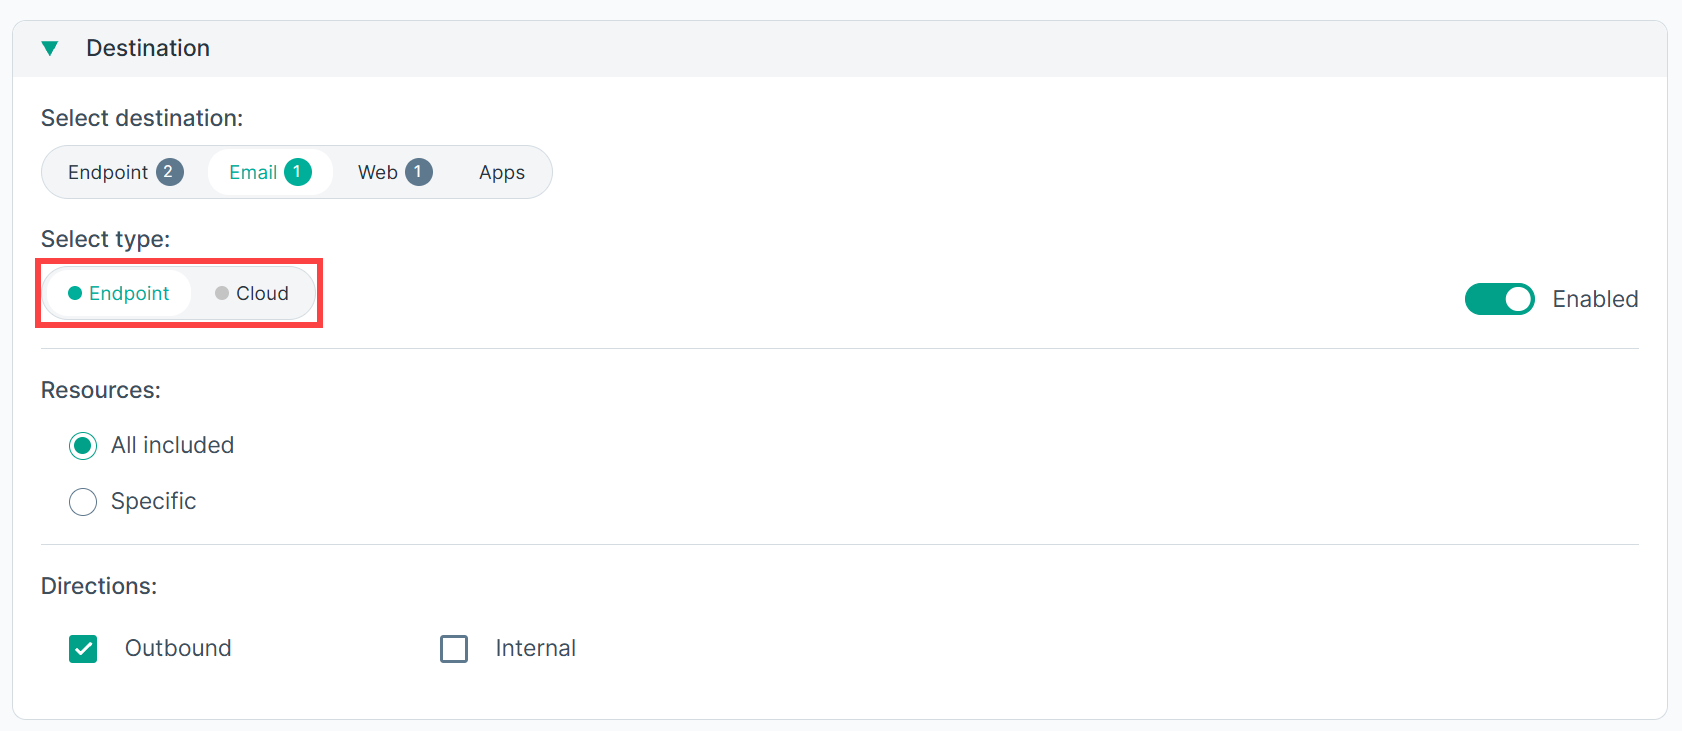
Select Email and then choose the channel type from Select type:
- Endpoint – Monitors email on endpoint machines via the endpoint agent.
- Cloud – Monitors email via the Data Protection Service (DPS).
Set the toggle to Enabled. If Endpoint is selected, specify whether the rule applies to All included or Specific destinations. If Specific is selected, use the search option to locate elements and click + to move them to the Inclusions or Exclusions box as required. To add, edit, or delete domains, see the Domains section.
Select the Direction:
- Outbound – Monitors email sent outside the organization.
- Internal – Monitors email exchanged within the organization.Note: Cloud Email requires a separate license and is displayed only if this license is in place.
Web
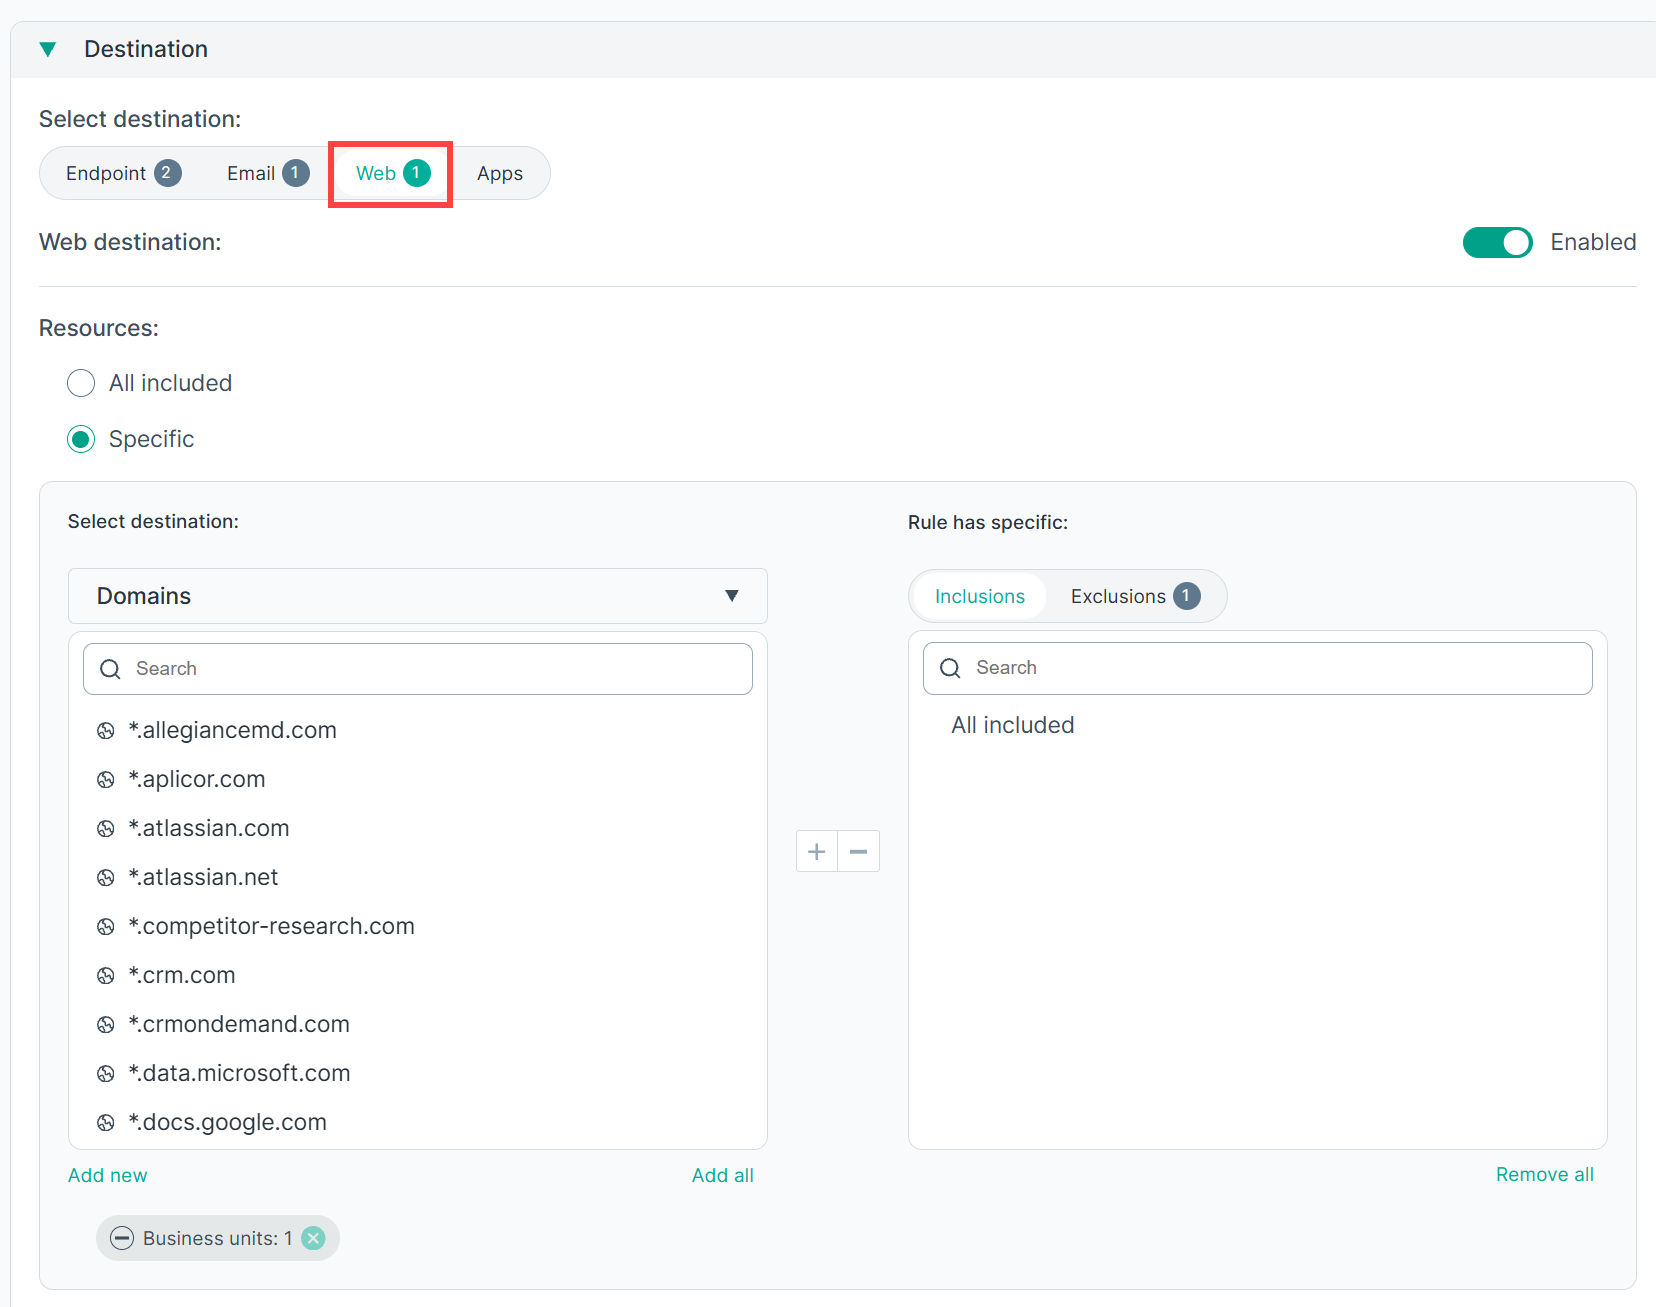
Select Web to prevent or monitor users posting sensitive data via web channels. Set the Web destination toggle to Enabled.
The Web destination includes both endpoint and cloud channels. Use the Channels field to select or deselect individual channels:
- Endpoint Web channels:
- Endpoint HTTP – Websites, blogs, and forums accessed by endpoint machines over HTTP.
- Endpoint HTTPS – Websites, blogs, and forums accessed by endpoint machines over HTTPS.
- Cloud Web channels:
- HTTP – Web traffic routed through the cloud proxy over HTTP.
- HTTPS – Encrypted web traffic routed through the cloud proxy over HTTPS.
- FTP – File transfers routed through the cloud proxy via FTP.
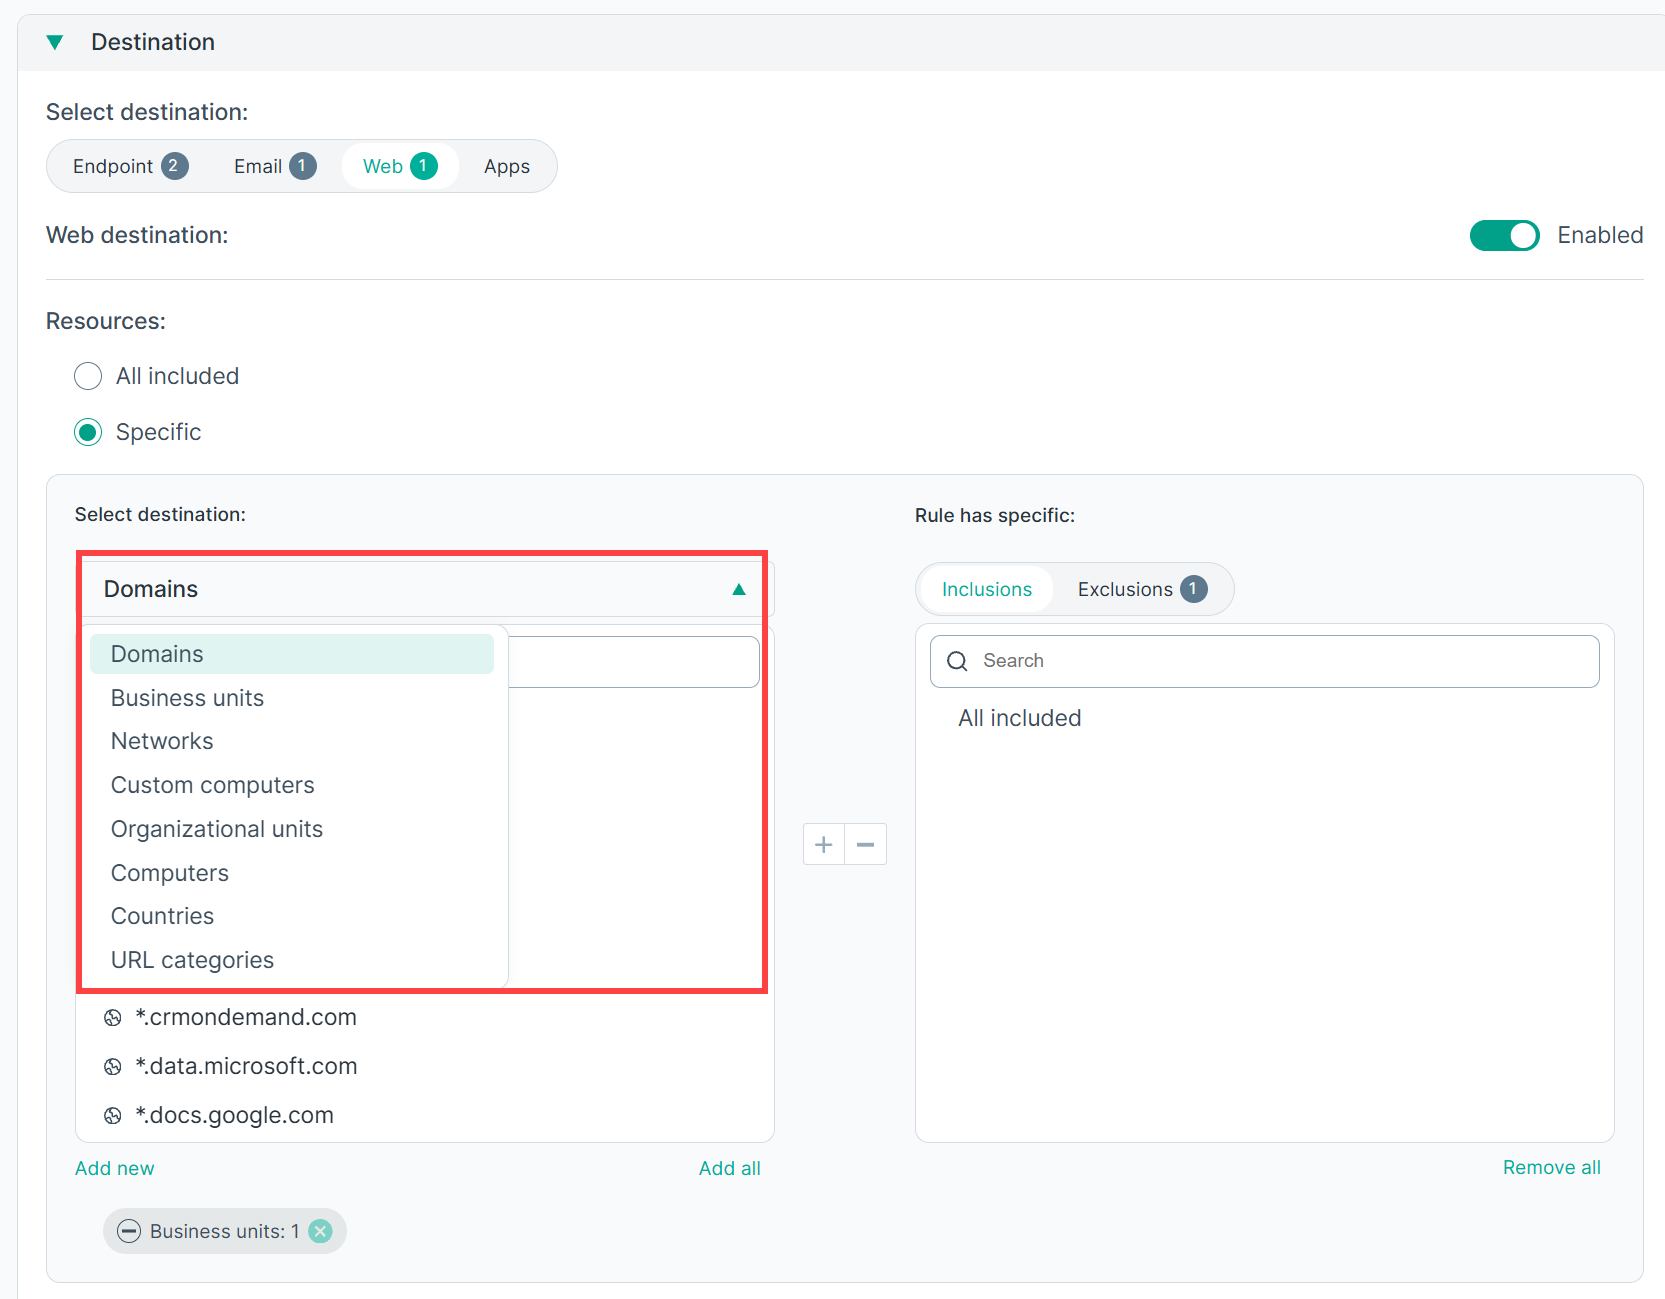
Note: HTTP, HTTPS, and FTP (Cloud Web) require a separate license and are displayed only if this license is in place.Specify whether the rule applies to All included or Specific destinations. If Specific is selected, use the Select destination dropdown to filter by resource type, then use the search to locate elements and click + / – to move them to the Inclusions or Exclusions list. Use Add all or Remove all to manage selections in bulk. The following resource types are available:
- Domains – Specific web domains or subdomains (e.g., *.example.com). Use Add new to create a domain entry.
- Business units – Predefined groups of users or resources representing a business unit in your organization. Use Add new to create a business unit.
- Networks – Specific IP address ranges or subnets. Use Add new to define a network.
- Custom computers – Individually defined computers that do not fall under standard organizational groupings. Use Add new to add a custom computer.
- Organizational units – Units defined in your directory structure (e.g., Active Directory OUs). Populated from your directory; no manual entry.
- Computers – Specific individual computers identified by hostname. Populated from your directory; no manual entry.
- Countries – Web traffic originating from or destined for specific countries. Select from the predefined country list.
- URL categories – Predefined hierarchical categories of URLs (e.g., Adult Material, Social Media, Finance). Select from the predefined category list.
To add, edit, or delete networks, domains, business units, and custom computers, see the Resources section.
Note: Several SaaS domains are excluded from Web analysis by default. You can add or remove domains from the exclusion list, or customize the resources excluded from web policies by default. For more information, see the Business Units section.
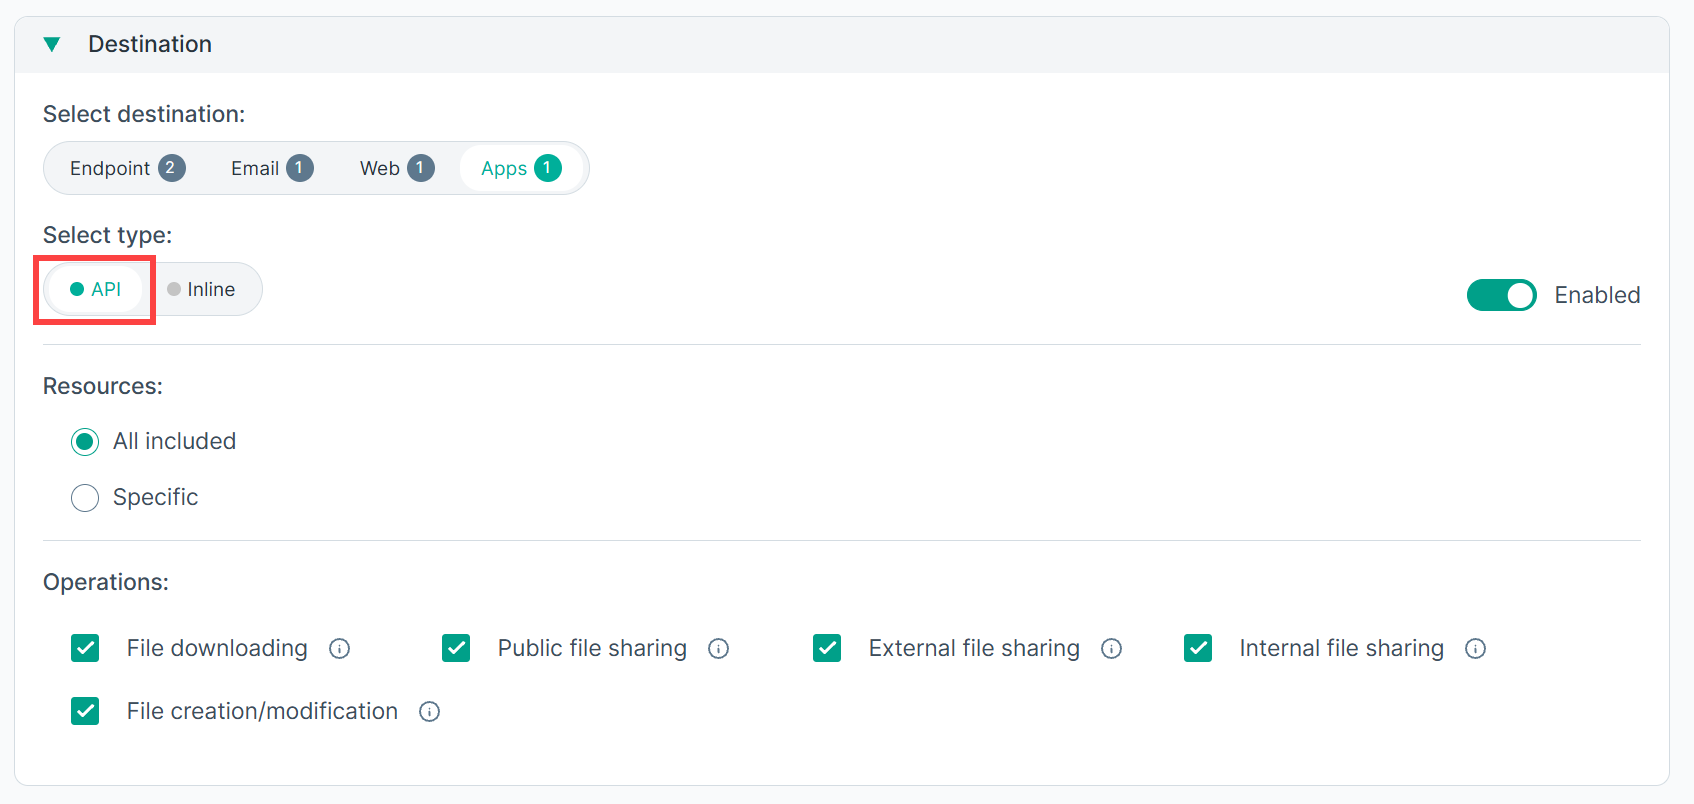
Apps
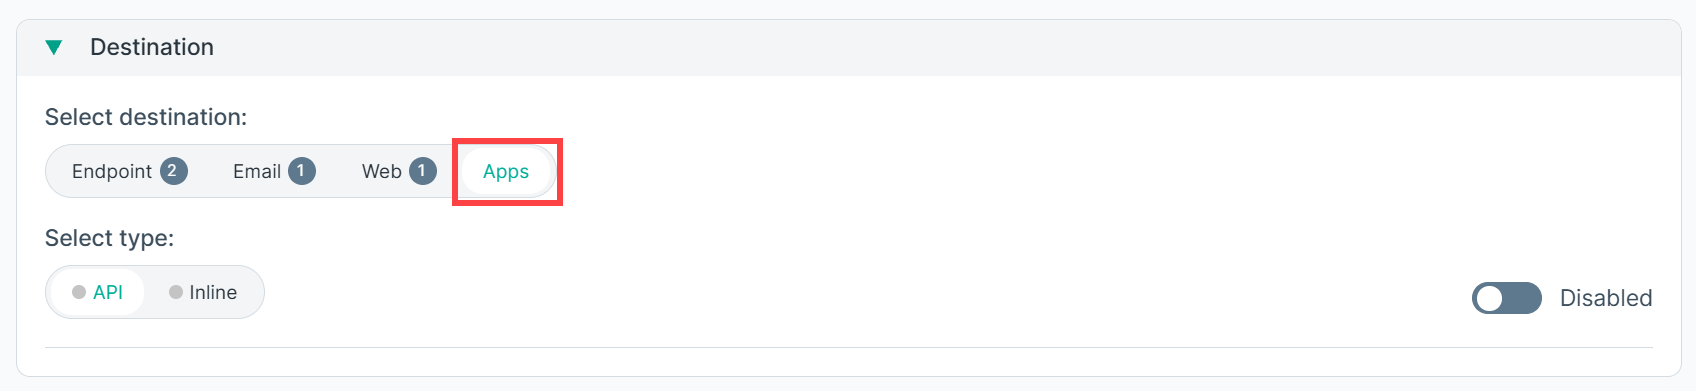
Select Apps to analyze files sent to supported cloud applications such as Microsoft 365 or Box. Choose the channel type from Select type:
- API – Analyzes cloud application activity via API integration. Set the toggle to Enabled. Specify whether the rule applies to All
included or Specific resources. If Specific is selected, use the search to locate applications and click + / – to
manage the Inclusions or Exclusions list. Select at least one operation from the following:
- File creation/modification – Detects sensitive content when files are created or modified in a cloud application.
- File downloading – Detects sensitive content when files are downloaded from a cloud application.
- Public file sharing – Detects sensitive content shared publicly via a cloud application.
- External file sharing – Detects sensitive content shared with users outside the organization.
- Internal file sharing – Detects sensitive content shared among users within the organization.
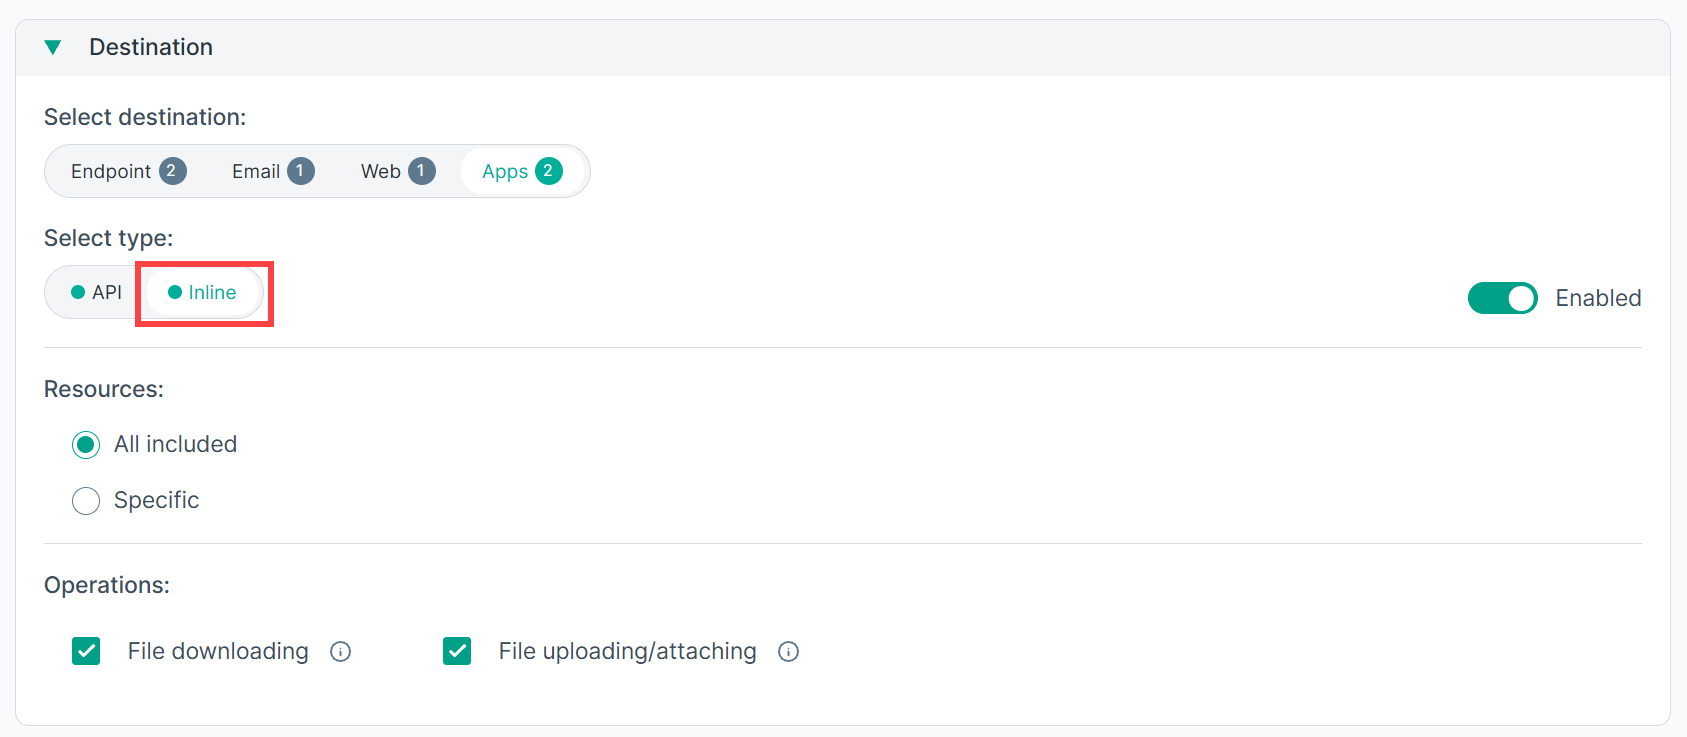
- Inline – Analyzes cloud application activity inline as traffic passes through the proxy. Set the toggle to Enabled. Specify whether the rule applies to
All included or Specific resources. If Specific is selected, use the search to locate applications and click
+ / – to manage the Inclusions or Exclusions list. Select at least one operation from the following:
- File downloading – Detects sensitive content when files are downloaded from a cloud application.
- File uploading/attaching – Detects sensitive content when files are uploaded or attached in a cloud application.
Action
Defines the severity and action to apply based on the matched conditions. Also allows for selection of notification templates to notify when certain actions are taken. For details, see Notification Templates.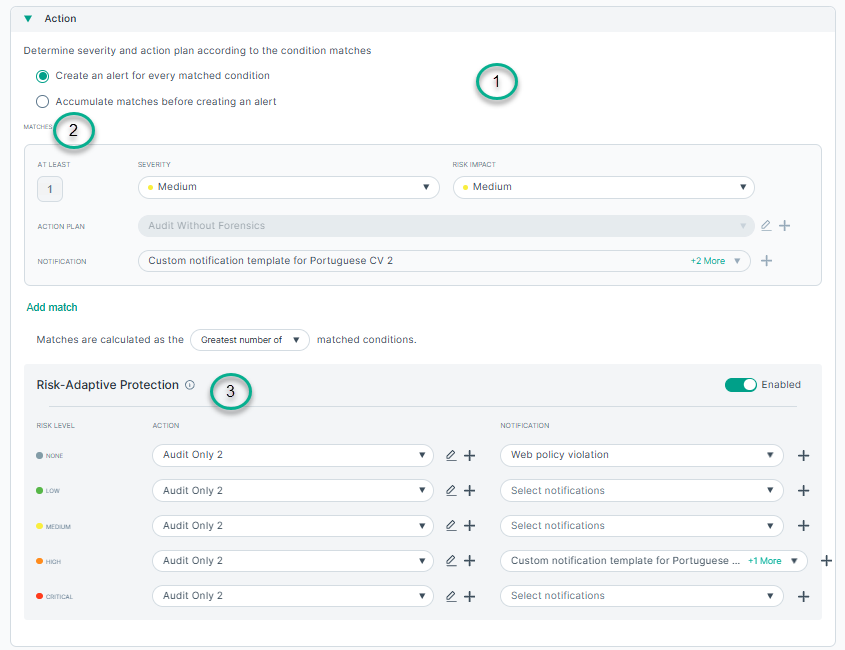
- 1
- Determine severity and action plan according to the condition matches: Choose any of the following options to trigger an incident:
- 1a
- Create an incident for every matched condition: To trigger an incident every time a condition in the rule is matched. (For example, if a user sends an email message containing sensitive content, then prints the message, 2 incidents are generated.)
- 1b
- Accumulate matches before creating an incident: To have the system collect matches for a particular source over time and create incidents when a threshold is
met (drip DLP). The system remembers user activity and generates incidents for matches that occur within a defined period.
Use the drop-down to set the Count for matches:
- transactions: Count incident transactions as they accumulate for a given source, even though each incident can have multiple triggers.
- unique matches: Count unique matches to count violation triggers that accumulate for a source, but only triggers that are unique.If, for example, there is a rule that does not permit 10 different credit card numbers to be sent within 1 hour:
- If a user sends 1 message with 20 credit card numbers, 1 violation trigger is counted.
- If the user sends 20 email messages with the same credit card number, no triggers are counted, because the numbers were not unique.
Note that case differences are counted separately in word-related classifiers. For example, word, Word, and WORD.
- all matches: Count all matches (default) that accumulate for a source, even duplicates. In the example above, even if the user sent 20 messages with the same credit card number, 20 triggers are counted.
Matches and transactions are counted individually for each source, such as user name or IP address, and they are counted only on the policy engine that detects them. Incidents are generated only when the threshold is met on a single policy engine.
Select a time period for accumulating matches. The time period is a sliding window. It resets every time a match is detected.
Use The rate of matches should decline... field to specify how long the system should continue counting matches once the rate begins to decline.
If the system continues to detect the configured number of matches over the configured period, it continues to accumulate the matches in the same incident.
- 2
- Matches: Use the Add Match button to add new matches.
Use the AT LEAST field to define the threshold for triggering an incident. For example, trigger an incident when there are at least 3 matches (3 or more). If the threshold is not met, the match count is 0.
Specify the incident SEVERITY for the match from the drop-down:- Low: Incidents that match this rule are of low importance. The policy breach is minor.
- Medium: Incidents that match this rule are of medium importance. The policy breach is moderate.
- High: Incidents that match this rule are very important and warrant immediate attention. The policy breach is severe.
If Risk adaptive protection is enabled, then the RISK IMPACT can be set using the drop-down. The value selected will impact the risk score calculation for the affected user.
Select an existing ACTION PLAN using the drop-down. If you want to add new action plan, click the + icon, and for editing click the pencil icon.
For more details, see the Action plans section.
Using the Matches are calculated... field, you can set how matches should be calculated:- Select Greater number of matched conditions to have the number of matches compared, and only the greatest number reported. For example, if there are 5 matches for the classifier “Confidential Pattern”, 3 for “SSN Pattern”, and 10 for “My Key Phrases”, the number of matches would be defined as 10.
- Select Sum of all matched conditions to have the number of matches added together and the total reported. Given the same example as above, the number of matches would be defined as 18.
- 3
- Risk adaptive protection: If enabled, different actions can be selected according to the source user’s risk level. An action can be set for the following risk levels:
- Level 1- None: The user does not have a risk score currently.
- Level 2- Low: The user’s risk score is between 1 and 39.
- Level 3- Medium: The user’s risk score is between 40 and 69.
- Level 4- High: The user’s risk score is between 70 and 89.
- Level 5- Critical: The user’s risk score is between 90 and 100.