Best practices for rolling SmartEdge Agents with policies
Lists the best practices for rolling SmartEdge Agents.
After each step, perform functional validation to ensure stability and coexistence with other security software.
- Policy Configuration:Forcepoint recommends the following to ensure end user productivity remains unaffected during rollout of SmartEdge agent and functional validation testing of new policies:
- Create a dedicated security (test) group that only includes the personnel who executes activities that trigger the policies in development or testing. The group may be created locally in Forcepoint Data Security Cloud | SSE or synchronized from the organizational directory services (For example, Active Directory, Okta, Entra ID).
- Configure incrementally actionable SWG and CASB policies, depending on purchased services, to only target the test group in Step 1a.
- Create a Direct App Access policy for SWG Content and CASB depending on purchased services and use Any for all policy conditions. This policy ensures that during the testing period outbound traffic for all non-test group users' traffic is routed directly to the web or cloud application bypassing policy controls.
- Within each policy group (SWG Content, CASB, and so on), policies are checked based on priority with the highest priority policy at the top. So, make sure the default policy in Step 1c is at the bottom of the policy group.
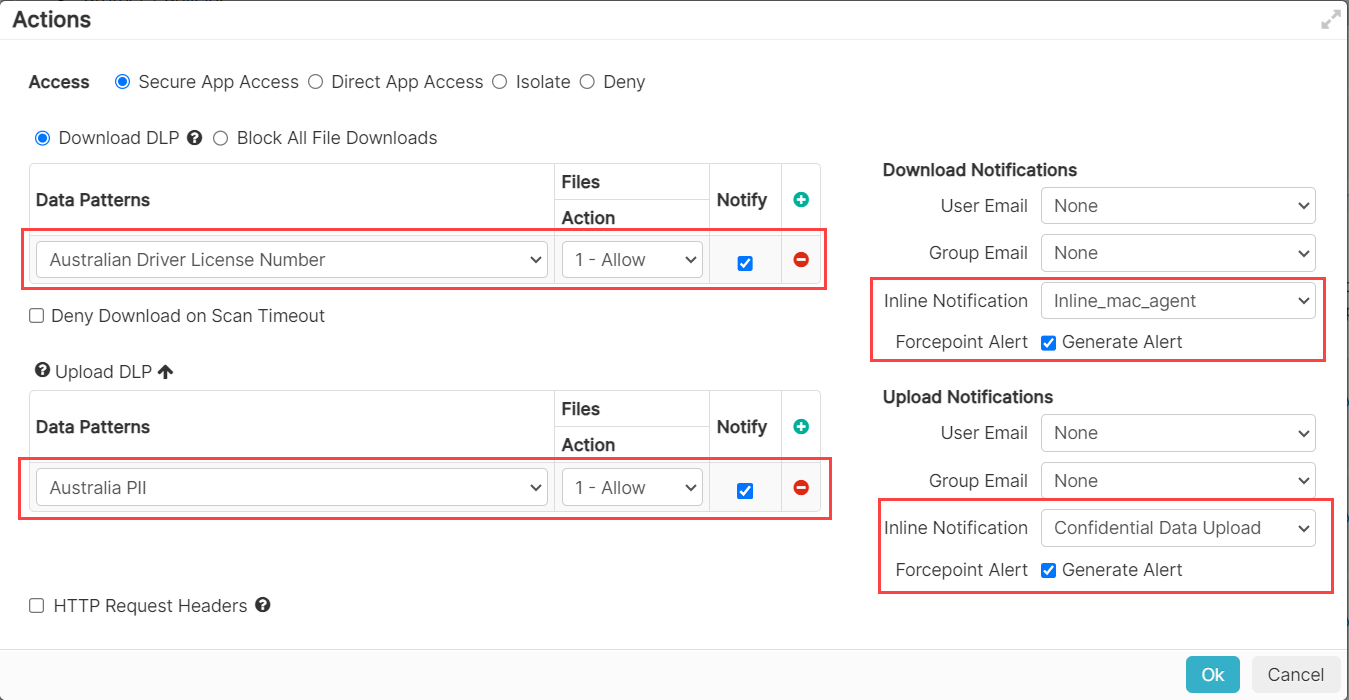
Example (SWG) policy configuration
- Set the policy's Action to Secure App Access.
- From the Download DLP section:
- Create and/or select the desired data pattern.
- Select the Files Action to Allow.
- Select the Notify check-box.
- From the Download Notifications section:
- Select the Inline Notification that you have created from the drop-down.
- Select the Generate Alert check-box next to Forcepoint Alert.
- From the Upload DLP section:
- Create and/or select the desired data pattern.
- Select the Files Action to Allow.
- Select the Notify check-box.
- From the Upload Notifications section:
- Select the Inline Notification that you have created from the drop-down.
- Select the Generate Alert check-box next to Forcepoint Alert.
To know more about Secure App Access Action, refer to Configuring proxy policy actions.
Example:
- Policy Validation:
Policy validation is needed after all subsequent steps. Make sure appropriate alerts and/or notifications are seen based on configured policies and appropriate traffic pattern passing through the system.
When policy is triggered:To know more about notifications, refer to Selecting notifications.
- Single endpoint with Manual Installation:
- Identify a test user. If your organization uses a combination of macOS and Windows workstations, it is recommended to test one of each.
- Locally add test user(s) to the platform and to the test group created in Step 1a.
- Manually install SmartEdge Agent to the workstation(s) of identified test users.
To install SmartEdge agent, refer to Installing SmartEdge Agent on Windows or Installing SmartEdge Agent 1.5.0 or newer versions on macOS.
- Test Antivirus scanning exceptions for SmartEdge Agent using EICAR method to make sure SmartEdge agent driver files and certificates are excluded from scan.
- Perform policy validation as per step 2.
- Deploy SmartEdge agent to additional endpoints:
- For subsequent steps, there are three options to deploy additional SmartEdge agents:
- MDM - Deploy the SmartEdge Agent using the organization’s MDM platform. Refer to Deploying SmartEdge Agents via MDM to wider audience.
- AD Group Policy for Windows - Deploy the SmartEdge Agent using the GPO to Windows devices. Refer to Rolling Windows SmartEdge Agent via Group Policy Management.
- Manual - Locally add users as per Step 3b, assign users to the test group as per Step 1a and then manually deploy SmartEdge Agent as per Step 3c.
- If your organization uses MDM, then you may want to leverage it for subsequent steps.
- For subsequent steps, there are three options to deploy additional SmartEdge agents:
- Pilot deployment with MDM and Engineering Acceptance Testing:
- Identify pilot groups consisting of 5 to 10 production endpoint workstations consisting of each OS (Window and Mac) used in your organization.
- Forcepoint recommends using IT or Security personnel workstations in case of issues, such as software conflicts. These pilot users should have local administrator privileges on their workstations and should be able to debug, disable, or uninstall the agent as needed.
- Build MDM deployment profiles and push the SmartEdge Agent using the MDM platform.
In the absence of MDM, use one of the other options from Step 4a or manually add users to the platform and make them part of the test group created in Step 1a.
- Perform functional validation and Engineering Acceptance Testing as per step 2.
- Production Pilot Deployment and User Acceptance Testing:
- Identify 5 to 10 non-IT production users.
- Add the test users to the test group created in Step 1a.
- Deploy the SmartEdge Agent using the organization’s MDM platform or other options from Step 4.
- Perform functional validation and user acceptance testing as per step 2.
- Policy reconfiguration as needed:
- If all configured policies have been validated for all production pilot users, but the original intent of certain policies is to block certain traffic, you should make necessary changes to the required policies.
- Perform functional validation of Block action, if any, with production pilot users for a desired monitoring period.
- Iterative Production Rollout:
- Adopt a crawl/walk/run approach.
- Depending on the size of your organization, perform stage production rollout to workstations at different times to minimize the risk of any unforeseen issues that were not identified
during Steps 3 to 7.
For example, for an organization consisting of 1000 users:
- Deploy the SmartEdge Agent on 50 workstations with a desired monitoring period.
- Deploy the SmartEdge Agent on 150 workstations with a desired monitoring period.
- Deploy the SmartEdge Agent on 150 workstations with a desired monitoring period.
- Deploy the SmartEdge Agent on 250 workstations with a desired monitoring period.
- Deploy the SmartEdge Agent on 400 workstations with a desired monitoring period.