SMB Streaming Configuration
This section walks you through the steps for enabling DDR streaming for a SMB connection and monitoring live streaming events within the DSPM platform.
Create a New Scan Configuration
- Navigate to .
- Click New Configuration. Enter Name, Credentials, and enter the Path. Check the field
Subscribe to events streaming (DDR). Make a note of the webhook host and URL.
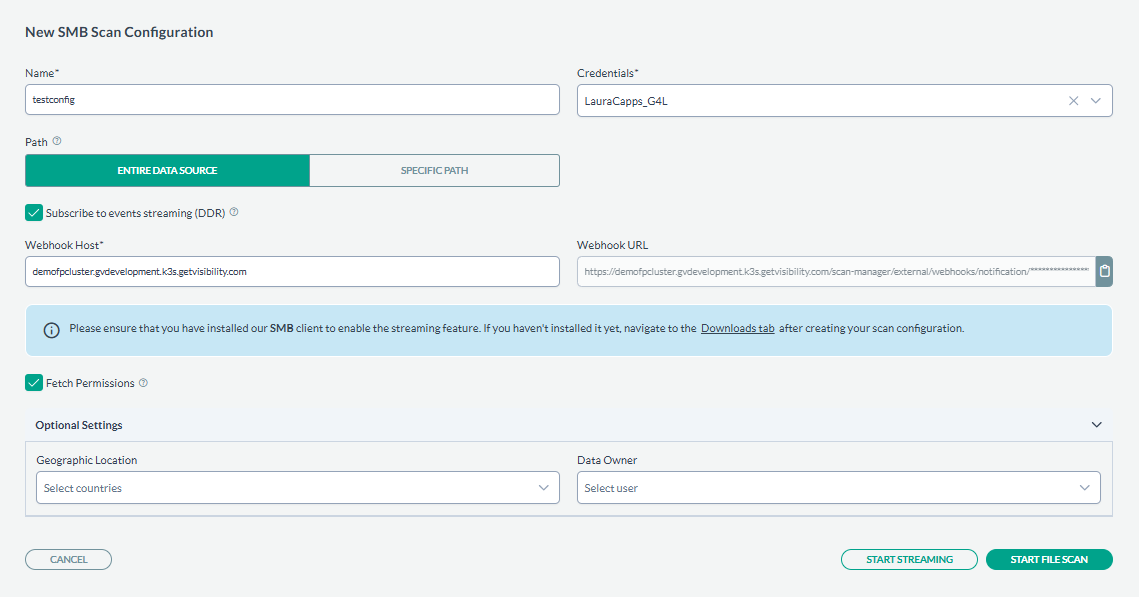
- Follow the download tab link and installation instructions of SMB agent.

- Follow further steps to install the SMB agent.
SMB Agent Installation
This steps below addresses the different methods to install the SMB Connector on a single machine.
SMB Connector Pre-requisites:
-
OS: Windows Server 2016 or later.
-
Processor: 2 GHz or faster, 2 cores (64-bit processor recommended).
-
Memory: 4GB RAM.
-
Hard Disk: 1GB free space.
-
Administrator Privileges: user needs admin permissions to install.
-
.NET 8 must be installed.
Installation config
The SMB Connector supports various configuration options which can be specified via smb_connector_application_config.json
Manual Installation
Pre-requisites:
- The ZIP of the installer files.
- smb_connector_application_config.json file.
- Windows Server machine access.
- Admin access to install the connector.
Steps
- Download the SMB Connector ZIP File: Obtain the ZIP file and save it to the Windows machine.
- Prepare for Installation:
-
Unzip the contents of the ZIP file
-
Place the
smb_connector_application_config.jsonfile in the same directory as the unzipped contents.
-
- Configure the Installer:
- Edit the
smb_connector_application_config.jsonfile as needed. Use thesmb_connector_application_config.json.examplefile in the unzipped folder if creating the configuration from scratch.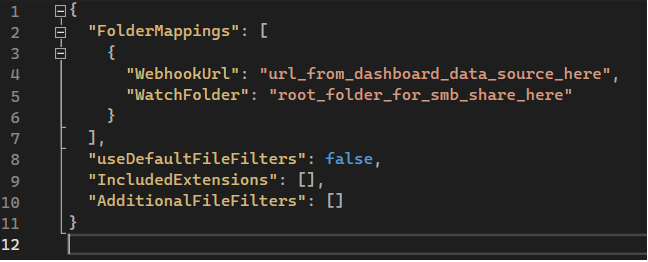
Create a folder mapping for every SMB share on the server that is to be scanned. The watched folder should be the root directory of the share, and the WebhookUrl should be from the scan configuration page for the SMB share on the dashboard (as shown below).
-
Keep
useDefaultFileFiltersset tofalseif you want all files in the share to be scanned. If set totrue, the connector will only scan files supported by the GV Synergy agent for classification. -
IncludedExtensionsandAdditionalFileFilterscan be used if you wish to apply filters other than the defaults.IncludedExtensionssupports file extensions in the format.txt, etc.AdditionalFileFiltersallows for any custom file filter, including*as a wildcard - Start the Installation:
- Execute the
install.ps1script by right clicking and choosingRun with PowerShell.
- Execute the
- Complete the Installation:
- After the installation completes, the PowerShell window can be closed.
- Edit the
- Save the Streaming configuration.
Monitoring Real-Time Events
After the subscription is activated (green magnifying glass icon), real-time events will start flowing into the platform, and you will be able to monitor them from various sections of the console. For viewing events in the Live Events Section, navigate to the Live Events section under Administration to view a detailed audit log of all streaming events (you may specify source filter to focus only on SMB events).