Salesforce
The Salesforce connector lets Forcepoint DSPM discover, classify, monitor, and remediate content held in a Salesforce org.
The connector covers unstructured Salesforce Files and legacy Attachments, as well as structured record data in standard, custom, and industry-cloud objects and fields.
| Type | Description |
|---|---|
| Files and Attachments | Unstructured documents attached to Salesforce records, including modern Files (ContentDocument / ContentVersion) and legacy Attachments. |
| Objects and Fields | Structured record data in standard and custom objects, such as Lead, Contact, Account, Opportunity, Case, Task, Event, Order, Quote, Asset, Contract, and customer-defined objects. |
Authentication
The connector authenticates to Salesforce through an External Client App using the OAuth 2.0 JWT Bearer flow. This approach avoids interactive login and stored passwords: Salesforce validates a signed JWT from DSPM against the certificate uploaded to the External Client App, and DSPM acts as the configured integration user.
Once connected, DSPM can run file and field scans, enumerate users and groups for trustee visibility, write supported classification labels back into Salesforce, and monitor in-scope file changes through Salesforce Change Data Capture.
Connector capabilities
The Salesforce connector supports both unstructured file scanning and structured record scanning. A file scan discovers Salesforce Files and legacy Attachments that are linked to Salesforce records; a field scan discovers scannable object records and field values. This lets DSPM identify sensitive data in uploaded documents and in CRM fields, show access visibility, apply supported labels, monitor in-scope file changes, and perform supported file remediation actions.
| Capability area | Supported capability | Notes |
|---|---|---|
| Deployment platform | On-Premises DSPM and Cloud DSPM | Salesforce is available as a supported DSPM data source in both deployment models. |
| Discovery and classification | Yes | Scans Salesforce Files, legacy Attachments, standard objects, custom objects, industry-cloud objects, and field values that the integration user can access. |
| Access visibility | Yes | Enumerates Salesforce users and groups and collects file access rights for trustee and effective-permission reporting. |
| Monitoring (DDR) | Real-time for files | Uses Salesforce Change Data Capture through Pub/Sub gRPC for in-scope file events. DDR applies to file changes; structured object field values are picked up by scans. |
| Remediation | Yes, for supported file actions | Supports file delete, upload, move, file stubbing, reclassification, and permission revocation for ContentDocumentLink/public-link exposure. Granting new permissions and object-record remediation are not supported. |
| Tagging | Yes | Supports Salesforce-native cloud tagging on ContentVersion and persistent hard-tagging where DSPM writes metadata into supported file types before re-upload. Microsoft sensitivity labeling is not supported for Salesforce. |
| Supported Salesforce API | API v66.0 default | Configure the API version in the Salesforce credentials. Salesforce Shield support is probed where applicable. |
What the connector can scan
The connector separates scannable Salesforce content into two broad groups: files and records. The following matrix summarizes what is included and what is excluded.
| Salesforce content / record type | Scan type | Supported | Details |
|---|---|---|---|
Salesforce Files - ContentDocument / ContentVersion |
File scan | Yes | Scans modern Salesforce Files attached to records through ContentDocumentLink, across the whole org or a selected scan scope. |
| Legacy Attachments | File scan | Yes | Scans the Attachment object, including attachments parented to EmailMessage, Accounts, Contacts, Opportunities, Cases, and custom objects. |
| Notes | File/content scan | Yes | Modern and legacy notes are discovered where they are exposed as supported Salesforce content in the configured scope. |
| Standard business objects | Field scan | Yes | Scans records and field values in standard objects such as Account, Contact, Lead, Opportunity, Case, Task, Event, Order, Quote, Asset, Contract, and similar CRM objects. |
Custom objects - __c |
Field scan | Yes | Scans customer-created custom objects and their field values, such as Invoice__c or Patient__c, when the integration user has access. |
| Industry Cloud and CDP objects | Field scan | Yes | Scans supported Salesforce Industries, Health Cloud, Financial Services Cloud, Loyalty, Manufacturing, CDP, and OmniStudio objects where present and accessible. |
Chatter / Feed attachments - FeedItem / FeedComment |
File scan | No | Files shared only through Chatter posts or feed comments are not currently discovered as standalone ContentDocument or Attachment scan targets. |
Classic Documents tab - Document object |
File scan | No | Org-level files stored in classic Salesforce Documents folders are not currently discovered or scanned. |
Email body content - EmailMessage.TextBody / HtmlBody |
Field/file scan | No | Email body text is out of scope for file scanning. Attachments on emails are in scope through legacy Attachment discovery. |
| Knowledge articles | Content scan | No | Knowledge article content is not currently discovered or scanned. |
| Salesforce metadata, configuration, and system objects | Field scan | No | Schema, code, UI definition, security/identity, telemetry, setup audit, custom metadata/settings, platform event, change event, external object, and big object types are excluded because they are configuration or infrastructure, not customer business data. |
Companion tables - *Share, *History, *Feed, *ChangeEvent |
Field scan | No | Excluded as duplicative or event-related companion data. DSPM scans the parent business object directly where supported. |
Prerequisites
Requirements to complete before you configure the Salesforce connector.
| Requirement | Details |
|---|---|
| A Salesforce administrator account | A Salesforce administrator account with access to and Object Manager. |
| An RSA key pair and X.509 certificate | An RSA key pair and X.509 certificate for JWT signing. The certificate is uploaded to Salesforce; the private key is stored in DSPM. |
| A dedicated integration user | A dedicated integration user in Salesforce, with a permission set granting read access to the objects and files in scope. |
| DSPM access | Access to . |
Create the External Client App
Create an External Client App in Salesforce that enables the OAuth 2.0 JWT Bearer flow for DSPM.
-
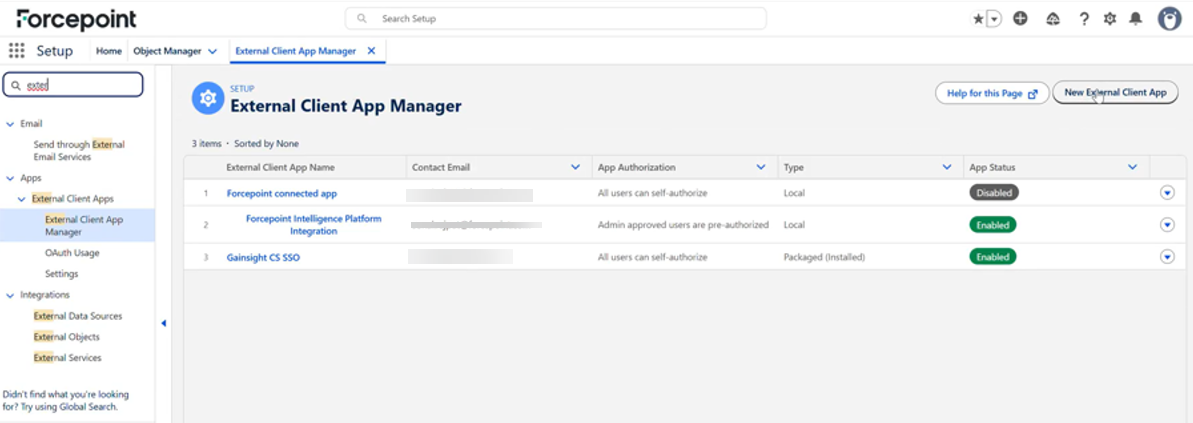
In Salesforce, go to , then click New External Client App.
Figure: External Client App Manager. Use New External Client App to begin.
-
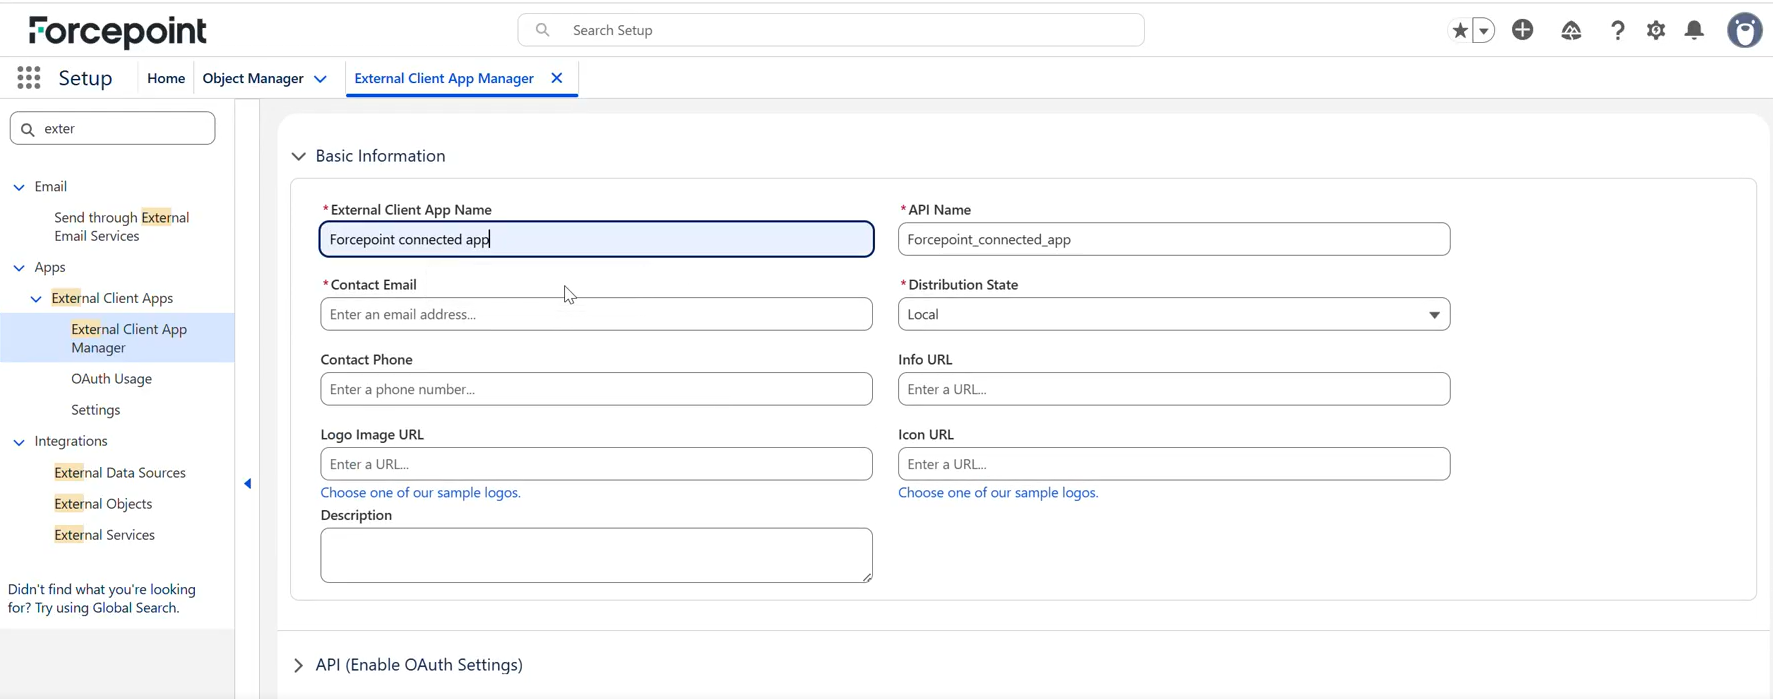
Under Basic Information, enter the External Client App Name and API Name, supply a Contact Email, and set Distribution State to Local.
Figure: Basic Information for the new external client app.
-
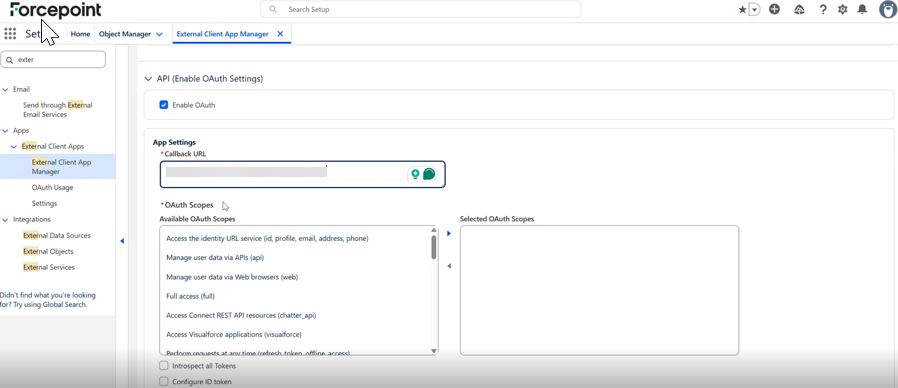
Expand API (Enable OAuth Settings), select Enable OAuth, enter the Callback URL, and move the following OAuth scopes into Selected OAuth Scopes:
- Manage user data via APIs (
api) - Manage user data via Web browsers (
web) - Perform requests at any time (
refresh_token,offline_access) - Access Connect REST API resources (
chatter_api) - Access Visualforce applications (
visualforce) - Access unique user identifiers (
openid) - Access custom permissions (
custom_permissions) - Access Lightning applications (
lightning)
Figure: Enabling OAuth and selecting the OAuth scopes.
- Manage user data via APIs (
-
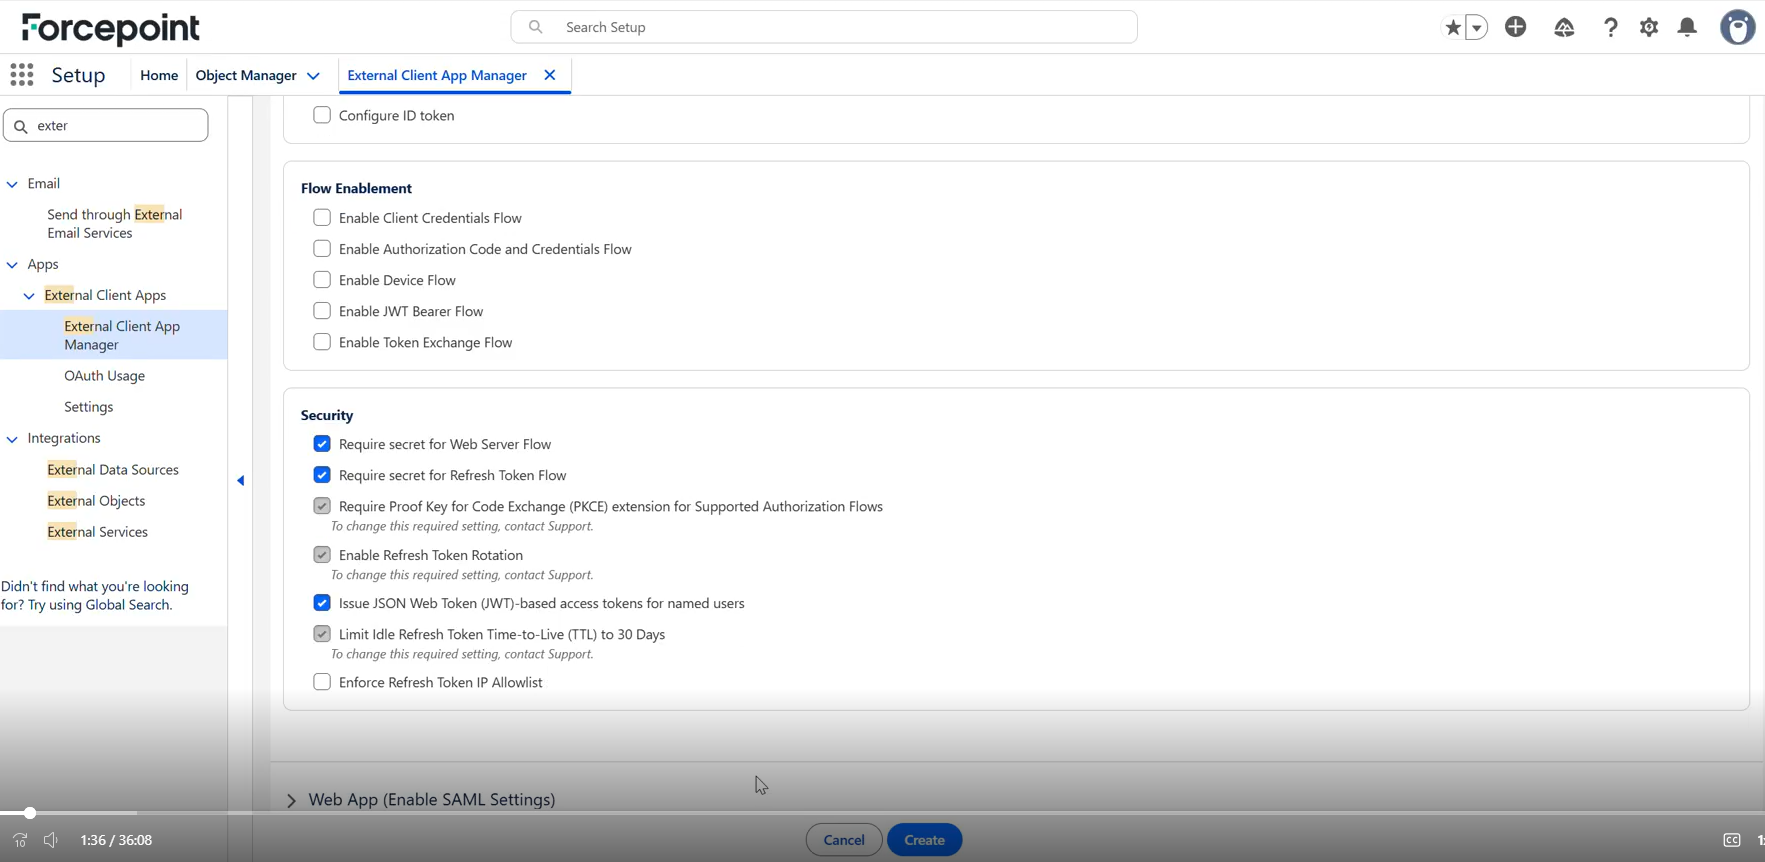
Under Flow Enablement, select Enable JWT Bearer Flow. Under Security, keep Issue JSON Web Token (JWT)-based access tokens for named users selected, then click Create.
Figure: Flow Enablement and Security settings, with Create at the foot of the page.
Configure the app after creation
Set the app policies, permission set, and OAuth policies, then copy the Consumer Key.
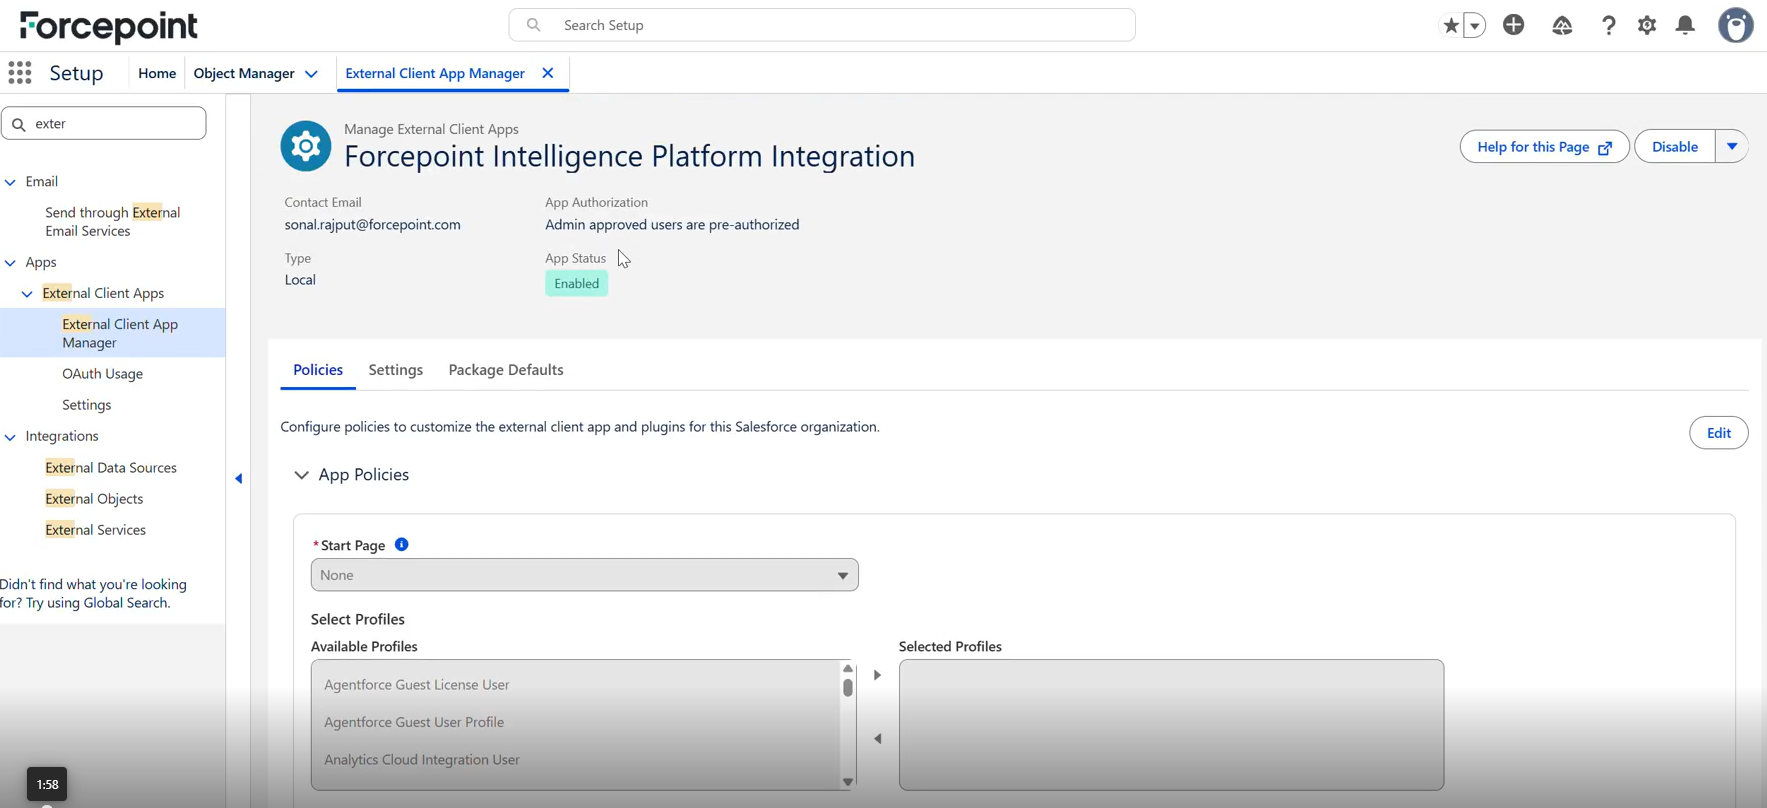
Open the newly created app. The header shows the contact email, app authorisation mode, type and status; confirm that App Status is Enabled.
-
On the Policies tab, under App Policies, select the profiles permitted to use the app.
Figure: App Policies: selecting the profiles allowed to use the app.
-
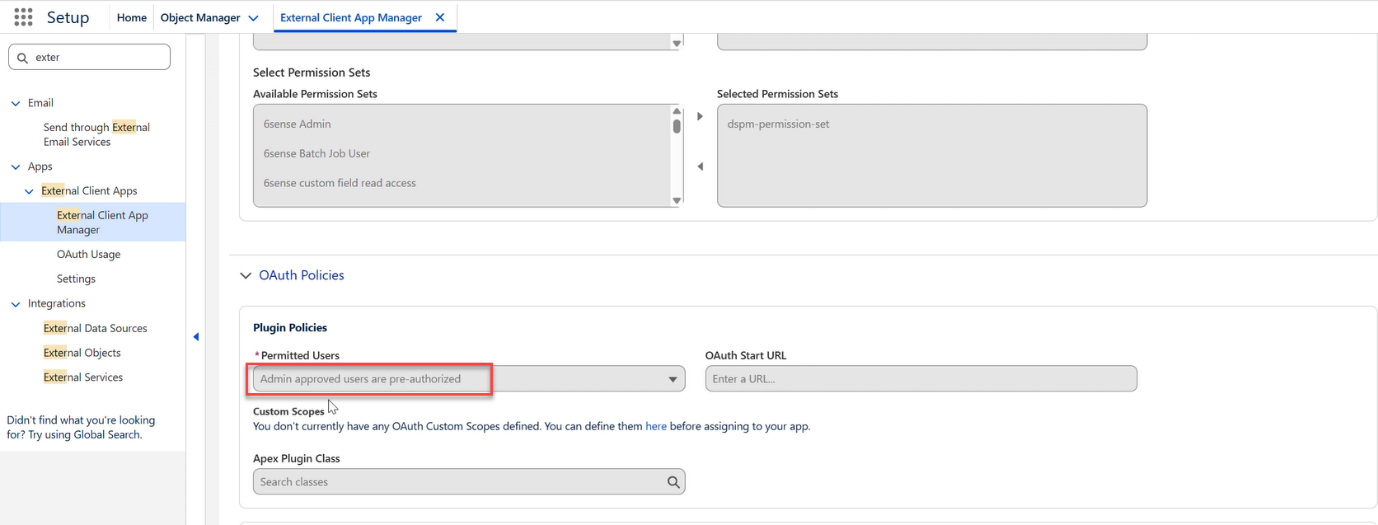
Still on the Policies tab, add the DSPM permission set (for example,
dspm-permission-set) under Selected Permission Sets. Under , set Permitted Users to Admin approved users are pre-authorized.Figure: Permission set assignment and the Permitted Users setting under OAuth Policies.
-
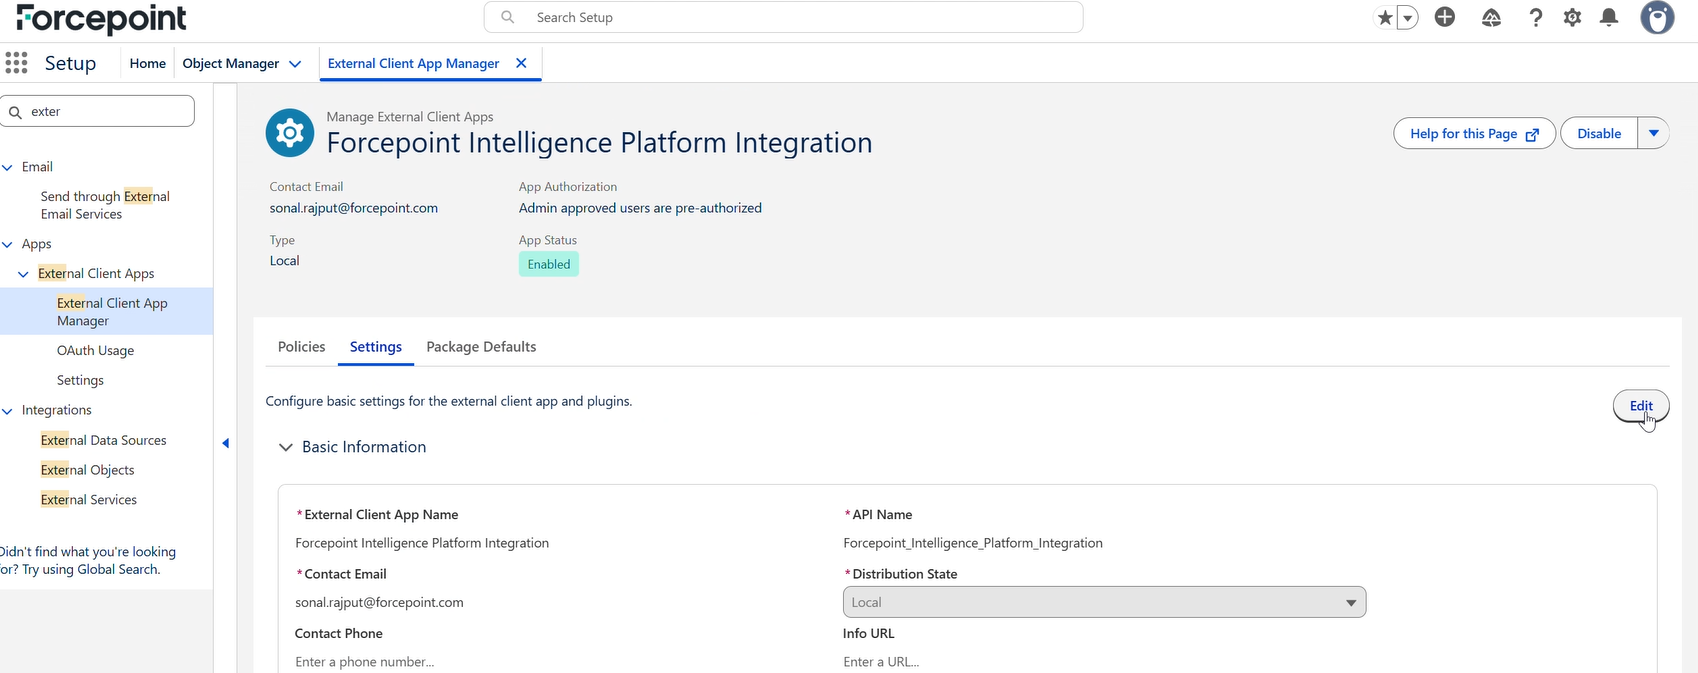
On the Settings tab, review the Basic Information and note the API Name. Click Edit to change any value.
Figure: Settings tab showing the app's basic information.
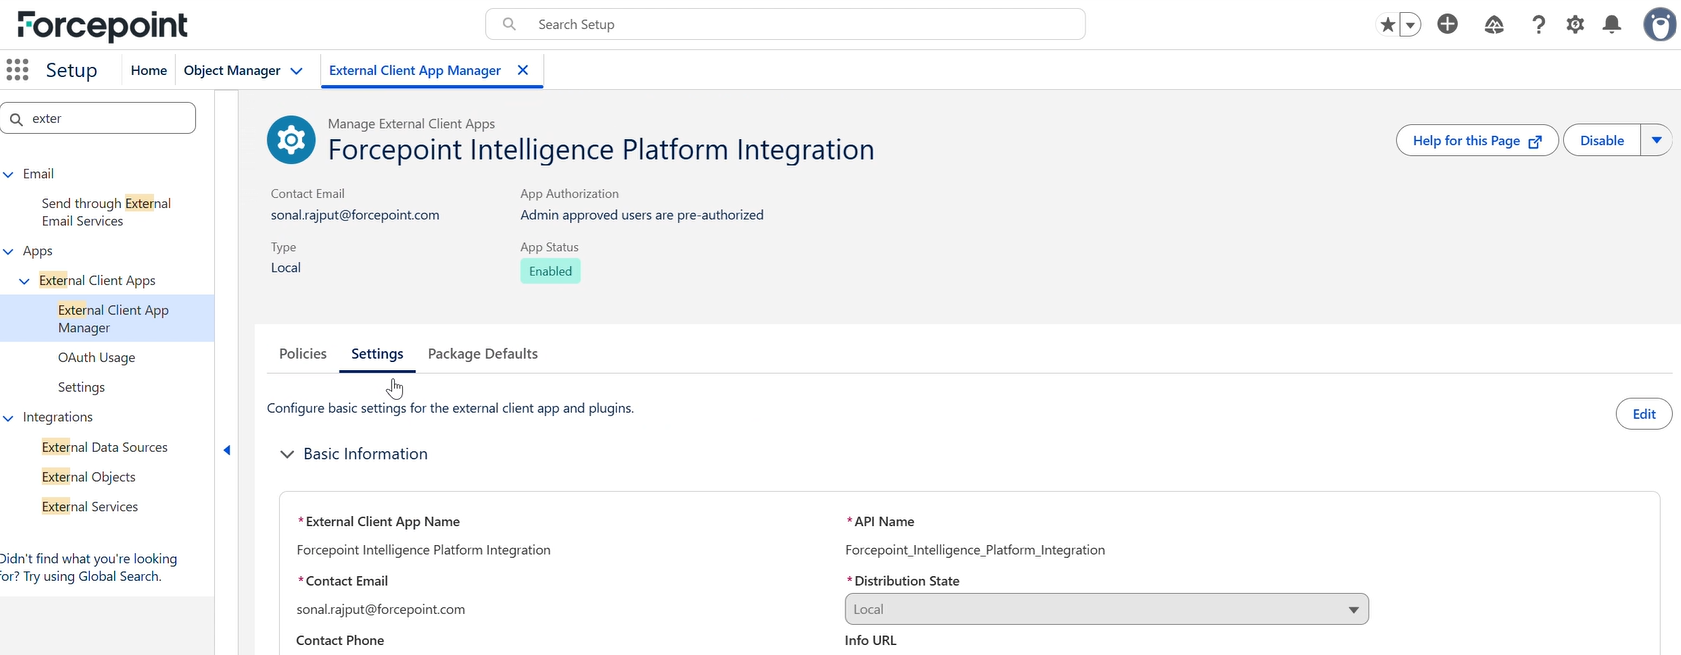
Figure: Use Edit on the Settings tab to amend the app configuration.
Verify the JWT Bearer flow and certificate
Confirm that the JWT Bearer flow is enabled and upload the connector certificate.
-
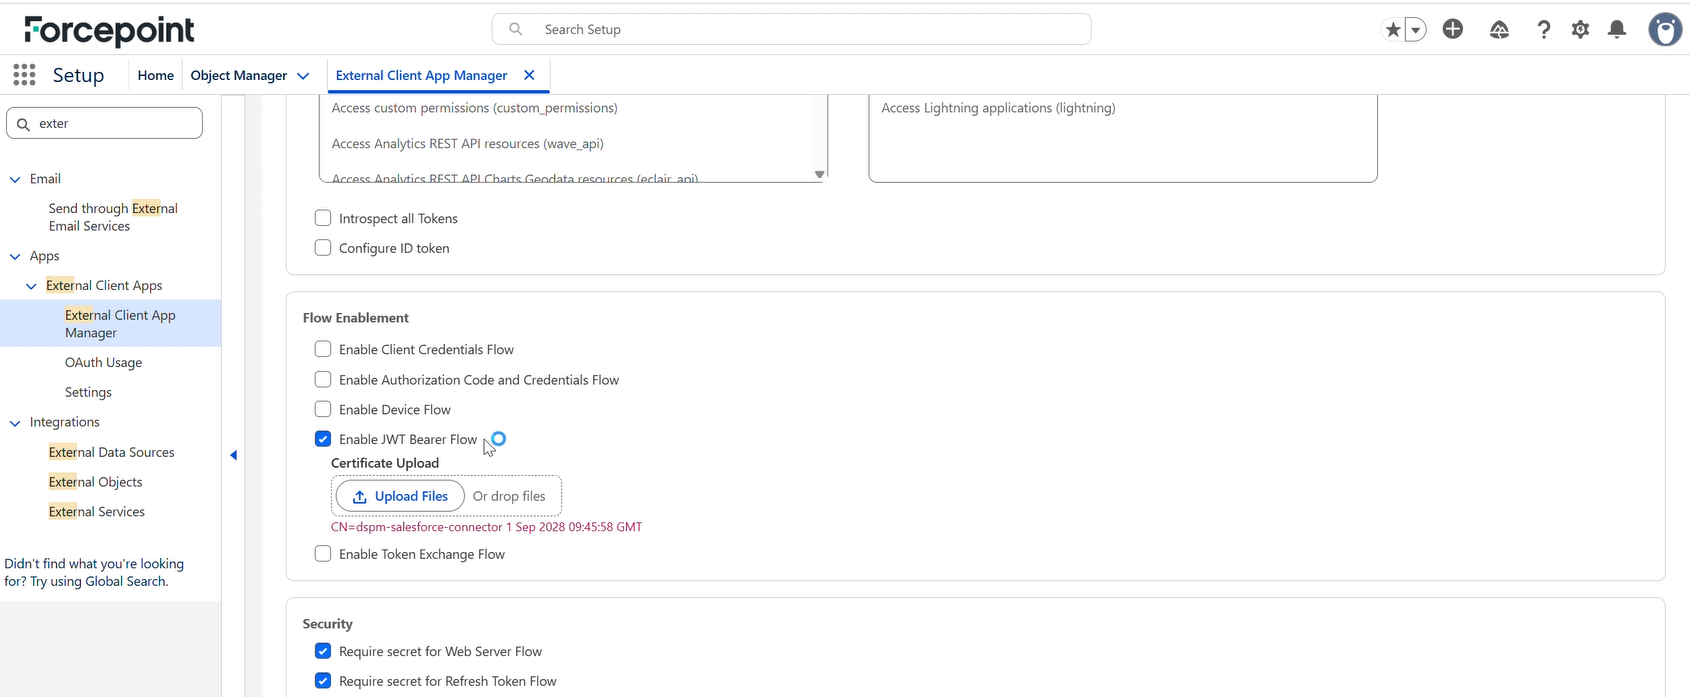
Under , confirm that Enable JWT Bearer Flow is selected. The Certificate Upload control appears directly beneath it.
Figure: Enable JWT Bearer Flow, with the Certificate Upload control below it.
-
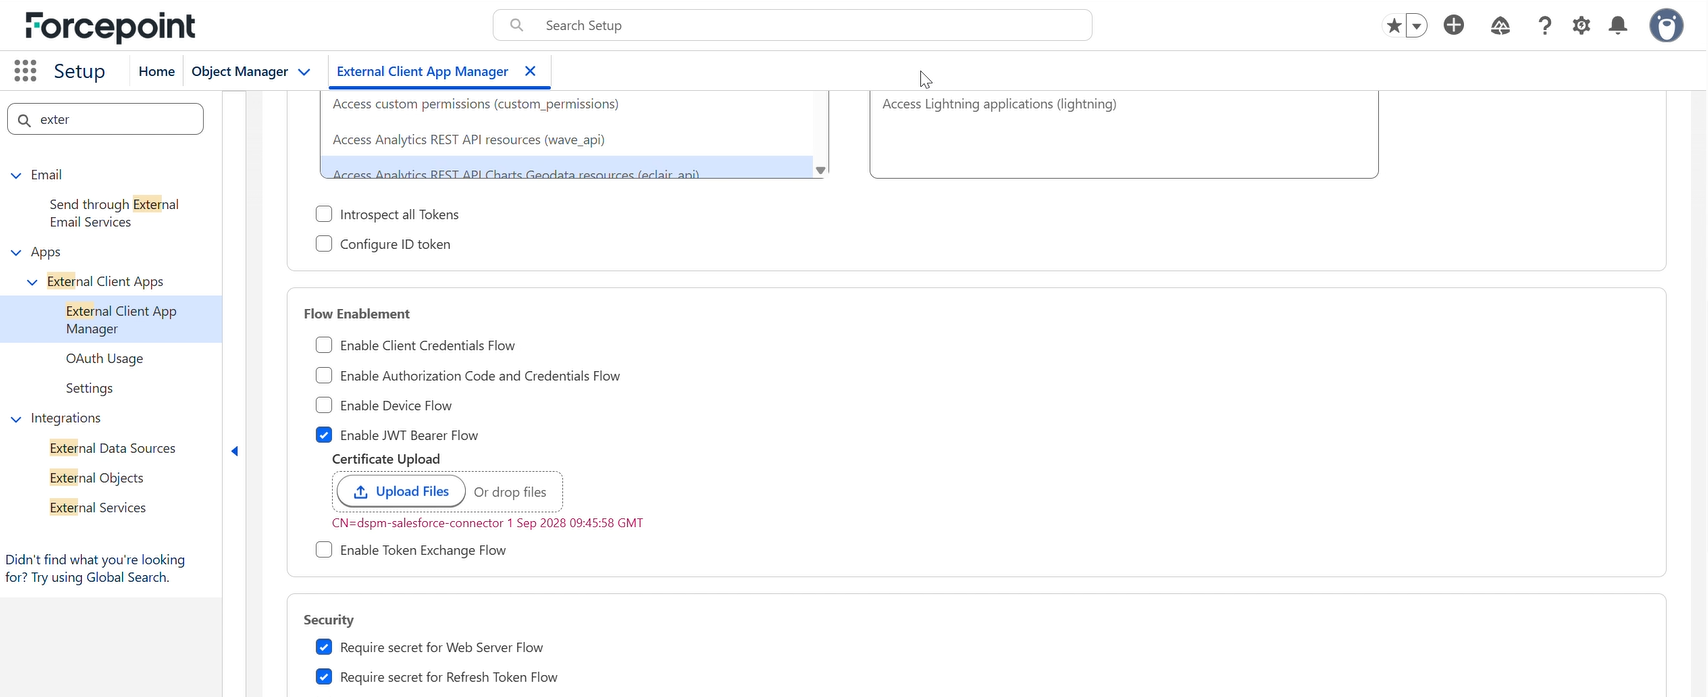
Upload the connector certificate.
Once the certificate is accepted, Salesforce displays the certificate subject and expiry date, for example
CN=dspm-salesforce-connectorwith its expiry date.Figure: The uploaded certificate, with its subject and expiry shown.
Forcepoint DSPM configuration
Open the Salesforce data source page in the DSPM portal.
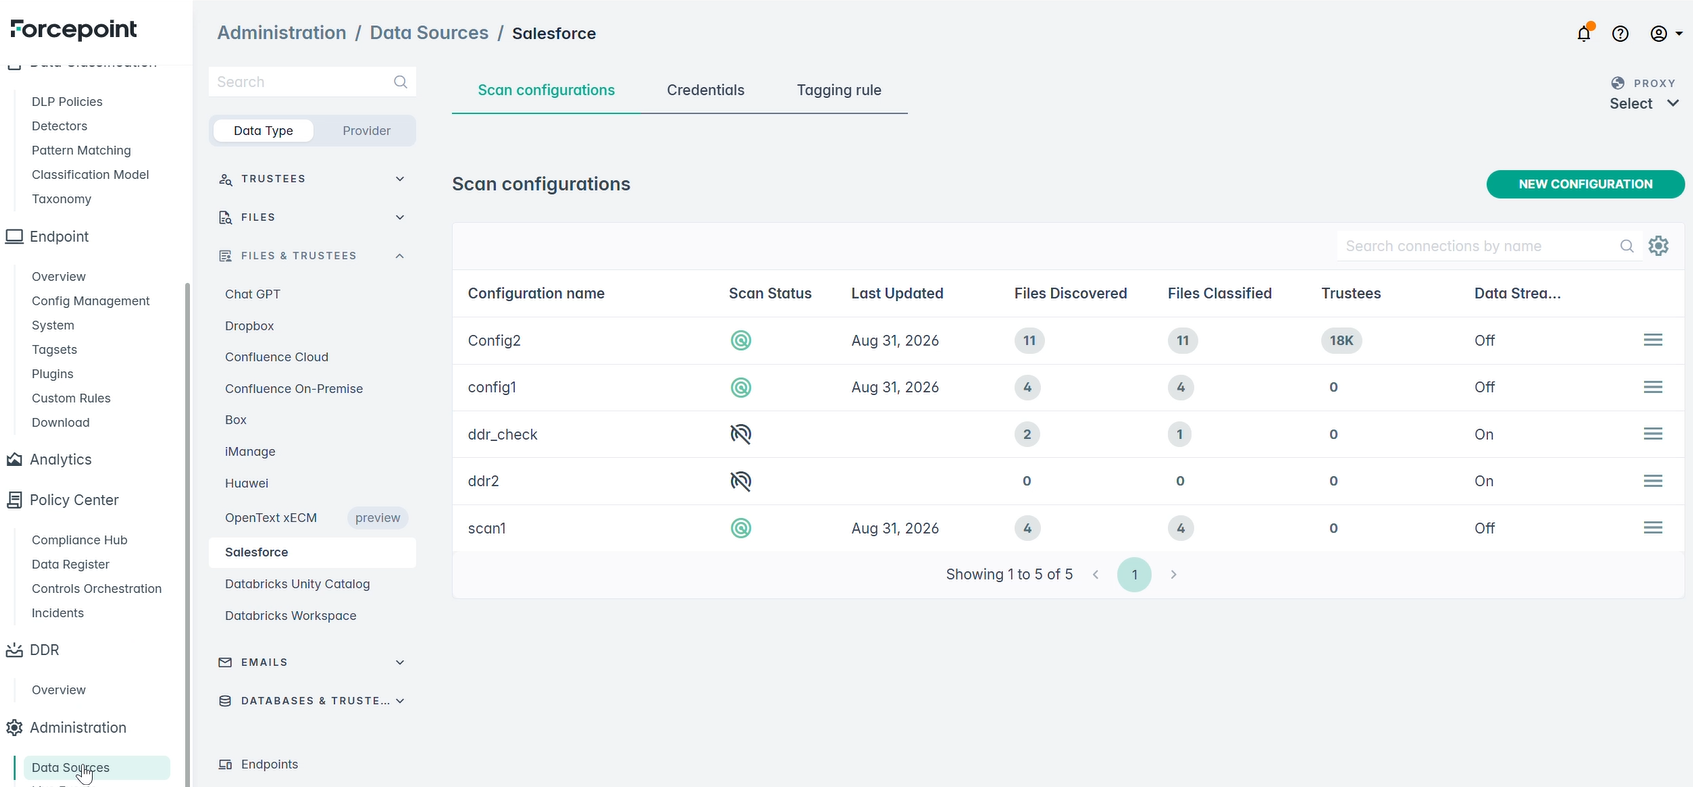
In the DSPM portal, go to and select Salesforce under Files & Trustees. The page has three tabs: Scan configurations, Credentials and Tagging rule.
Figure: The Salesforce data source page in Administration > Data Sources.
Create credentials
Create the DSPM credentials by using values from the External Client App.
-
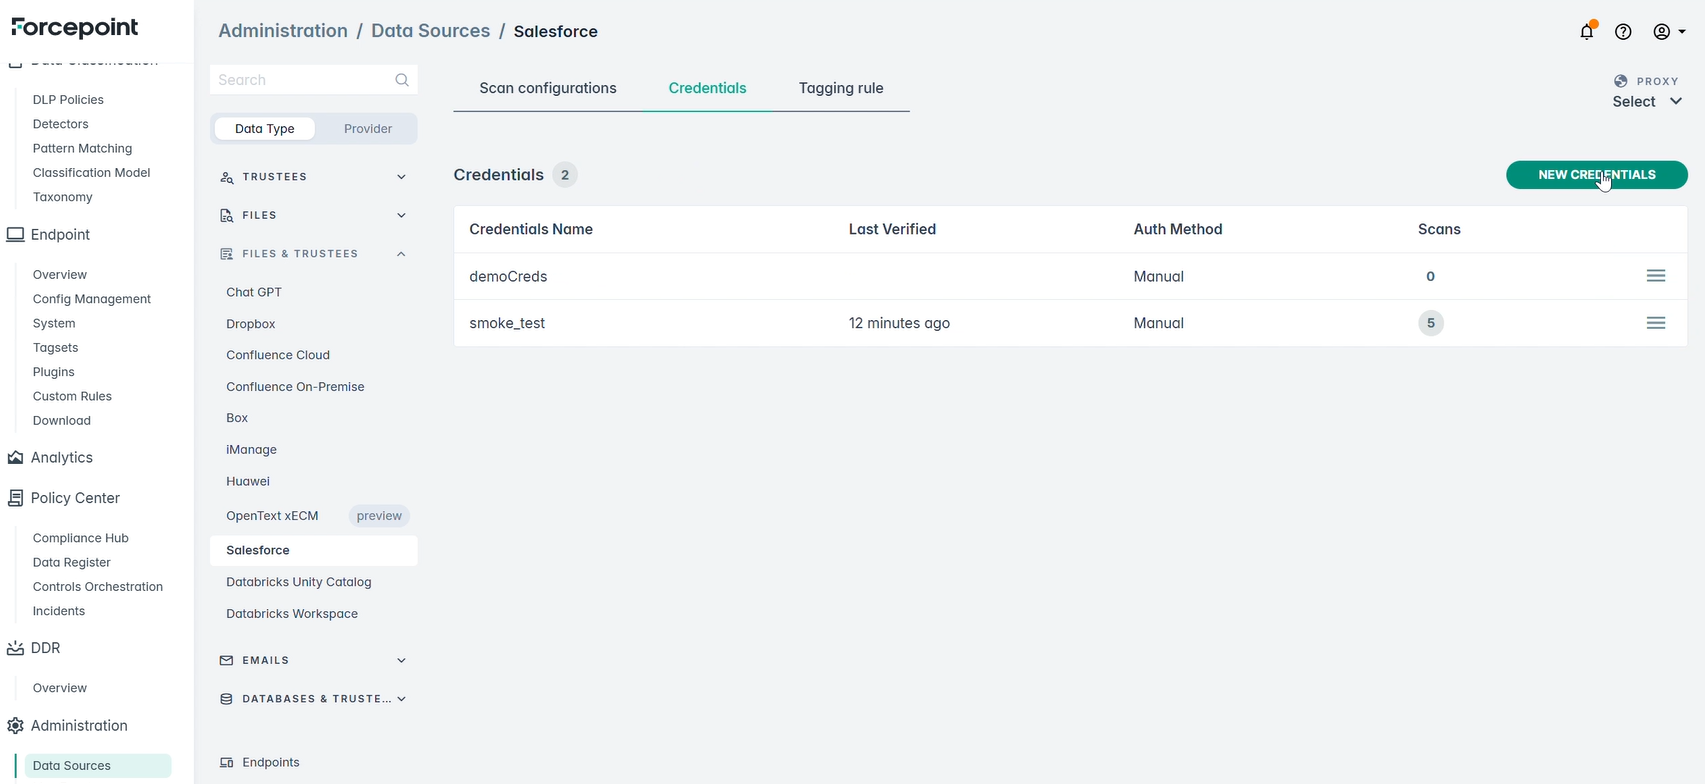
Open the Credentials tab and click New Credentials.
Figure: Credentials tab for the Salesforce data source.
-
Complete the form using the values from the External Client App, then save.
Field Value Credentials name A friendly name for this connection (for example, demo-creds).Instance URL The Salesforce org URL (My Domain / instance URL). Consumer key The Consumer Key copied from the External Client App. Integration user The Salesforce username the connector impersonates. RSA private key (JWT-Bearer) The private key matching the certificate uploaded to Salesforce. API version The Salesforce REST API version to use (for example, v66.0).Figure: Providing pre-configured access keys manually on the New Credentials page.
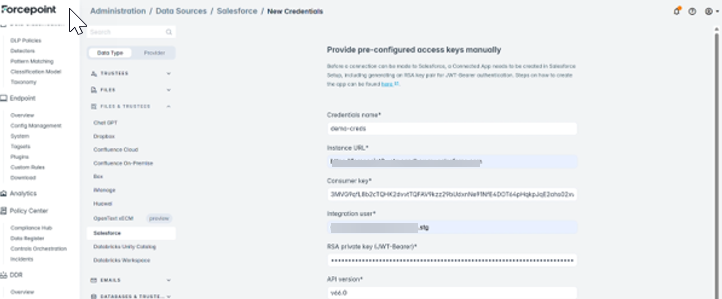
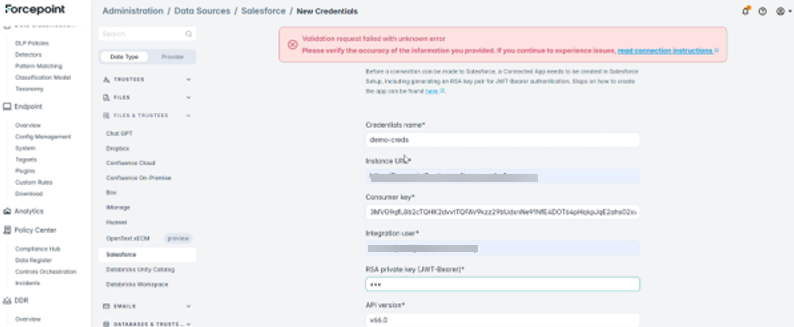
Figure: Validation error shown when the RSA private key does not match the certificate.
Create a scan configuration
Define a scan configuration that uses the credentials you created, and choose the scan scope and options.
-
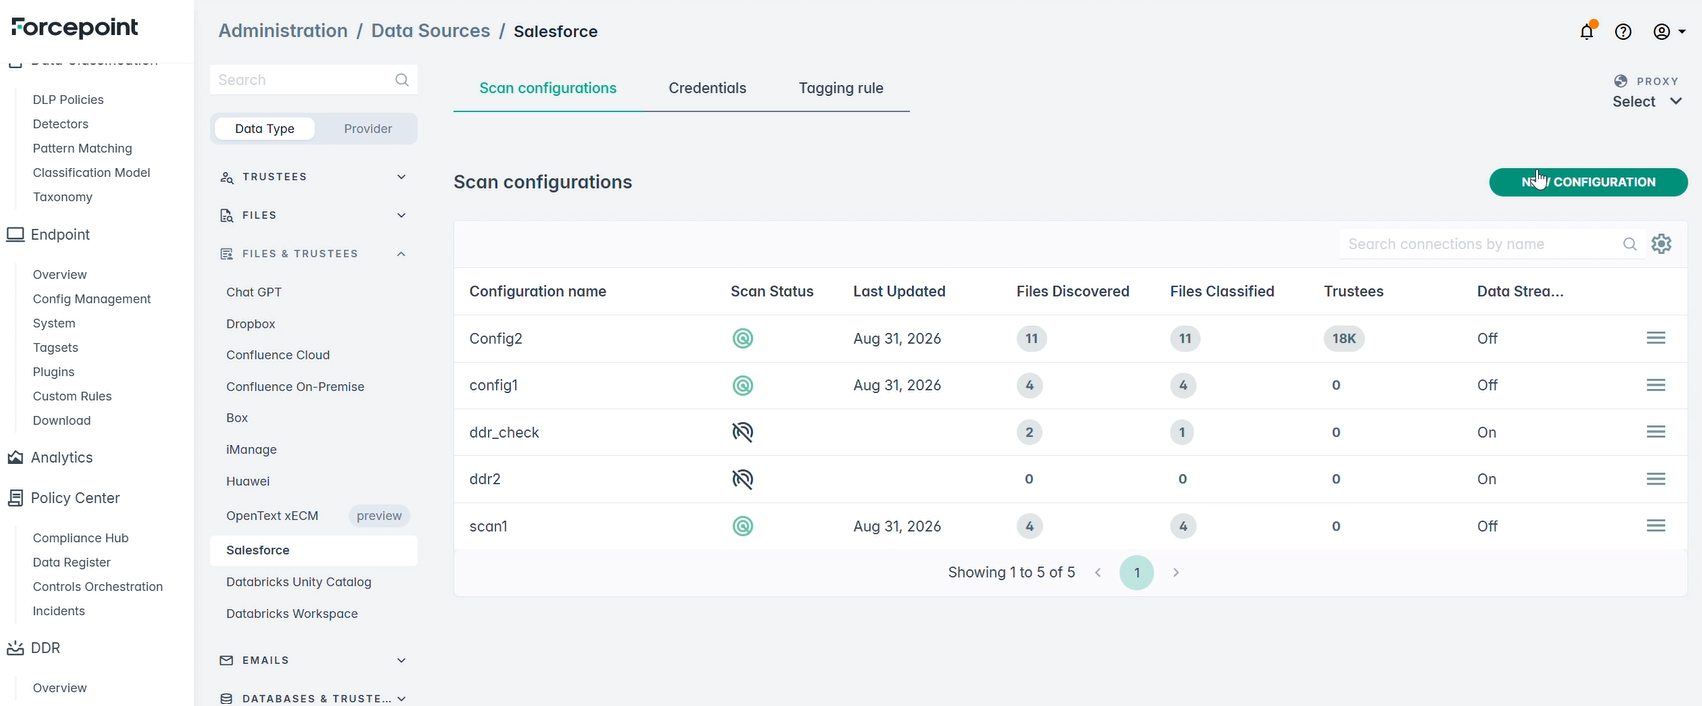
On the Scan configurations tab, click New Configuration.
Figure: Existing scan configurations, with New Configuration at the top right.
-
Enter a Name and select the Credentials created in Create credentials.
-
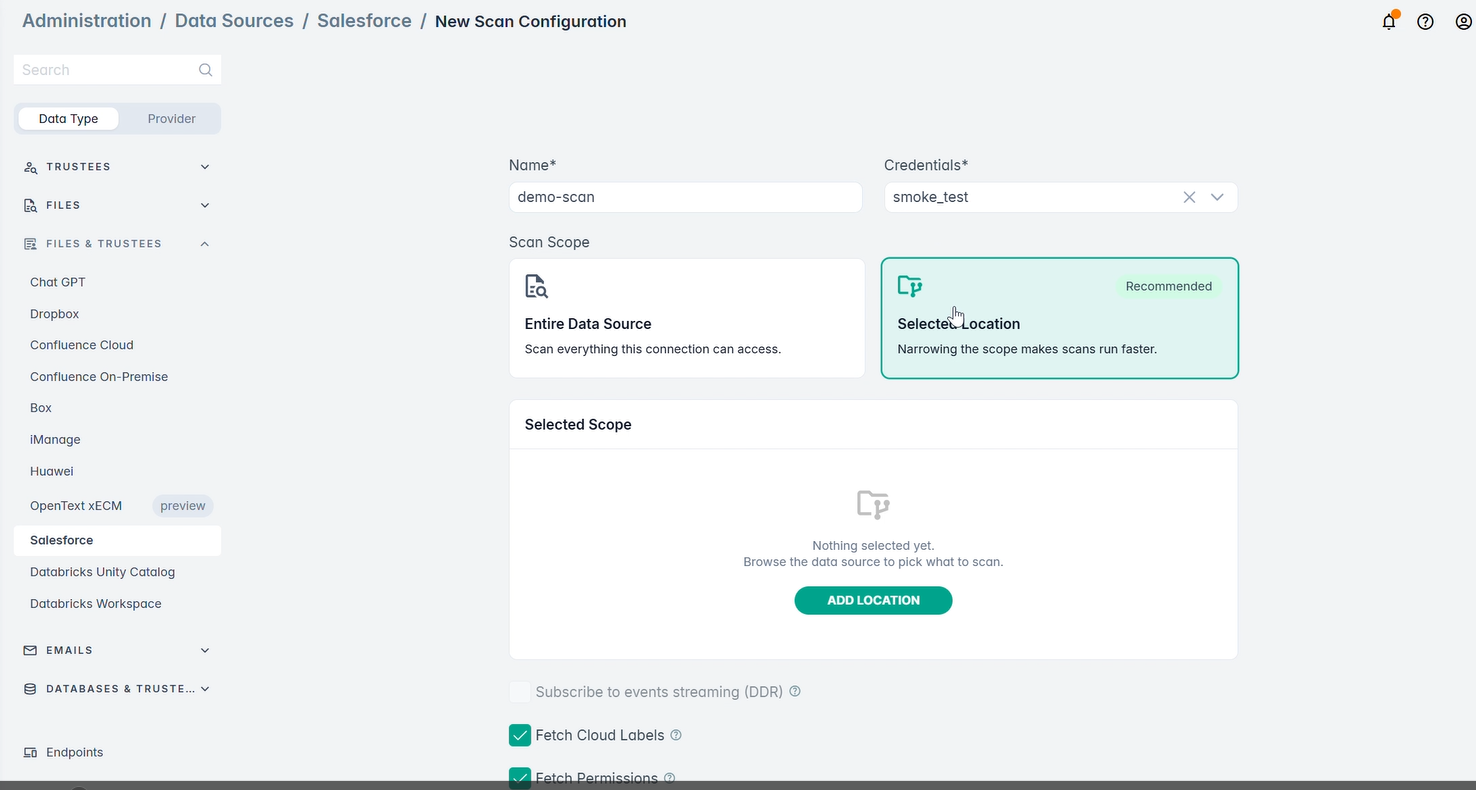
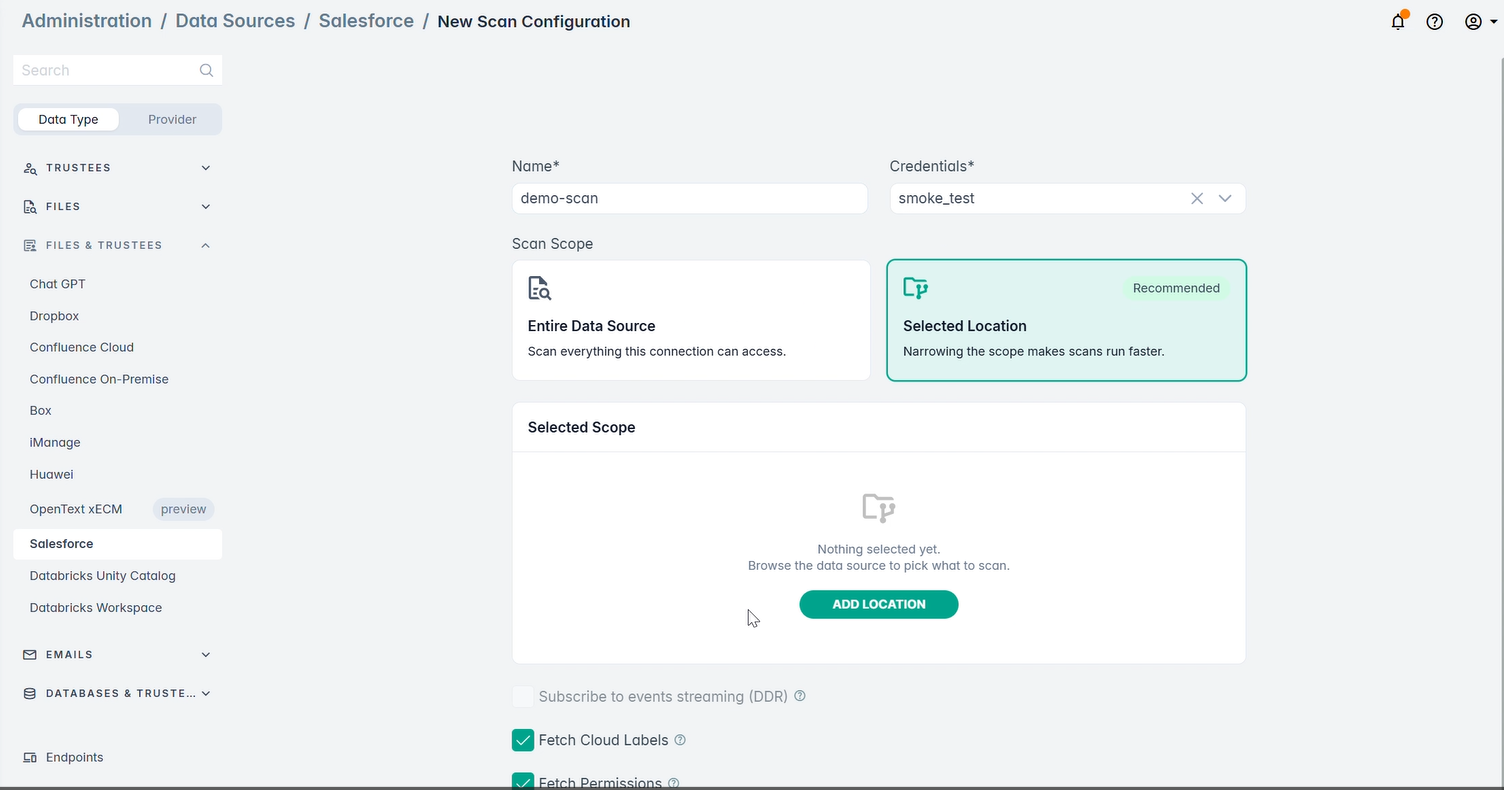
Choose the Scan Scope.
- Entire Data Source scans everything the connection can reach.
- Selected Location (recommended) narrows the scope so scans run faster.
Figure: New Scan Configuration: naming the scan and choosing the scan scope.
-
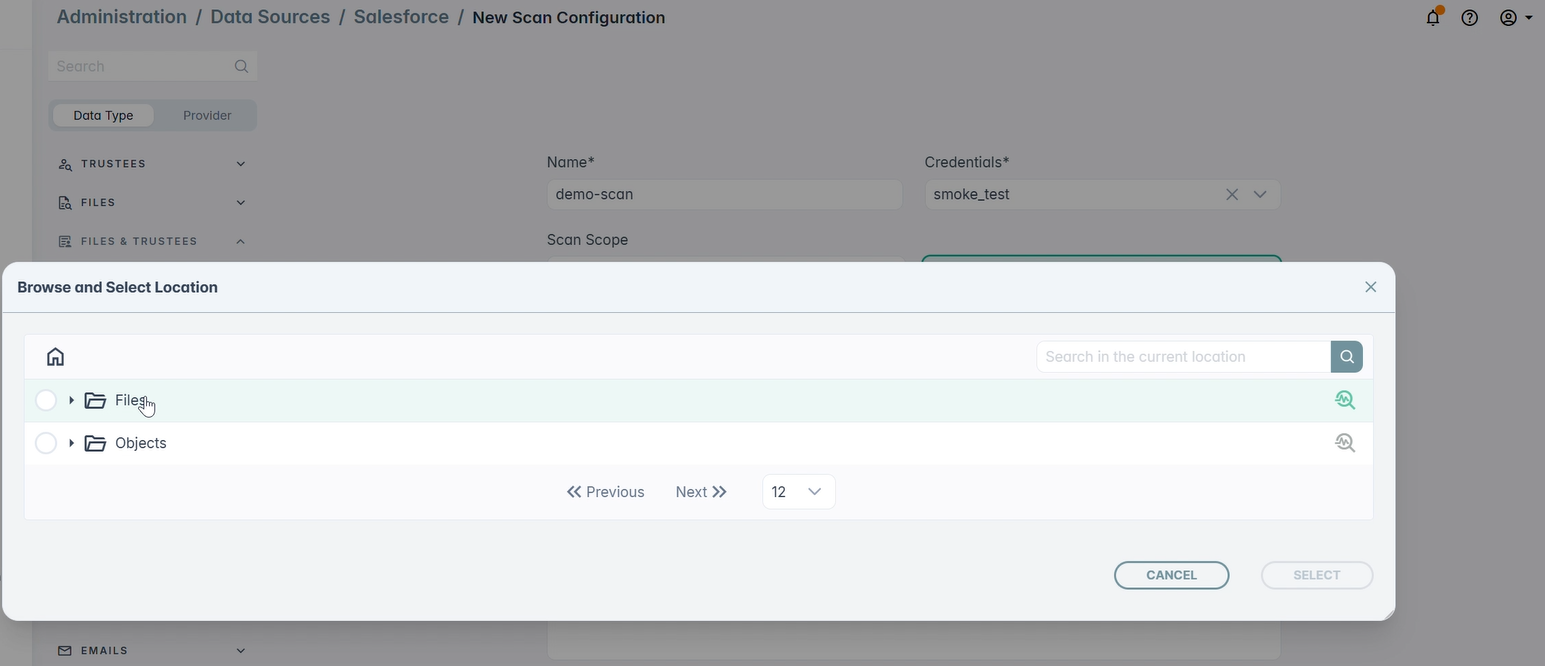
For a narrowed scope, click Add Location.
Figure: Add Location opens the data source browser.
-
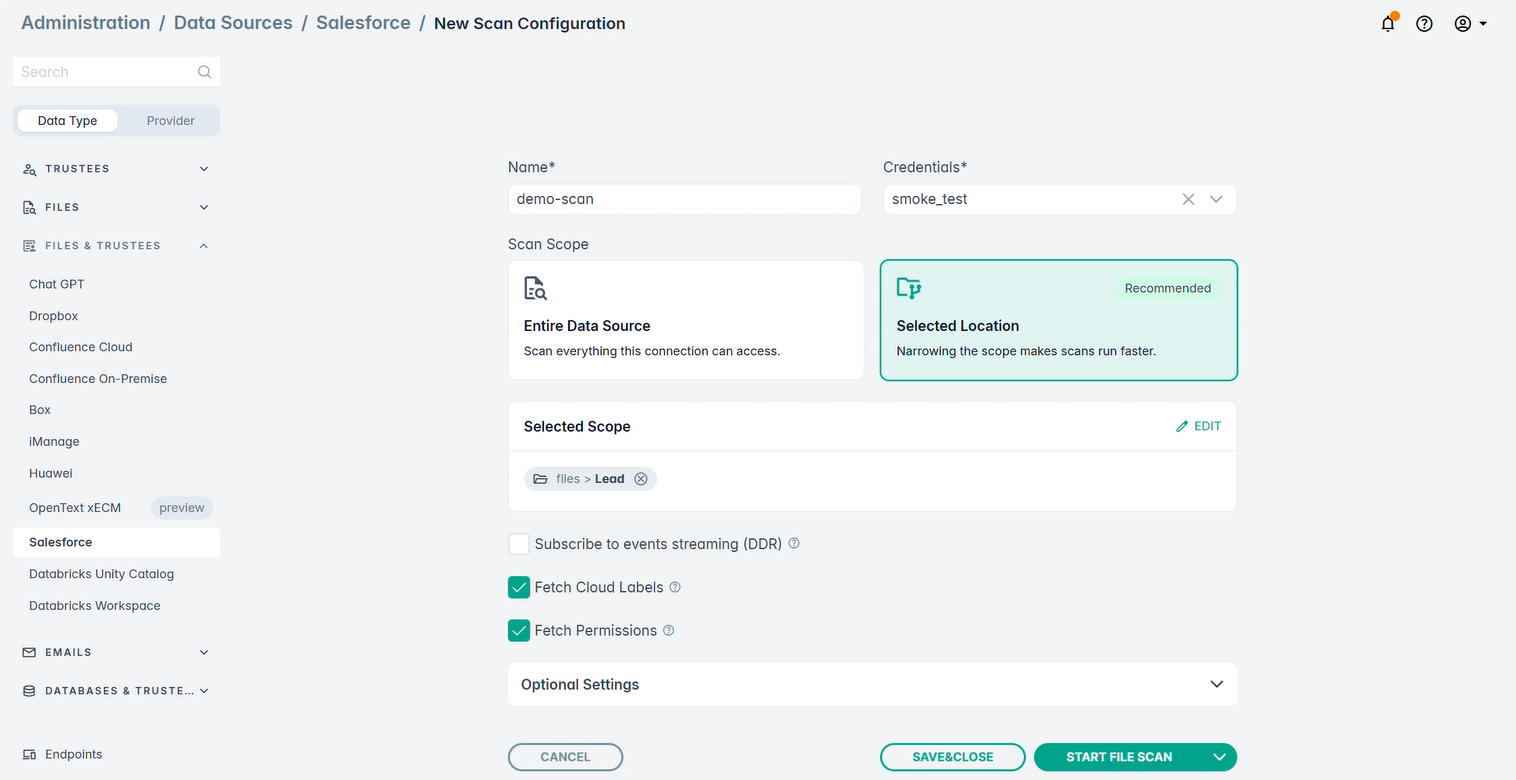
Browse the data source and select what to scan. Two roots are exposed, Files and Objects, and each can be expanded to pick individual objects.
Figure: Browse and Select Location, showing the Files and Objects roots.
-
Review the selected scope and the scan options, then click Save & Close, or Start File Scan to run the scan immediately.
Option Effect Subscribe to events streaming (DDR) Enables near-real-time change monitoring via Salesforce Change Data Capture. See Near-real-time monitoring (DDR). Fetch Cloud Labels Reads existing Salesforce-native labels and tags on scanned items. Fetch Permissions Collects access rights so trustees and effective permissions can be reported. Optional Settings Additional scan tuning, including file type and size filters and scheduling. Figure: A completed configuration scoped to files > Lead, with the scan options below.
Run scans
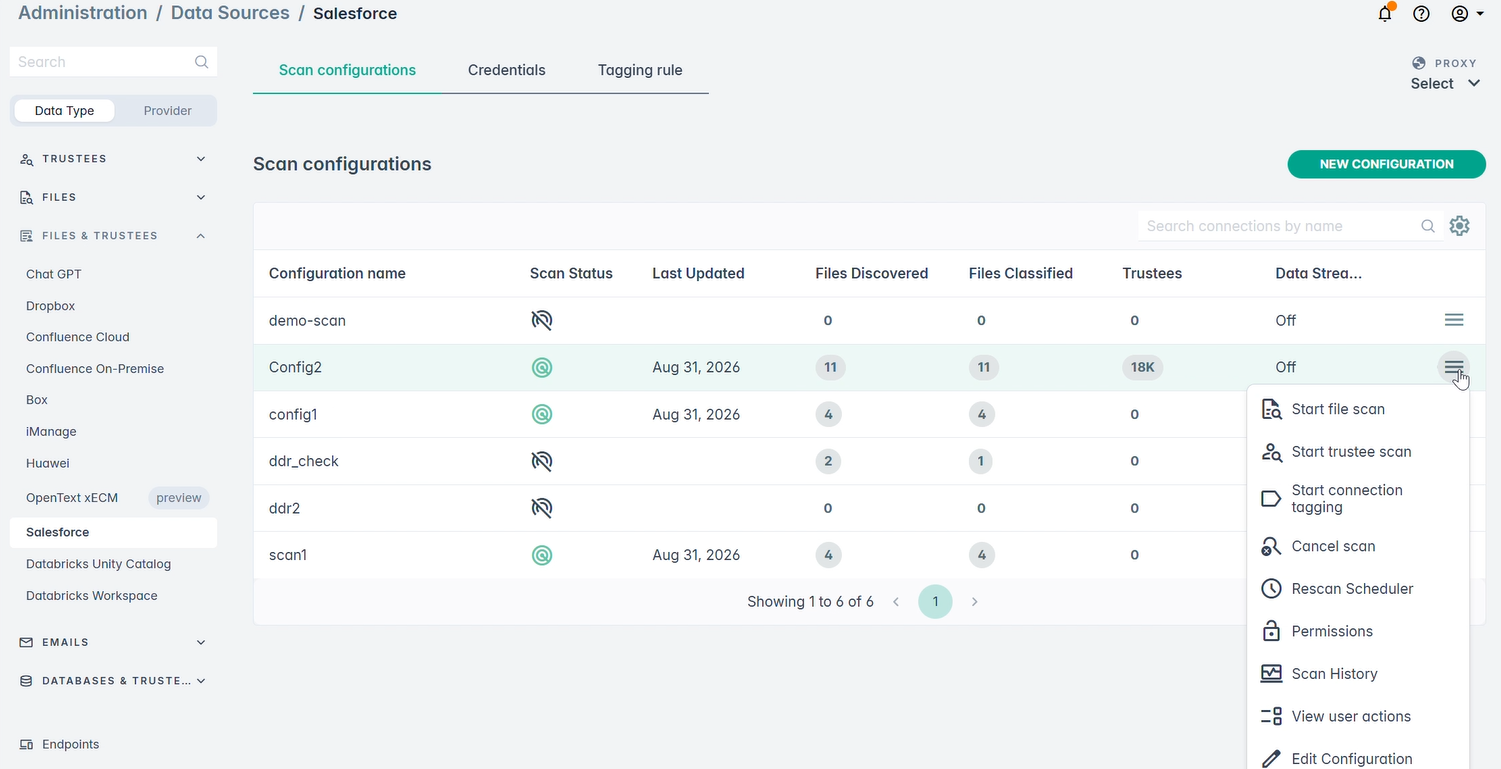
Start file scans, trustee scans, and connection tagging from the actions menu of a scan configuration.
Each configuration row has an actions menu offering Start file scan, Start trustee scan and Start connection tagging, together with Cancel scan, Rescan Scheduler, Permissions, Scan History, View user actions and Edit Configuration.
Figure: Actions available on a scan configuration.
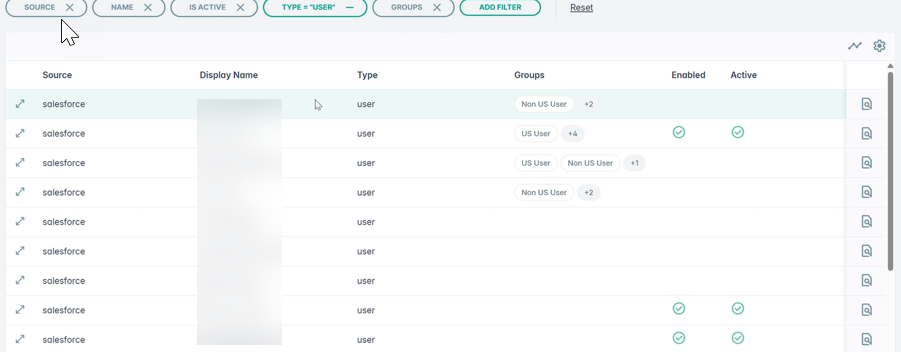
Trustee scanning is fully supported: all Salesforce users and groups are enumerated. Results are listed with source "salesforce", type "user", group membership, and enabled and active state.
Figure: Trustees returned by a Salesforce trustee scan.
Reviewing scan results
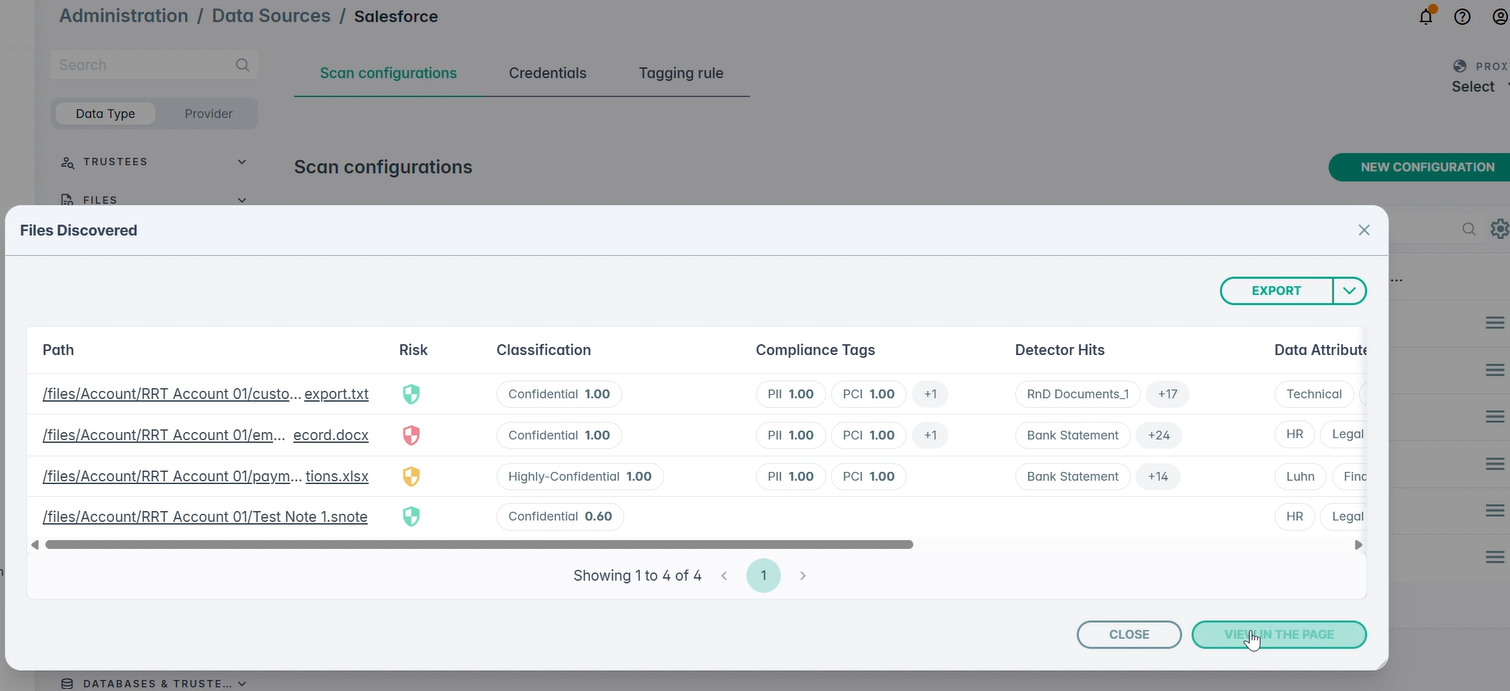
Discovered items are listed with their path, risk score, classification, and related attributes.
Discovered items are listed with their path, risk score, classification and confidence, compliance tags, detector hits and data attributes. Both file paths (/files/Account/…) and object paths (/objects/Lead/…) are returned. Results can be exported or opened in Enterprise Search.
Figure: Files Discovered for a completed scan, with classification and compliance tags.
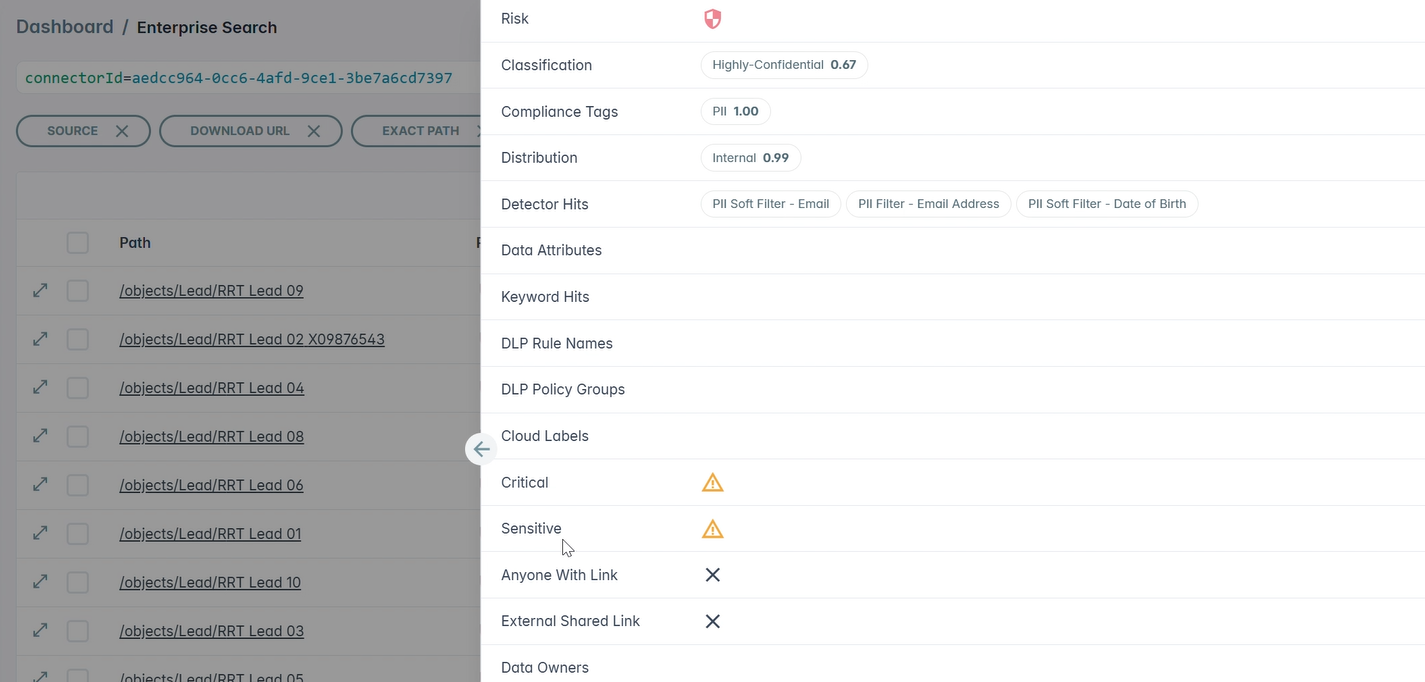
The detail pane for an item adds distribution, keyword hits, DLP rule names and policy groups, cloud labels, critical and sensitive flags, link-sharing exposure and data owners.
Figure: Item detail pane in Enterprise Search.
Remediation
Supported remediation actions for discovered Salesforce files.
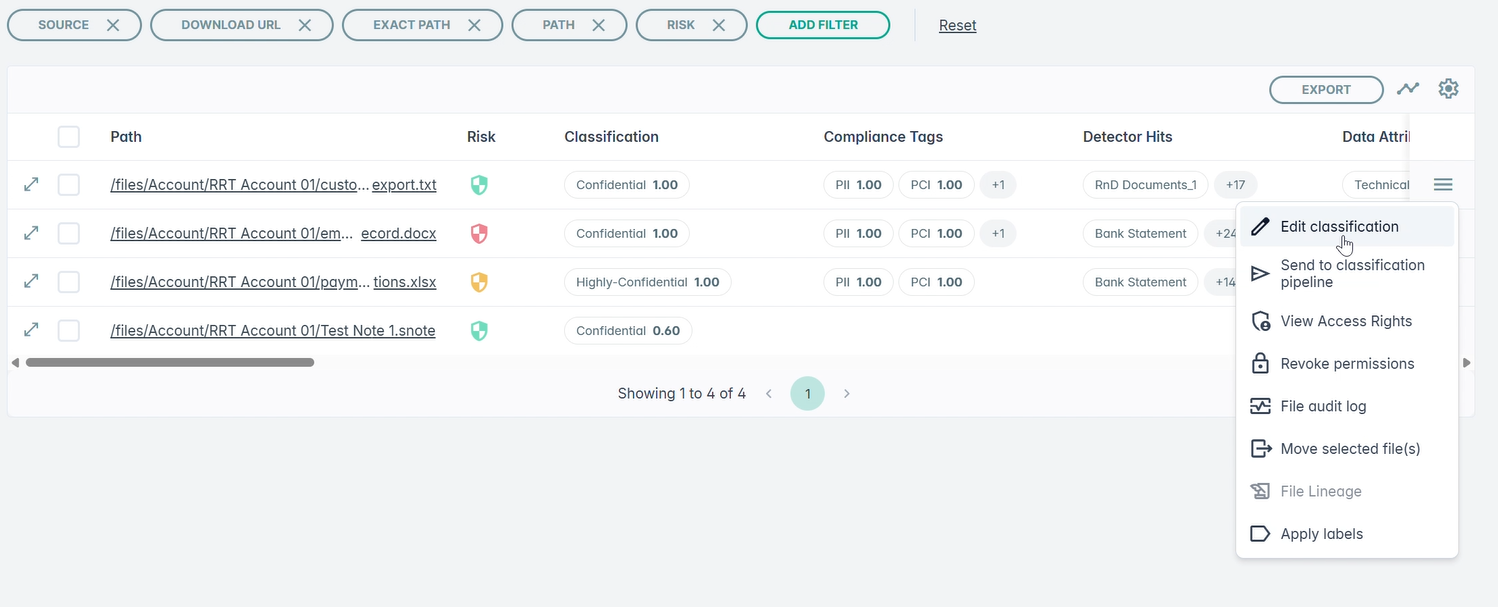
Supported Salesforce file remediations include:
- Edit classification
- Send to classification pipeline
- View Access Rights
- Revoke permissions
- File audit log
- Move selected file(s)
- File stubbing
- Apply labels
Salesforce supports delete, upload, and move actions for files, plus permission revocation for ContentDocumentLink and public-link exposure; granting new permissions is not supported. File Lineage is listed in the actions menu but is not available for this connector.
Moving files
When using Move selected file(s), the destination must be a folder within the Library section of the Salesforce data source. Moving a file to a location outside the Library is not supported.
File stubbing
File stubbing replaces the original file in Salesforce with a stub that retains the file's metadata and classification but removes the sensitive content. This action is available from the file actions menu on any discovered file.
Figure: Remediation actions available on a discovered Salesforce file.
Applying labels (cloud tagging)
Write classification values back into Salesforce by using cloud-only or cloud and persistent tagging.
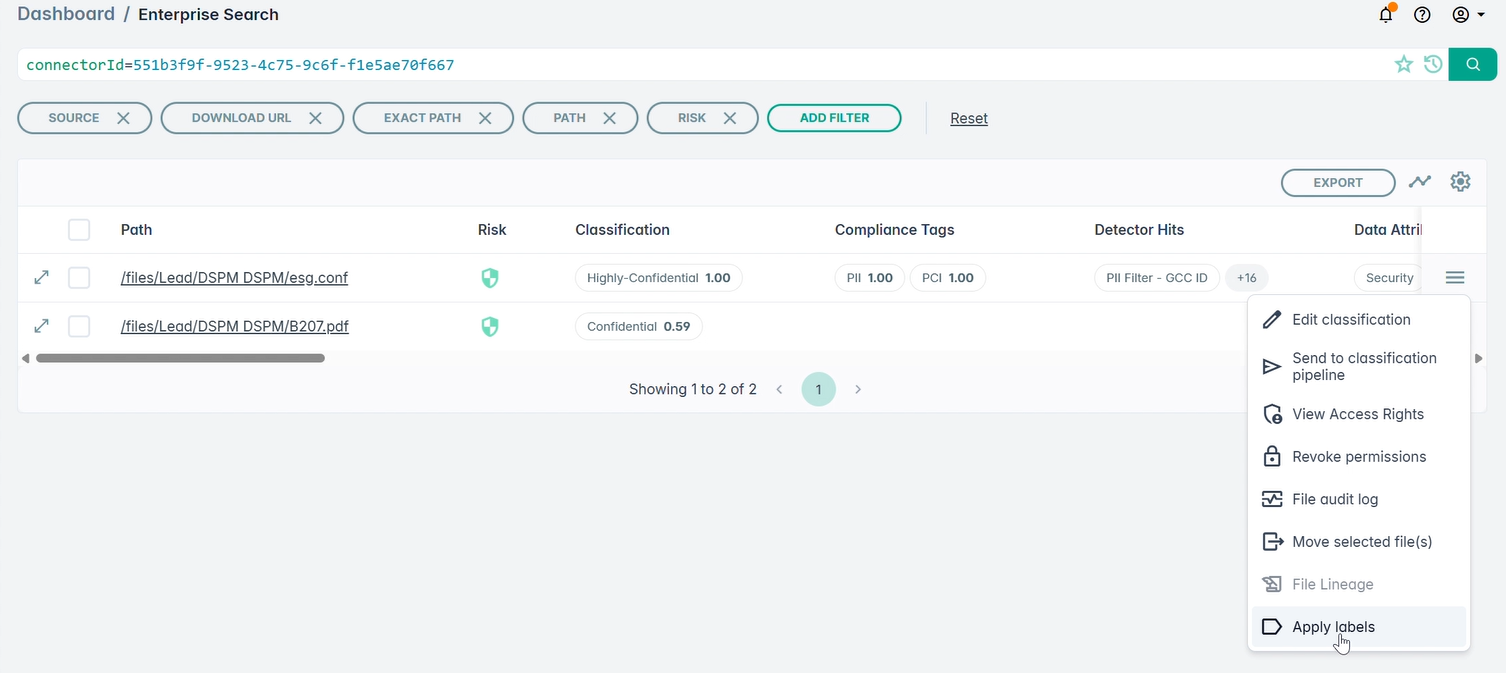
Select Apply labels on a file, or Start connection tagging on a configuration, to write classification values back into Salesforce.
Figure: Apply labels on the file actions menu.
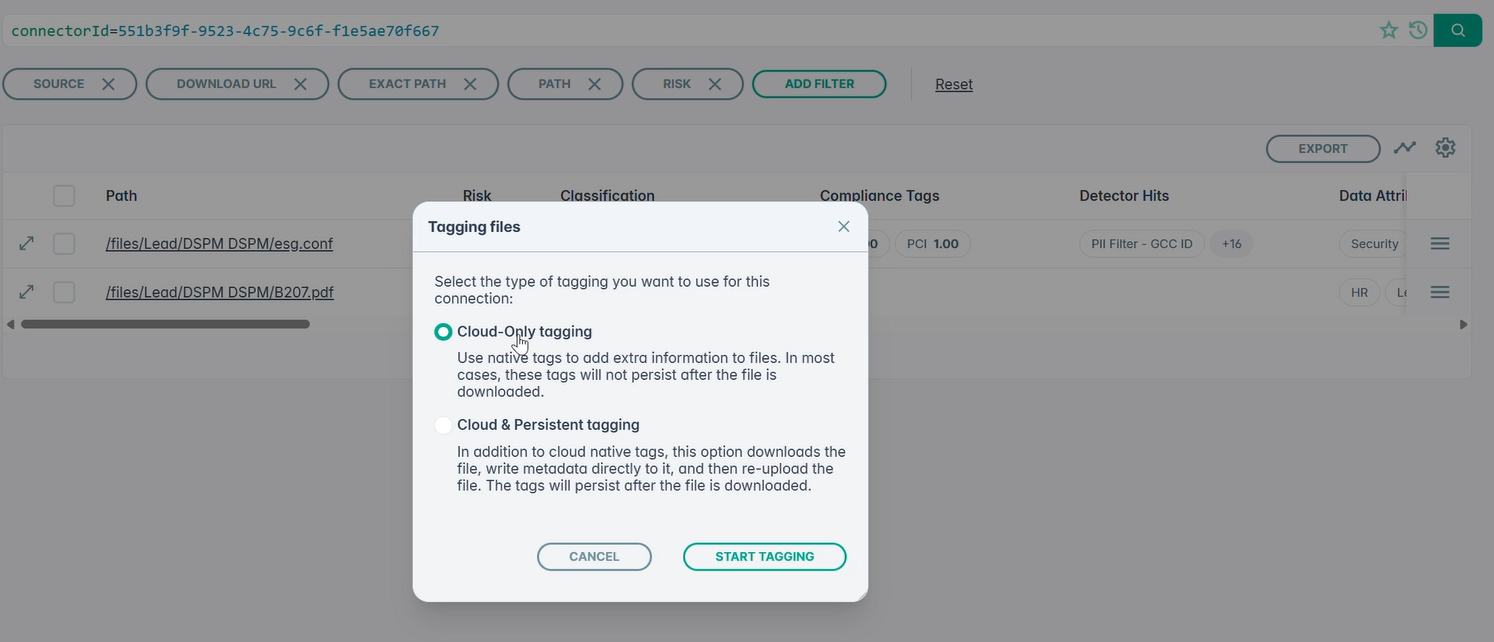
The Tagging files dialog offers two modes:
| Mode | Details |
|---|---|
| Cloud-Only tagging | Writes Salesforce-native tags. In most cases these tags do not persist once the file is downloaded. |
| Cloud & Persistent tagging | In addition to native tags, DSPM downloads the file, writes the metadata into the file itself and re-uploads it, so the tag survives download. |
Figure: Tagging files dialog with Cloud-Only tagging selected.
Create the Classification field for cloud tagging
Create a multi-select picklist on the Content Version object to receive the classification value.
Salesforce must have a field to receive the classification value. Create it on the Content Version object.
-
Go to and click New.
-
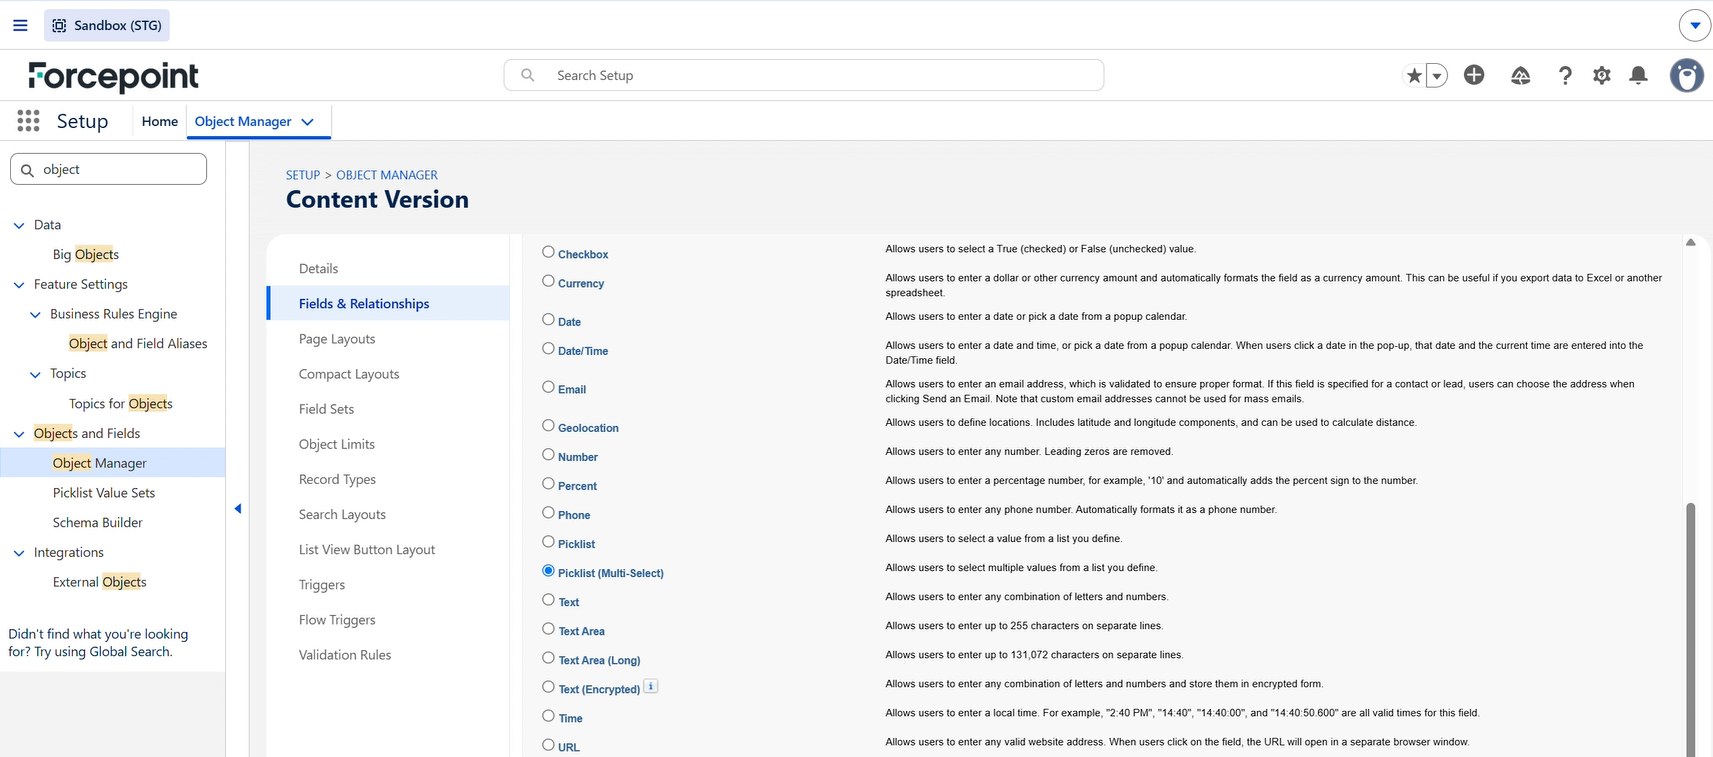
Select the field type Picklist (Multi-Select) and click Next.
Figure: Choosing Picklist (Multi-Select) as the field type on Content Version.
-
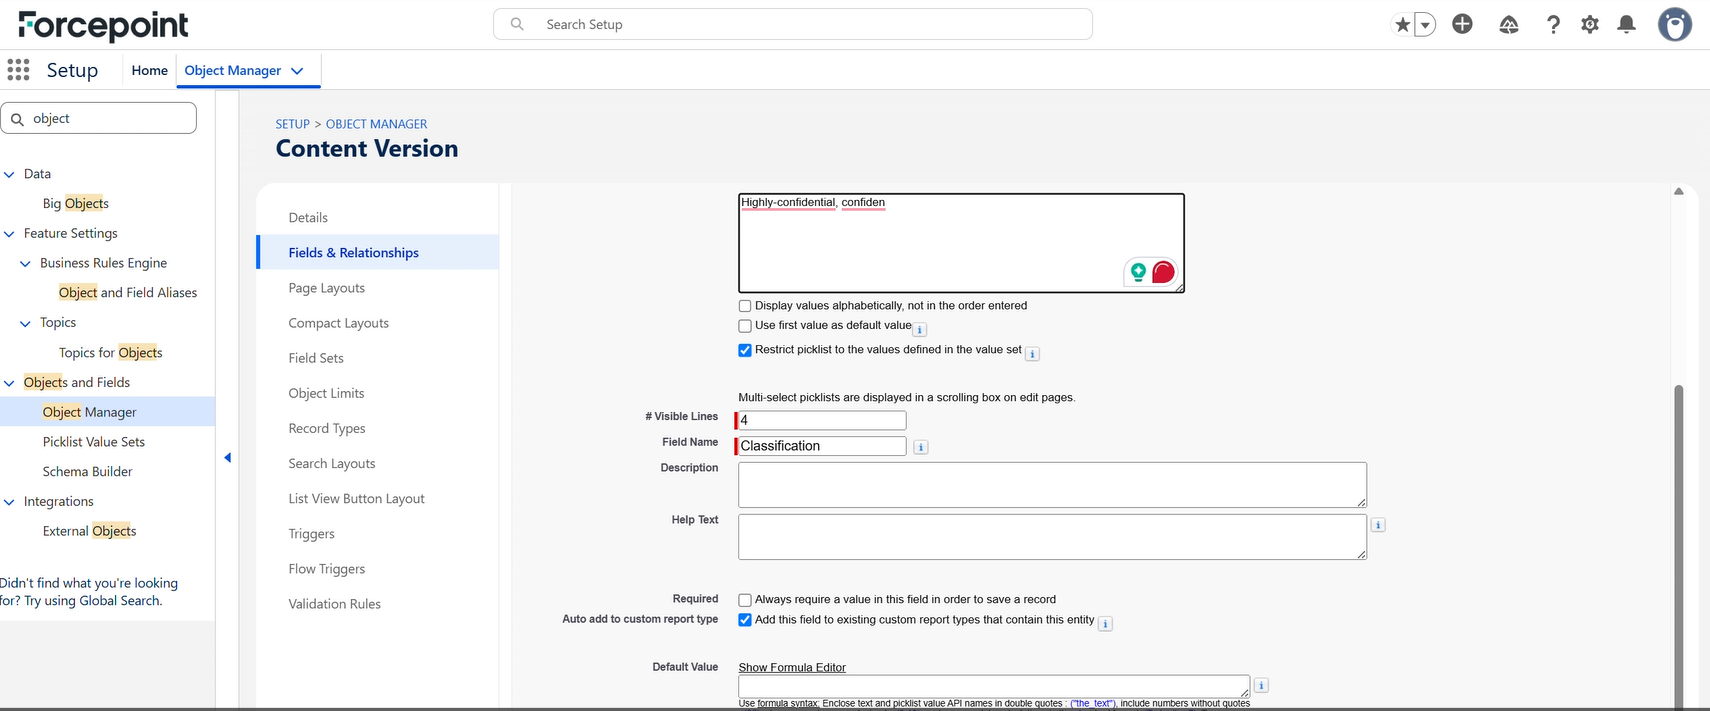
Enter the classification values in the Values text area, with each value on its own line (new-line separated). Set Field Name to
Classification, set # Visible Lines, and select Restrict picklist to the values defined in the value set. Save the field.For example, to define three classification levels, enter:
Confidential
Internal
Public
Warning: Entering multiple values on a single line or using comma or semicolon separators causes Salesforce to treat the entire entry as one value, which prevents correct tagging by DSPM.Figure: Defining the picklist values and naming the field Classification.
-
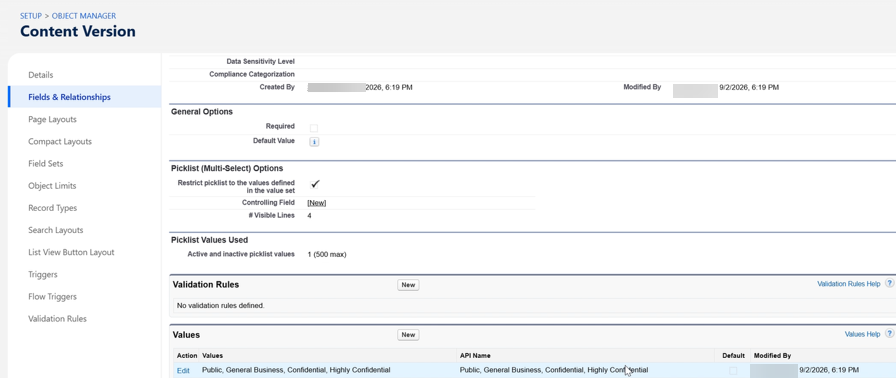
Confirm that the classification values appear under Picklist Values Used on the field detail page, and verify that the integration user has permission to read and update this field.
Figure: Field detail page showing the classification values in use.
Apply persistent tagging
Use Cloud & Persistent tagging where the tag must travel with the file.
-
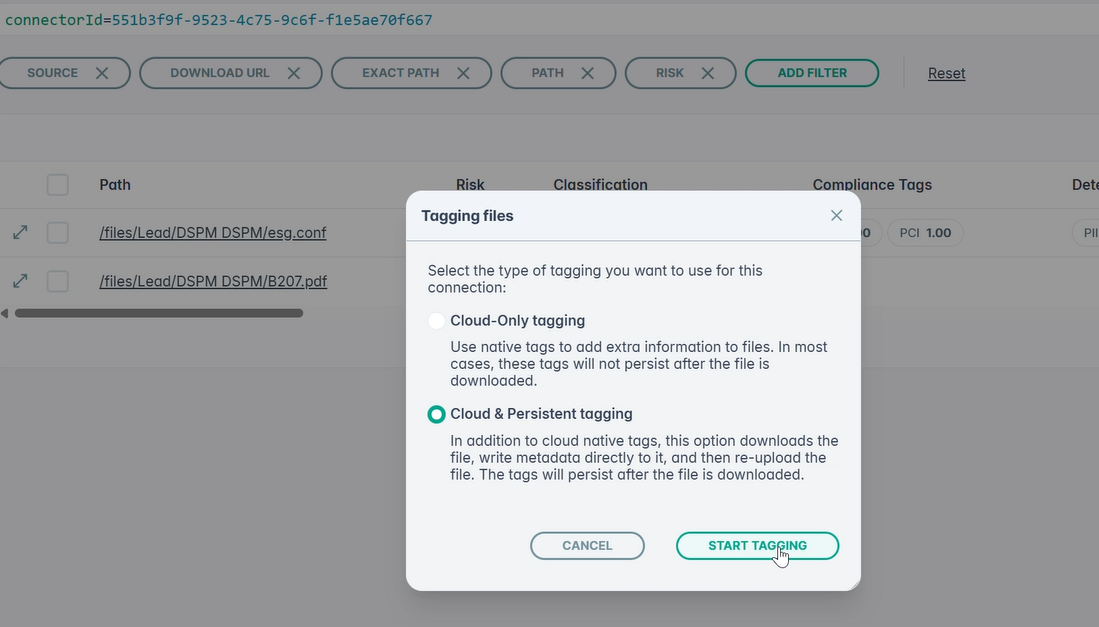
In the Tagging files dialog, choose Cloud & Persistent tagging.
Figure: Cloud & Persistent tagging selected in the Tagging files dialog.
-
Click Start Tagging.
Near-real-time monitoring (DDR)
Enable Salesforce Change Data Capture so that DSPM can monitor file changes in near-real time.
Forcepoint DSPM monitors Salesforce file activity in near-real time using Salesforce Change Data Capture (CDC). It detects changes to Salesforce Files (ContentDocuments) that are linked to records within a scan's scope, and reclassifies the affected file as each event is received.
Salesforce CDC is required for file-change monitoring only; it does not provide near-real-time monitoring for structured object field values.
-
In Salesforce, go to and move the required entities into Selected Entities.
Entity group Notes Required file entities Enable CDC for ContentDocument,ContentVersion, andContentDocumentLinkso DSPM can detect file creation, updates, and link changes for files in scope.Record objects that hold linked files Enable CDC for the standard or custom objects that files attach to in the configured scan scope, such as Lead, Contact, Account, User, and custom objects. Salesforce supports CDC for all custom objects and only a subset of standard objects. Figure: Selecting entities for Change Data Capture in Salesforce Setup.
-
In Forcepoint DSPM, select Subscribe to events streaming (DDR) on the scan configuration.
Notes and limitations
Known limitations of the Salesforce connector.
| Item | Detail |
|---|---|
| CDC scope limitation | CDC only reports changes to files linked to records already inside a scan's scope. Files outside the configured scope are not reclassified. |
| Cloud-only tags persistence | Cloud-only tags are generally not retained in a downloaded copy of the file. Use Cloud & Persistent tagging where the tag must travel with the file. |
| JWT certificate expiry | The JWT certificate has an expiry date. Track it and re-upload before expiry, or scans will fail authentication. |